Launch Packets automatically from a form
A launcher form starts a Packet for you. Someone fills out one short form, such as a new hire request or a registration intake, and when the submission reaches the step you choose, Droplet starts a Packet from your template, assigns every form to the right person, and fills in the details it already knows. There is no need to open the Packet Start Page and type the same names.
This guide walks you through the setup, explains every setting in plain words, and covers what to check if a Packet does not appear. The setup lives in the Code Builder, but every block you need is here to copy and adapt.
If you are new to the code builder or run into any issues with this process, please reach out to your implementation manager or ask for help at support@droplet.io.
What is a launcher form?
Normally a Packet is started manually: someone opens the template, picks a contributor for each role, and clicks Start Packet (see Start and track Packets). A launcher form (you may also hear it called a packet initiator form) does that job automatically. It is an ordinary Droplet form with one extra instruction on one of its workflow steps: "when a submission arrives here, start this Packet."
Because the launcher is a form, it can collect everything the Packet needs before it starts: who the Packet is about, who should fill out each item, and any details worth copying into those items. It can also go through an approval first, so the Packet only starts once someone signs off.
A few terms used throughout this article:
| Term | Meaning |
|---|---|
| Launcher form | The form that starts the Packet. Its submission is the launching submission. |
| Packet template | The blueprint you already built on the Packets page. It supplies the Packet's name, its emails, its reminders, and its tags. |
| Destination forms | The forms that are created inside the new Packet, one submission each, assigned to the people you name. |
| Started by | The person the Packet records as having started it. The launcher sets this from the launching form, since no one clicks a Start button. |
When to use one
The same Packet goes out many times. Onboarding every new hire, enrolling every new student, or registering every new vendor.
The people who request a Packet are not the people who build it. A principal or a parent can fill out a simple request form without needing access to the Packets page.
The Packet should wait for an approval. Place the launcher after the approval step, and the Packet starts only when the request is approved.
If you want separate submissions that are not grouped or tracked together as a Packet, use Auto-launch submissions with code instead. It works the same way but creates standalone submissions.
How it works
A launcher has two pieces, both on the launcher form:
A hidden Computed field that describes the Packet. It lists the template to use, what to call the Packet, which forms to create, and who each one goes to. Because it is a formula, it can use the answers on the form, so every Packet is built for the person it is about.
A workflow step that points at that field. A single
startPacketline tells the step to start the Packet described in the Computed field when a submission arrives.
Here is what happens when a submission reaches the launcher step:
Droplet reads the Computed field and starts a new Packet from your template.
It creates a submission on each destination form, assigns it to the person you listed, and fills in any values you chose to copy over.
Each assignee receives the Packet's assignment email, using the message set on the template. Any reminders set on the template are scheduled too.
The Packet appears on the Packets tab of All Submissions, where you track it like any other Packet.
The launching submission carries on through the rest of its own workflow as normal.
Before you start
Your organization needs the Packets add-on, and the Packet template must already exist. If you have not built one yet, start with Understand and create Packet templates.
Every destination form must be published and active. A form that is still a draft, disabled, or archived cannot be added to a Packet, and Droplet quietly leaves it out.
Work in a draft of the launcher form. Nothing you change takes effect until you publish, so you can set this up safely. If you are new to the builder, see Create and edit a form and Configure workflows.
Be comfortable pasting into the Code Builder. Open it from the ⋮ menu at the top right of the form builder, then choose Code Builder. You will use its Form and Workflow tabs. Copy the examples here and change only the parts this article tells you to.
The example used in this guide
To keep things concrete, this guide builds a New Hire Request launcher. A school's office manager fills it out with the new employee's details and their supervisor. Once HR approves the request, Droplet starts a New Hire Onboarding Packet containing three forms:
Employee Information, assigned to the new hire.
Direct Deposit Authorization, assigned to the new hire.
Equipment Request, assigned to the supervisor.
Swap in your own template, forms, and fields as you go.
Step 1: Add fields for everything the Packet needs
The launcher can only use information that is on the launcher form. Make sure it has a field for each of these:
Who is starting the Packet. A name and an email to create
initiatedBy. Use the launcher form's own Submitter Name and Submitter Email fields (submittedByNameandsubmittedByEmail). You can relabel them, for example as "Requester Name" and "Requester Email," but do not change their IDs. This person is recorded as the Packet's starter, and their name appears wherever the template's emails mention who started the Packet.Who fills out each destination form. A name and an email for each person. In the example,
employeeNameandemployeeEmailfor the new hire, andsupervisorNameandsupervisorEmailfor the supervisor.Anything worth copying forward. In the example,
schoolandstartDate.
Email fields should use the Email input type so a typo is caught on the launcher form, where it is easy to fix, rather than after the Packet has gone out to the wrong address.
Step 2: Find the IDs you need
The launcher refers to your template and forms by their IDs: short codes such as yevkn0 that Droplet gives every template and form. There are two ways to find these:
Go to the Forms page and hover over the form's title or go to the Packetspage, select Templates, then hover over the template's title. Click to copy.
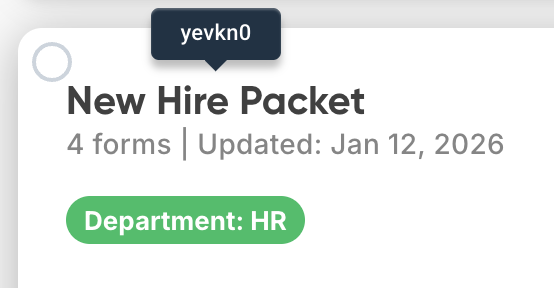
Open the form or packet template to locate the URL. For packets, the address ends in
/packets/templates/yevkn0/edit. The part betweentemplates/and/editis the template ID (yevkn0).For forms, the address ends in
/forms/DN92zY/edit. The part betweenforms/and/editis the form ID (DN92zY).
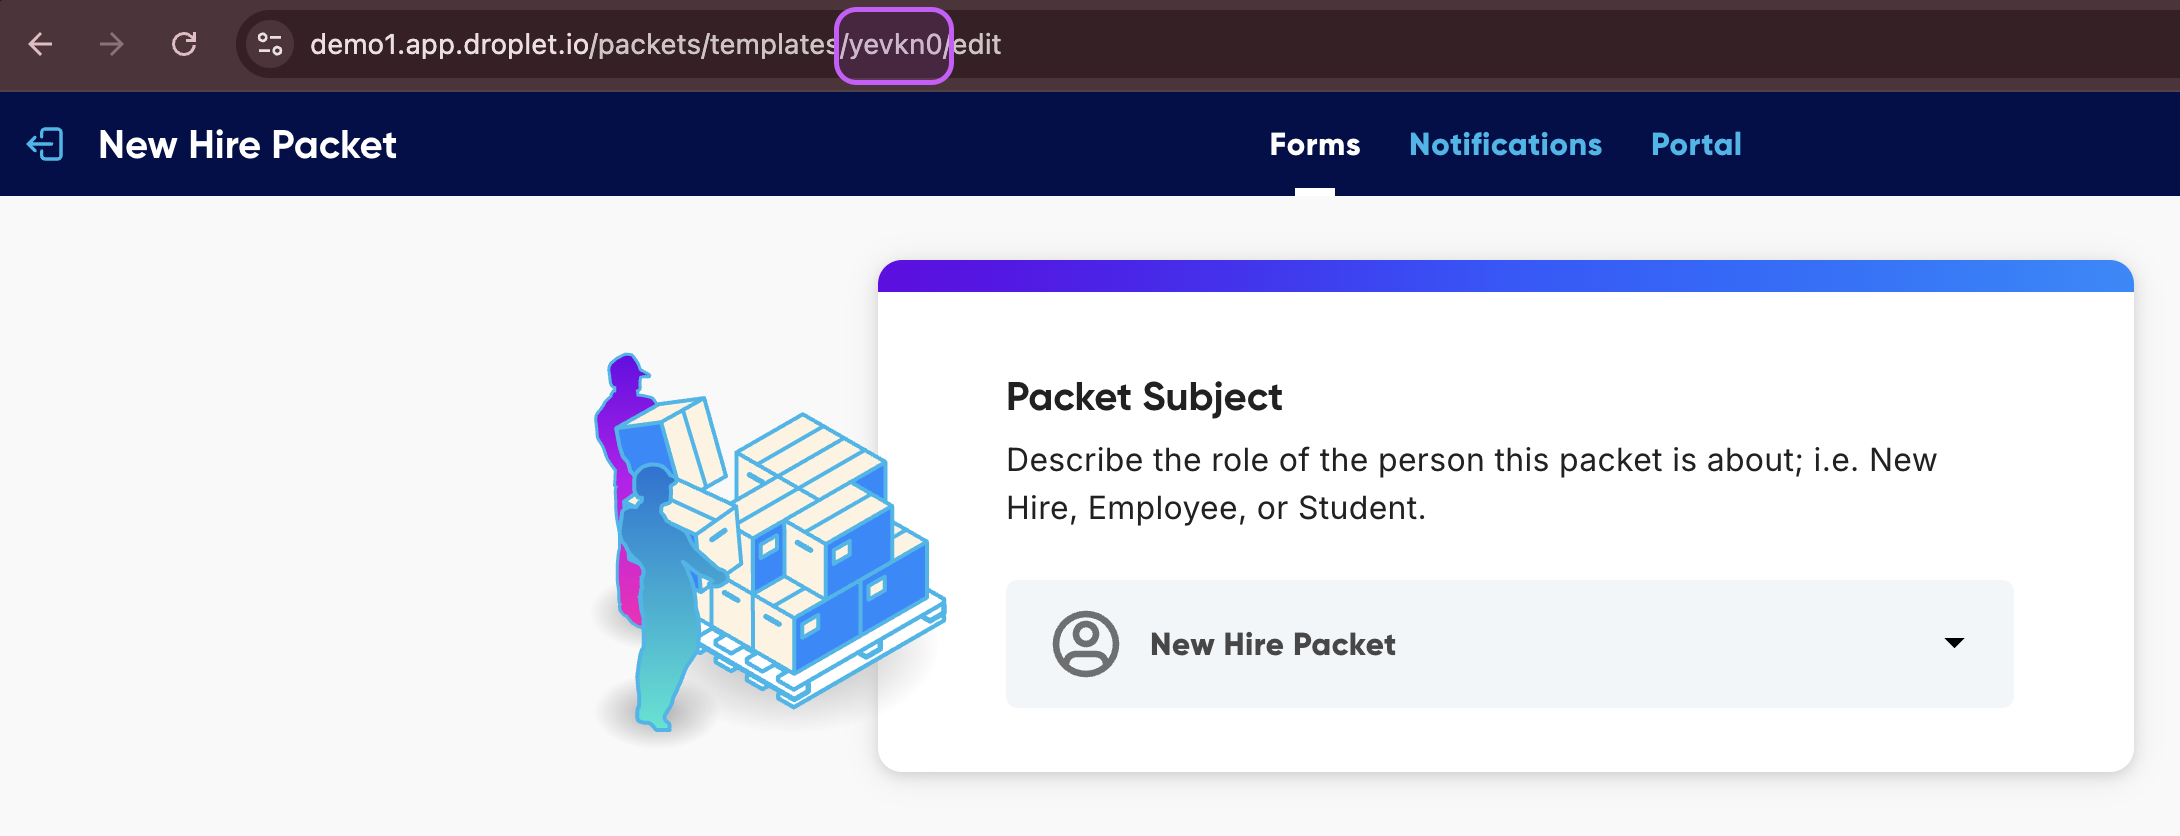
Using one of the methods above, locate and copy the packet template ID.
Using one of the methods above, locate and copy each destination form ID.
If you want to copy answers into a destination form(s), you also need the IDs of the fields that should receive them. Select a field in the builder to see its ID in the properties panel.
Form IDs and Field IDs are case sensitive. xDaxeY & xdaxey are different forms. The feild ID approverNamewill not work typed as approvername. Make sure to copy these IDs exactly as they appear.
Step 3: Describe the Packet in a hidden Computed field
Open the Code Builder of the Packet Launcher form to the Form tab and add a Computed field anywhere inside a Section. This is the complete example; paste it and then adapt it using the table below:
<Computed
  id="onboardingPacket"
  display="false"
  formula="[
    {
      'packetTemplateId': 'REPLACE_WITH_PACKET_TEMPLATE_ID',
      'subject': { 'type': 'label', 'label': `${employeeName} onboarding, ${school}` },
      'initiatedBy': { 'name': submittedByName, 'email': submittedByEmail },
      'submissions': [
        {
          'formId': 'REPLACE_WITH_FORM_ID',
          'assignedTo': { 'name': employeeName, 'email': employeeEmail },
          'data': {
            'submittedByName': employeeName,
            'submittedByEmail': employeeEmail,
            'fullName': employeeName,
            'school': school,
            'startDate': startDate
          }
        },
        {
          'formId': 'REPLACE_WITH_FORM_ID',
          'assignedTo': { 'name': employeeName, 'email': employeeEmail },
          'data': { 'submittedByName': employeeName, 'submittedByEmail': employeeEmail }
        },
        {
          'formId': 'REPLACE_WITH_FORM_ID',
          'assignedTo': { 'name': supervisorName, 'email': supervisorEmail },
          'data': {
            'submittedByName': supervisorName,
            'submittedByEmail': supervisorEmail,
            'startDate': startDate
          }
        }
      ]
    }
  ]"
/>
Note: display="false" keeps the field hidden, so the people filling out the form never see it.
Here is what each part means:
| Setting | What it does |
|---|---|
packetTemplateId | The template to start, from Step 1. The Packet takes its name, emails, reminders, and tags from this template. |
subject | What the Packet is called on the Packets tab and in emails. Use 'type': 'label' with any text, or build it from answers as the example does. You can instead use { 'type': 'contributor', 'name': employeeName, 'email': employeeEmail } to make the subject a person, in which case the Packet shows their name. |
initiatedBy | The name and email of the person who is starting the Packet. This is required. Without it, the Packet is not created. |
submissions | The list of destination forms to create, one entry per form. You need at least one. |
formId | The destination form's ID, from Step 1. |
assignedTo | The name and email of the person who fills out that form. They do not need a Droplet account. |
data | Optional. Answers to copy into the destination form. On each line, the left side is the field ID on the destination form, and the right side is the field ID on the launcher form. Always include submittedByName and submittedByEmail, set to the same person as assignedTo, so assignees don't have to type their name and email on every form. |
A few rules keep the formula working:
Text you type yourself goes in single quotes, like
'nzoMg0'. Field IDs from the launcher form go without quotes, likesubmittedByName, so Droplet uses the answer instead of the word.To mix text and answers, wrap the whole thing in backticks and put each field ID inside
${ }, as in`${submittedByName} onboarding`.Separate entries with commas, and do not leave a comma after the last one in a list.
Keep the outer square brackets. The formula returns a list of Packets, even when there is only one.
The forms in the launched Packet come from this list, not from the forms on the template. Include every form you want in the Packet, in the order you want them, even if the template already lists them. Use the template for the Packet's name, emails, and reminders.
Step 4: Tell a workflow step to start the Packet
Click the Workflow tab. Each step can have an "onEnter" section that describes what happens the moment a submission arrives on it. Add a startPacket line to the step that should start the Packet, naming the Computed field from Step 3. In the example, the Packet starts once HR approves, so the line goes on the Completed step:
"completed": {
  "status": "completed",
  "onEnter": {
    "startPacket": "onboardingPacket"
  }
}
If the step already has an "onEnter" section, such as an "assign" block, add startPacket inside it rather than creating a second one, with a comma between the two:
"hrReview": {
  "status": "pending",
  "label": "HR Review",
  "onEnter": {
    "assign": { "name": "Jordan Lee", "email": "jordan.lee@example.org" },
    "startPacket": "onboardingPacket"
  },
  "onSubmit": { "target": "completed" }
}
The value is the Computed field's ID in double quotes. Click Save. If the ID does not match a field on the form, Droplet flags it so you can fix the spelling.
Choosing the right step
The Packet starts every time a submission enters the step. Pick a step that each submission reaches once:
The Completed step is usually the safest choice. The Packet starts only after every approval is done, and a completed submission does not come back.
An approval step starts the Packet as soon as the request arrives for review, so the Packet's forms and the approval run side by side. Be careful if that approval can send the submission back for changes: when it returns to the approval step, a second Packet starts.
If your workflow has a revision loop, such as a reject route that "sends it back to the requester, who resubmits to the same approver," do not put the launcher on a step inside that loop. Each trip around the loop starts another Packet.
Step 5: Publish and test
Click Publish. Check that every destination form within the packet is published too.
Fill out the launcher form with test names and email addresses you can check, then move the submission through the workflow until it reaches the launcher step.
Go to All Submissions and open the Packets tab. Your Packet appears with the subject you set as its title and the template's name beneath it. Expand it to check that every form is there and assigned to the right person.
Each test assignee should receive the Packet's assignment email. Open one of the forms from the email and confirm the copied answers landed in the right fields.
When you are done testing, archive the test Packet from the Packets tab so it does not clutter your reports.
More things a launcher can do
Add the launcher's own submission to the Packet
Add 'includeLaunchSubmission': true next to packetTemplateId and the launching submission itself becomes part of the Packet. The original request then sits alongside the forms it started, so anyone tracking the Packet can open it in one place.
'packetTemplateId': 'nzoMg0',
'includeLaunchSubmission': true,
Start more than one Packet at once
The formula returns a list, so you can add a second Packet after the first, separated by a comma. Each one can use a different template and different people. For example, a new hire request could start an HR Onboarding Packet for the employee and a separate Technology Setup Packet for the IT team.
formula="[
  { 'packetTemplateId': 'nzoMg0', ... },
  { 'packetTemplateId': 'Rt8vQa', ... }
]"
Start a Packet only when it is needed
To launch only for some submissions, have the formula return an empty list [] when no Packet is needed. In this example, only full-time hires get the onboarding Packet:
formula="employmentType === 'Full-time' ? [
  { 'packetTemplateId': 'nzoMg0', ... }
] : []"
When the result is an empty list, the step runs as normal and no Packet starts.
Send the template's status emails to a role
A template can send emails when every form in the Packet is started, when every form is completed, or when a form is rejected. If those emails go to a specific person, they work the same for launched Packets. If they go to a contributor role instead, such as "Supervisor," tell the launcher who fills that role by adding a contributors entry:
'contributors': {
  'Supervisor': { 'name': supervisorName, 'email': supervisorEmail }
},
The role name on the left must match the contributor title on the template exactly. Without this entry, a status email addressed to a role has no one to go to, so it is not sent.
What people receive
Assignees get the template's assignment email, with a link to the forms waiting for them. Someone assigned several forms gets one email, not one per form. They do not need a Droplet account to open and complete them.
Reminders set on the template are scheduled from the moment the launcher starts the Packet.
The person in
initiatedByis recorded as the Packet's starter, and their name fills in wherever the template's emails refer to who started the Packet.The person filling out the launcher form does not need permission to start Packets. Droplet starts the Packet on the form's behalf, which is what lets a principal, a parent, or anyone else with the link kick off the process.
To change the wording of any of these emails, edit the template's notifications on the Packets page. See Understand and create Packet templates.
If a Packet does not appear
A launcher that cannot start its Packet does not stop the launching submission. The submission moves on through its workflow as if nothing happened, so the first sign of a problem is usually a missing Packet. Work through this list:
| What you see | Likely cause | Fix |
|---|---|---|
| No Packet at all | initiatedBy is missing, or its name or email field was blank on the submission. | Add initiatedBy and make both of its fields required on the launcher form. |
| No Packet at all | The packetTemplateId is wrong or points to another organization's template. | Copy the ID again from the template's address bar, matching capitalization exactly. |
| No Packet at all | An email address is not a valid email, often because a field was left blank or has a typo. | Use Email-type inputs and make every name and email field the formula uses required. |
| No Packet at all | The submission never reached the launcher step, or the step's "if" condition skipped it. | Open the submission and check which steps it passed through. |
| A form is missing from the Packet | That destination form is unpublished, disabled, or archived, or its formId is wrong. | Publish or restore the form, or correct the ID. |
| A field did not pre-fill | The field ID on the left side of data does not match a field on the destination form. | Check the ID in the destination form's builder, including capitalization. |
| Two or more identical Packets | The submission entered the launcher step more than once, usually after being sent back. | Move the launcher to a step each submission reaches once, such as Completed. |
| Status emails are not sent | The template addresses them to a role, and the launcher did not say who fills it. | Add a contributors entry, as described above. |
If you have checked everything here and a Packet still does not start, contact support with the launcher form's name and the ID of a submission that should have started one. We can see why a specific launch failed.
Common questions
Can I set up a launcher in the visual builder?
Not yet. It is only available in the Code Builder. Once it is saved, you can switch back to the visual builder and keep editing the rest of the form as usual.
Does the Packet use the forms listed on the template?
No. A launched Packet contains exactly the forms listed in the launcher's submissions. The template provides the Packet's name, emails, reminders, and tags. List every form you want in the Packet in the launcher.
Can a launched Packet include eSign documents?
eSign cannot be launched with a packet launcher at this time.
If I change the template later, do launched Packets pick up the change?
Mostly. Packet emails use the template as it is when each email is sent, so wording changes apply to running Packets too. Reminders are the exception: they are scheduled when the Packet starts and keep the wording they had then. The launcher points at the template by ID, so there is nothing to update on the launcher form unless you want to change which forms are included.
What happens if I archive the template?
Packets that are already running are not affected. To stop new Packets from starting, remove the startPacket line from the launcher form's workflow and publish, or disable the launcher form.
Can the same person be assigned more than one form?
Yes. In the example, the new hire is assigned two forms. They receive one assignment email with a link to everything waiting for them.
Can the launcher form be public, with no login required?
Yes. Because Droplet starts the Packet on the form's behalf, the person filling it out does not need a Droplet account or permission to start Packets. Consider putting an approval step before the launcher so a person reviews each request before the Packet goes out.
What is the difference between a launcher and auto-launching submissions?
Both create new submissions from a workflow step. A launcher groups them into a Packet that is tracked together on the Packets tab and uses the template's emails and reminders. Auto-launch submissions with code creates standalone submissions, each tracked on its own.