Configure workflows
Define the steps a submission follows after it's submitted - who reviews it, in what order, and what happens at each step.

How workflows work
In Droplet, every form submission is routed through a workflow - a series of steps where an assignee reviews, adds information, or takes action (approve, reject, or send back for corrections). Submissions move between steps when someone clicks the Submit or Reject button on the form.
When you first open the Workflow Editor, you'll see the simplest workflow possible: it starts at Start and goes directly to Completed.
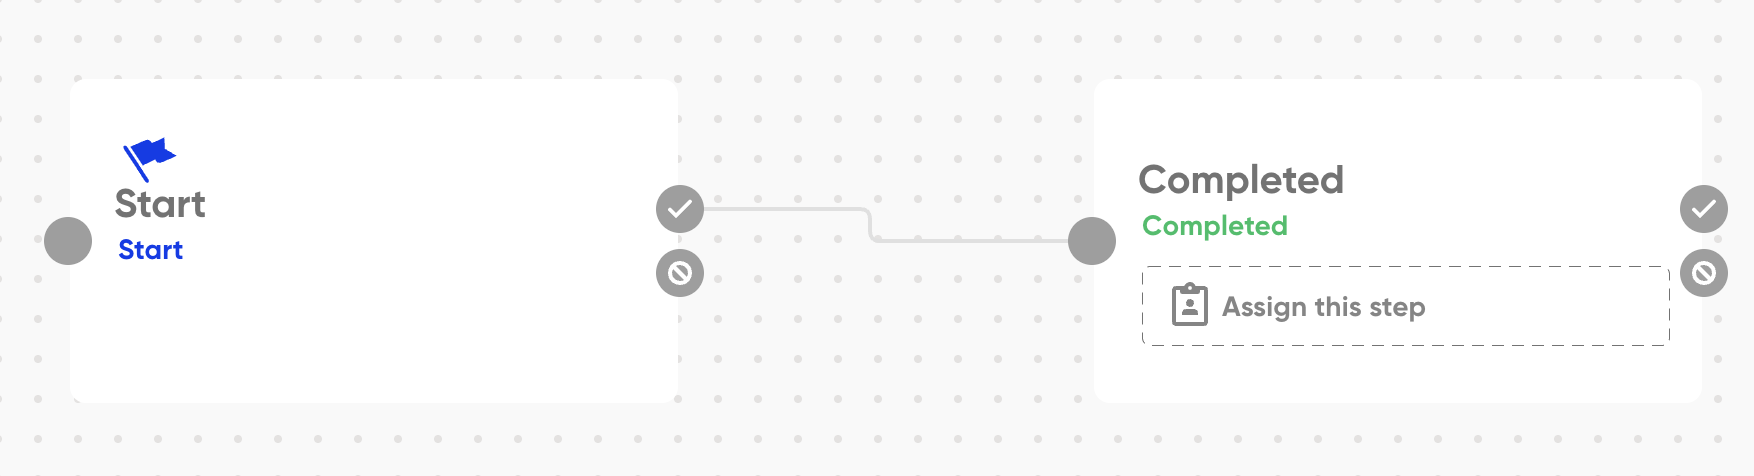
The default workflow starts at Start and moves directly to Completed.
Add workflow steps
Click the blue approve icon or red reject icon on a step card to add a new step. Each step card is connected to the next through the button someone clicks on the form:
A path from the checkmark shows where the submission goes when the Submit button is clicked.
A path from the circle-with-line icon shows where the submission goes when the Reject button is clicked.
You can re-route your workflow by clicking a connection line and moving it to a different card.
Give each step a clear, descriptive name so your workflow is easy to understand at a glance. You can also set each step's status to In Progress, Completed, or Rejected to control how the submission appears in Droplet at that point.
Assign workflow steps
When a submission reaches a step, the assignee receives an email notification by default. There are several ways to assign a step:
New A workflow step can be assigned to a group of people through the API, so whichever one of them acts first clears the step for everybody.
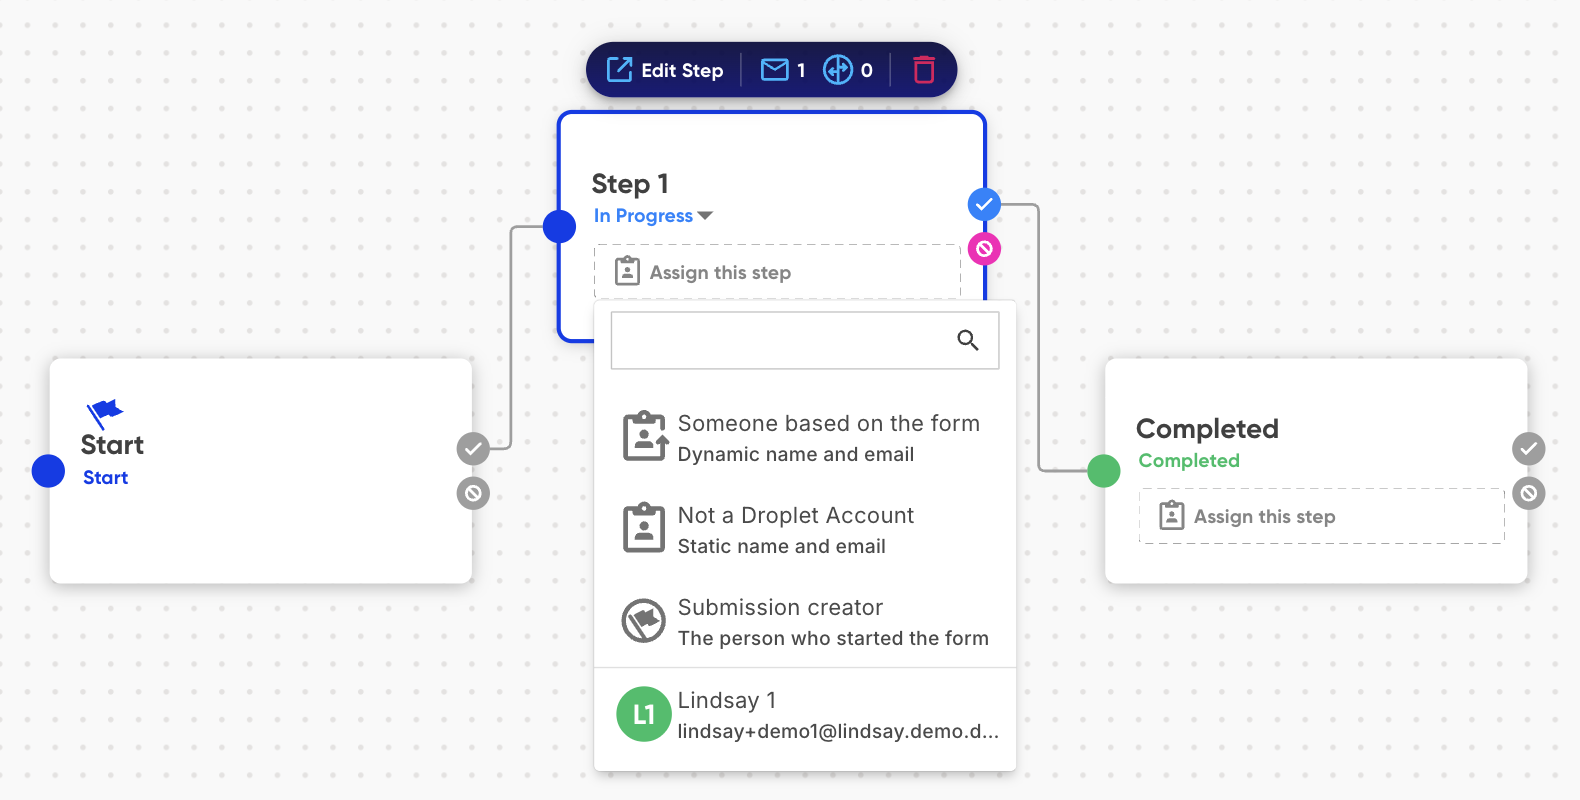
Choose how each workflow step should be assigned.
- Unassigned
- No one is assigned. Common for terminal steps like Completed and Rejected.
- Someone Based on the Form (Dynamic)
- Assigns the step based on data in the submission, using an expression. For example, you can auto-assign a school principal based on the school selected in a dropdown. Dynamic assignments typically reference computed fields or datasets.
- Not a Droplet Account
- Assign someone who doesn't have a Droplet account by entering their name and email. Workflow assignees don't need Droplet accounts.
- Submission Creator
- Assigns the step to the person who initiated the submission. Useful for corrections workflows where the submitter needs to make changes and resubmit.
- Static (from drop down list of Droplet users)
- Assigns the step to the same person every time. Select a user from the dropdown or begin typing their name into the search bar.
- A Group of People (configured through the API)
- Assigns the step to several people at once. The first of them to submit or reject the step completes it, and everyone else sees that it has already been submitted.
If an assignee receives a lot of submissions from the same form and doesn't want an email for every one, a step can opt out of the automatic assignment email. Open the step's email panel and remove Send to Assignee, and Droplet stops mailing when a submission enters that step. This is opt-in and off by default, so steps keep emailing their assignee until you remove it. Manual reassignment still sends an email.
Configure step details
Click Edit Step on any workflow card to open the Step Details panel. From here you can:
Add or change the step assignee.
Add a Step Run Rule to skip the step under certain conditions.
Create conditional routing to determine the next step based on submission data.
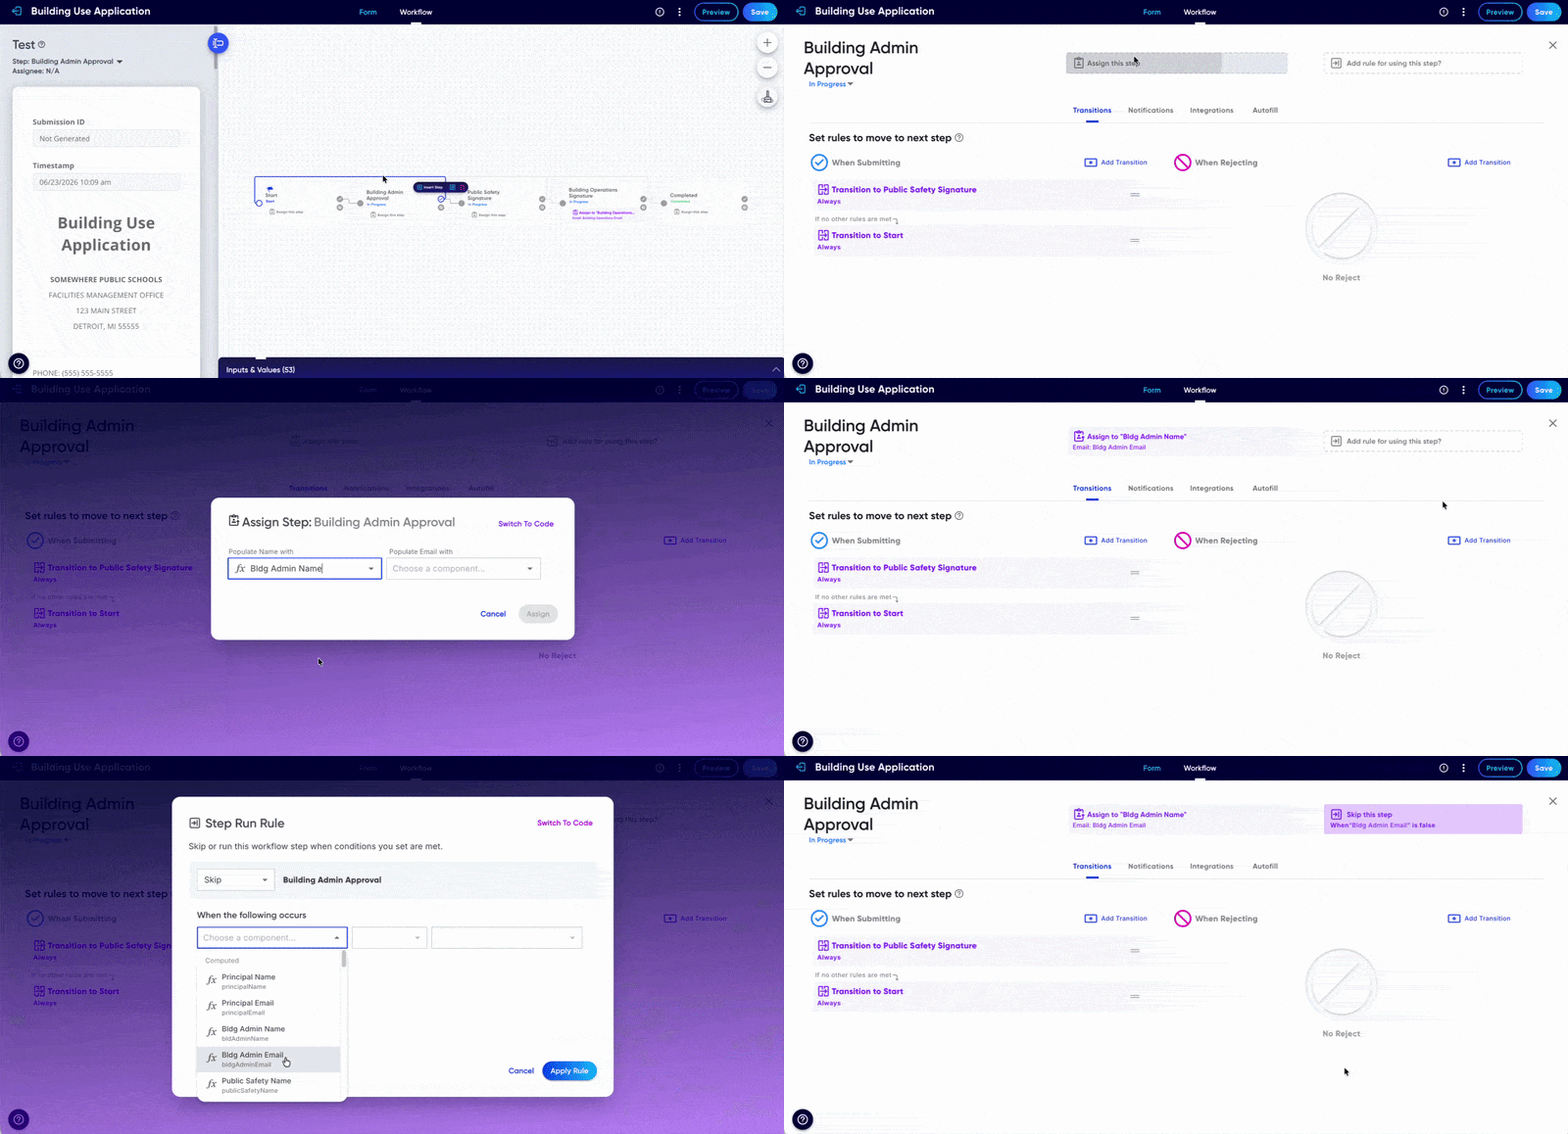
The Step Details panel lets you configure assignees, conditions, and routing for each step.
Skip a step with a Step Run Rule
Sometimes a step only applies under certain conditions. For example, a finance review might only be needed when the amount is over a threshold. A Step Run Rule lets Droplet evaluate a condition when the submission arrives and skip the step automatically when it is not met.
Click Edit Step on the step card to open the Step Details panel.
In the Step Run Rule section (top-right corner), enter the condition (an expression) that must be true for this step to run.
If the condition is false when the submission arrives, the step is skipped automatically and the submission continues to the next step in the workflow. A skipped step does not notify an assignee.
For steps inside a parallel group, you set Step Run Rules on each substep (and on the parallel step itself) the same way. See Set up parallel workflow steps.
Create conditional workflow routing
Complex forms often need to follow different paths based on the data in the submission. You can define this routing in the Step Details panel by adding a list of step transitions with expressions.
The list evaluates in order from top to bottom, routing the submission to the step of the first expression that evaluates to true.
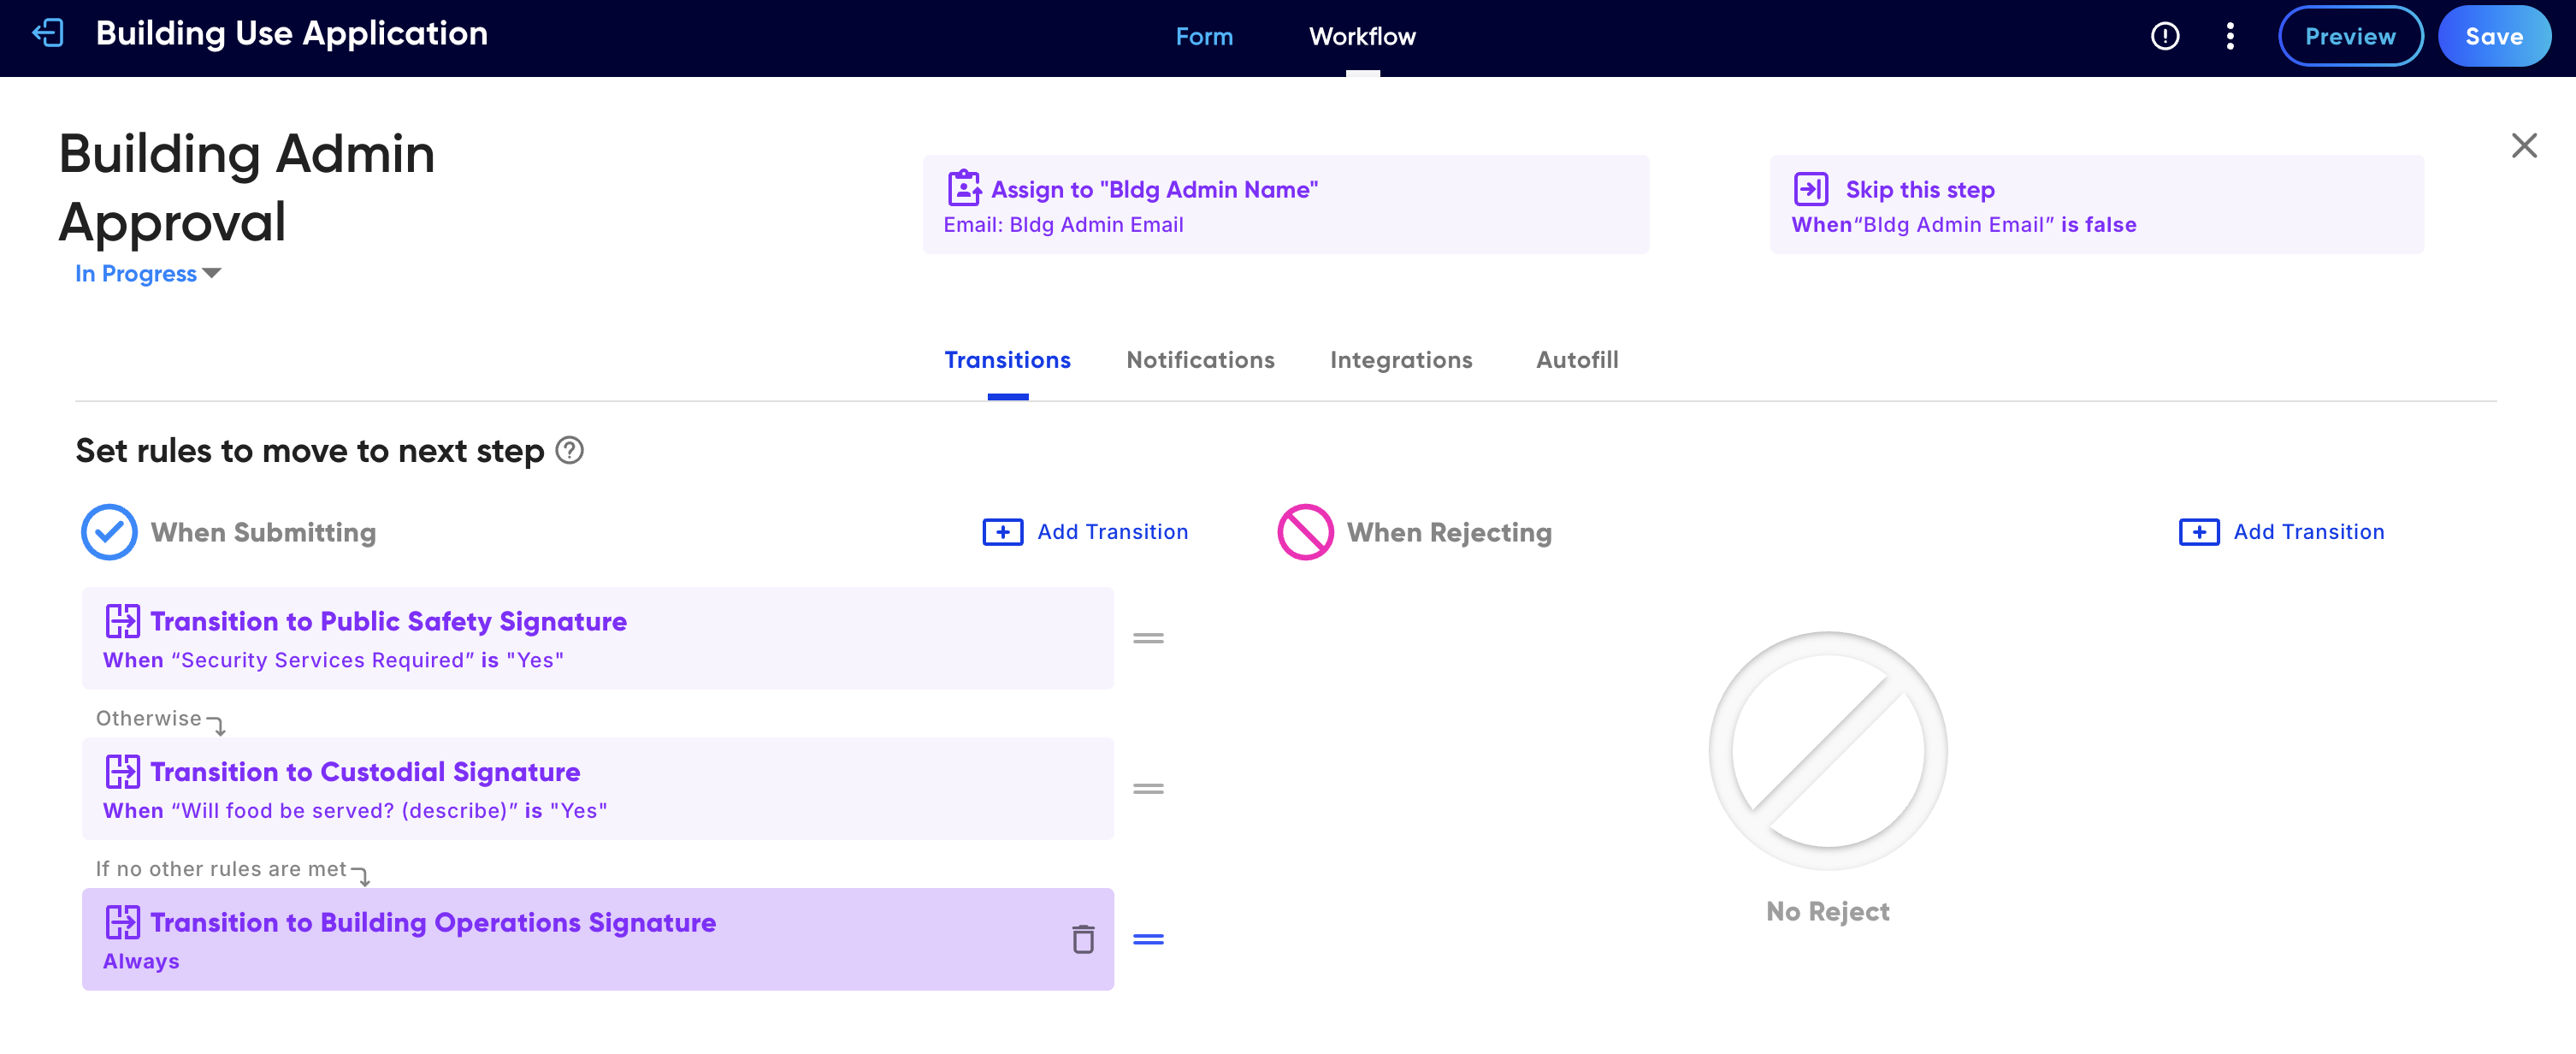
Conditional routing sends submissions down different paths based on their data.
Always include a fallback step at the end of your list - one with no conditions attached. If all expressions evaluate to false and there's no fallback, the submission won't be able to advance and the user will see an error.
Control field visibility per step
Each form component can be set to one of four visibility states at every workflow step:
- Editable
- The field is visible and users can modify it.
- Visible
- The field is visible but locked for editing (read-only).
- Redacted
- The field stays in the layout, but its value is hidden. Use this for sensitive data (such as an SSN) that should not be shown to the assignee at this step.
- Hidden
- The field is completely removed from view at this step.
You can also control the submit and reject buttons per step (the _actions setting). On terminal steps like Completed and Rejected, the action bar is hidden so no further action can be taken.
By default, components are editable at the Start step and visible at all other steps. To customize visibility, click the Visibility tab in the Form Builder, select a component, and adjust the settings in the right-hand panel for each step.
Group related components inside a Section or Group, then set visibility on the container. If the container is hidden, everything inside it is hidden too.
Create a send back workflow
You can now easily send back submissions without creating a path in the workflow. However, you may still want to do it this way or have forms that are working off of this structure.
To create a send back workflow, follow these steps:
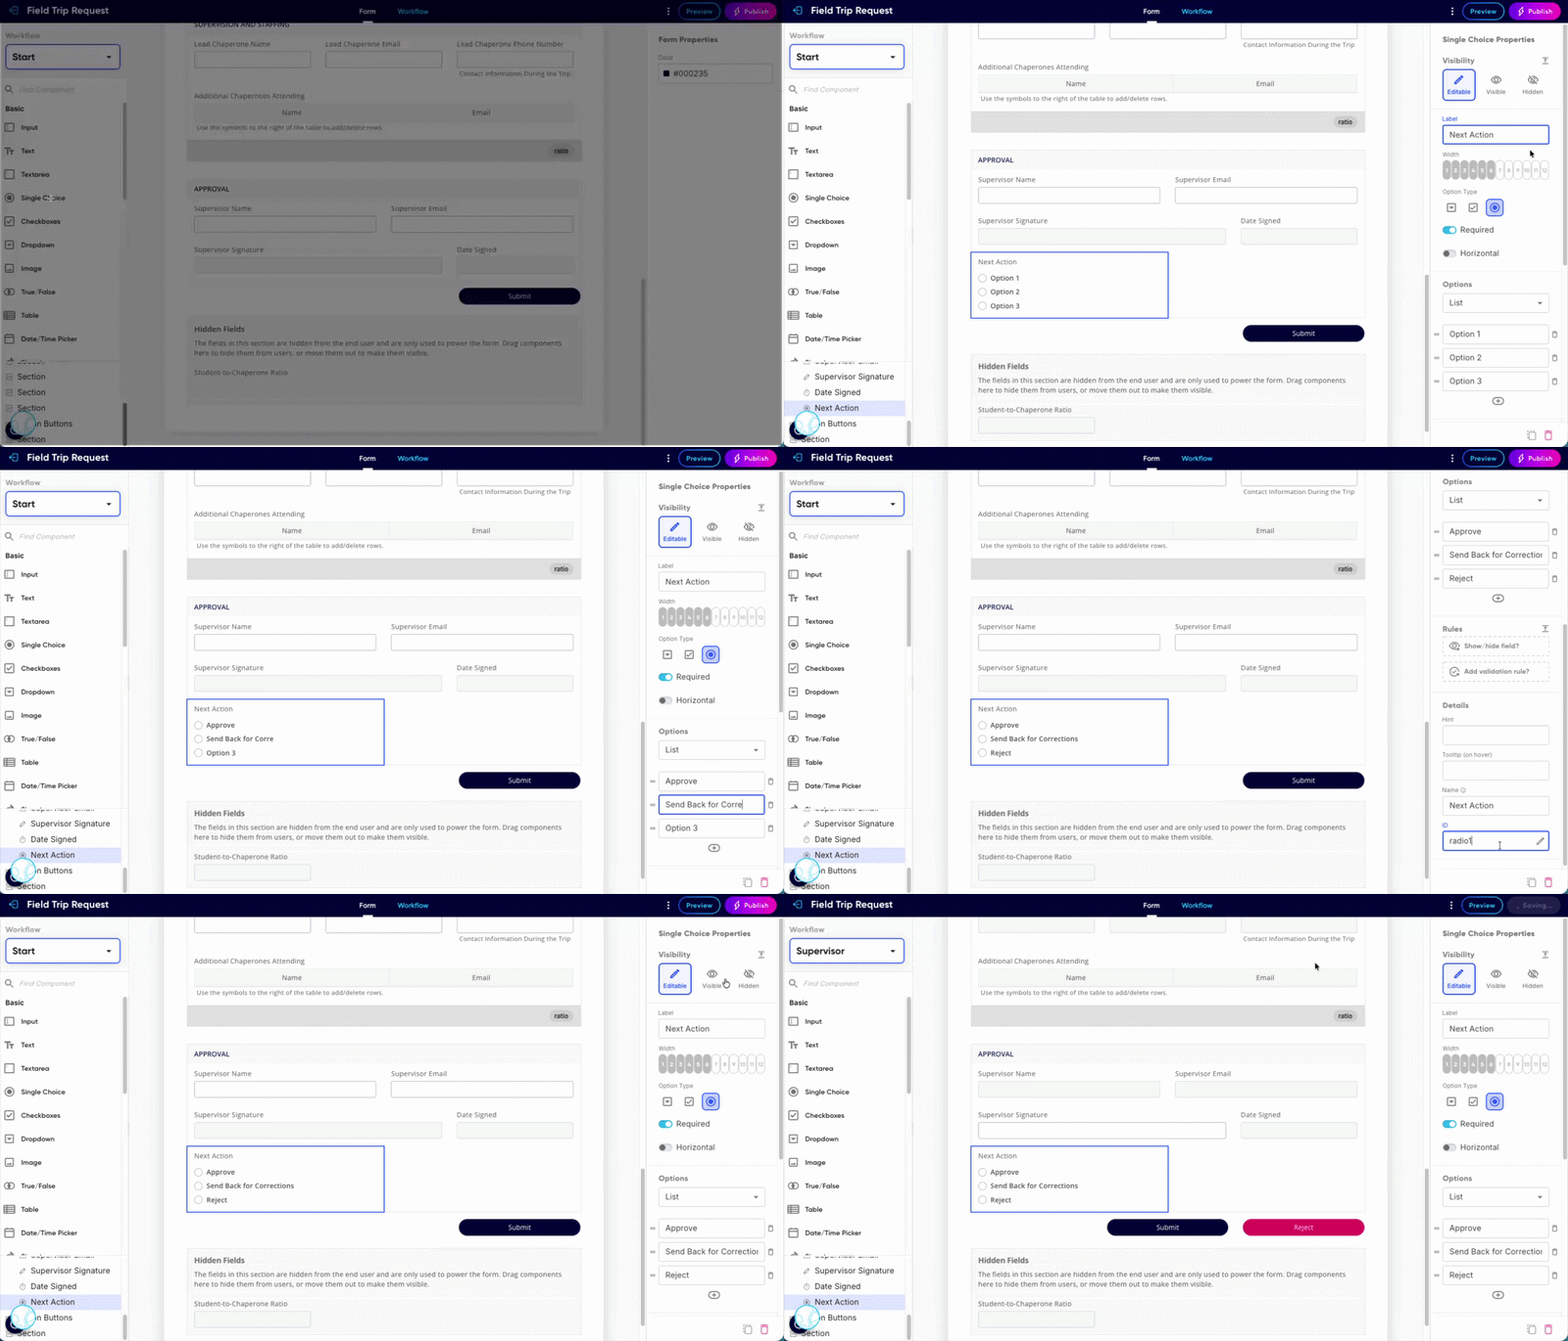
Add a Single Choice component to choose a path
Drag a single choice component onto your form and place is where you'd like the approver to have these options for the next action. Label it "Next Action" and add Approve, Send Back for Corrections, and Reject as the options.
Change the ID to be more descriptive (i.e. nextAction)
Ensure that the single choice component is editable for the approver step and not for the start step.
Add Action Buttons
Depending on the step and what the approver selects, you’ll want to show the right button for the next action.
Drag two sets of additional Action Buttons onto your form layout underneath the existing set to make three total sets: the first will be for the Start Step (a typical Submit button). The second two will be for approving and rejecting based on our New Action component.
On the second set of Action Buttons, deselect Reject. This will serve as our approve button when "Approve" is selected from Next Action. On the third set of Action buttons, deselect Submit. This will serve as our rejection button when either "Send
Back for Corrections" or "Reject" is selected from the Next Action.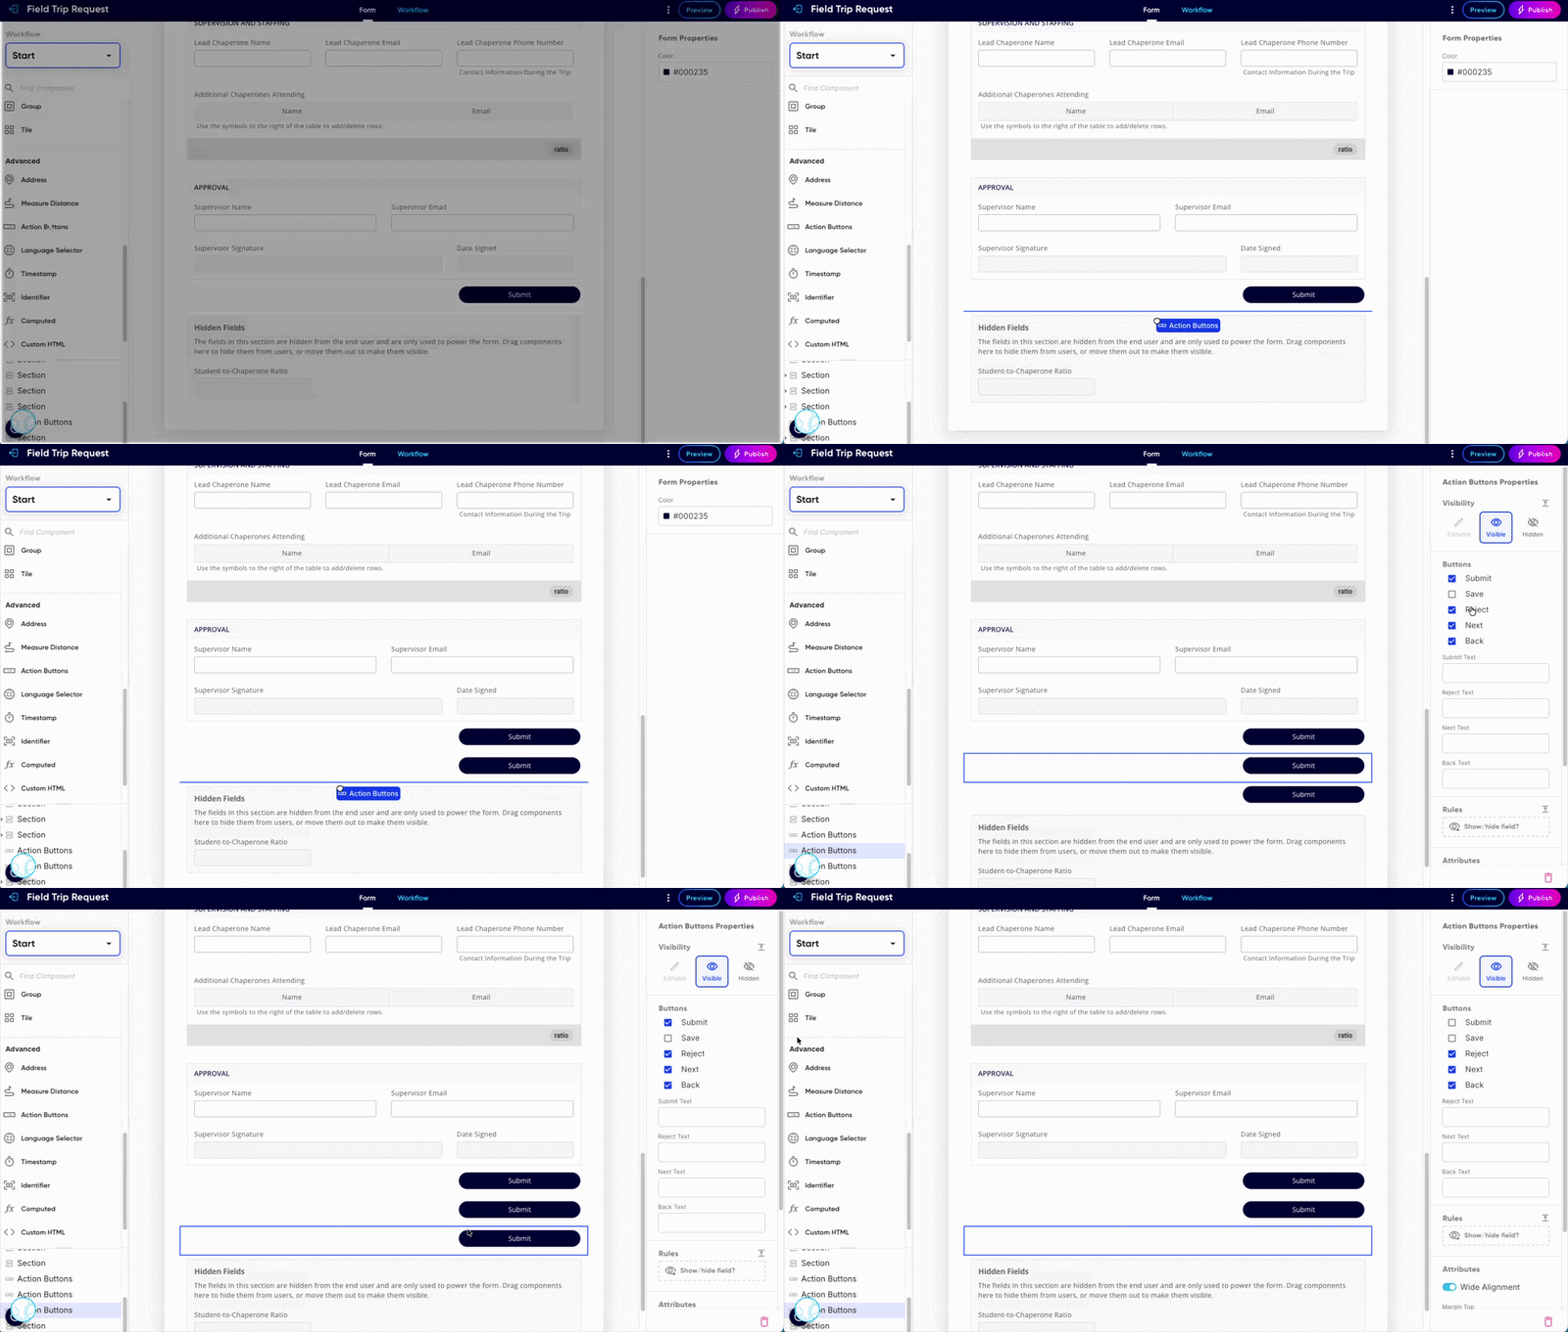
On the third Action Button, let's use the value of the Next Action radio button to populate the text of the reject button. Click in the Reject Text input on the Properties panel and type ##nextAction##. The double-hashtags indicate a merged field value, so whichever option the approver choose from Next Action will be the text that will appear in the reject button. For the second Action Button, let's simply enter "Approve" in the Submit Text input.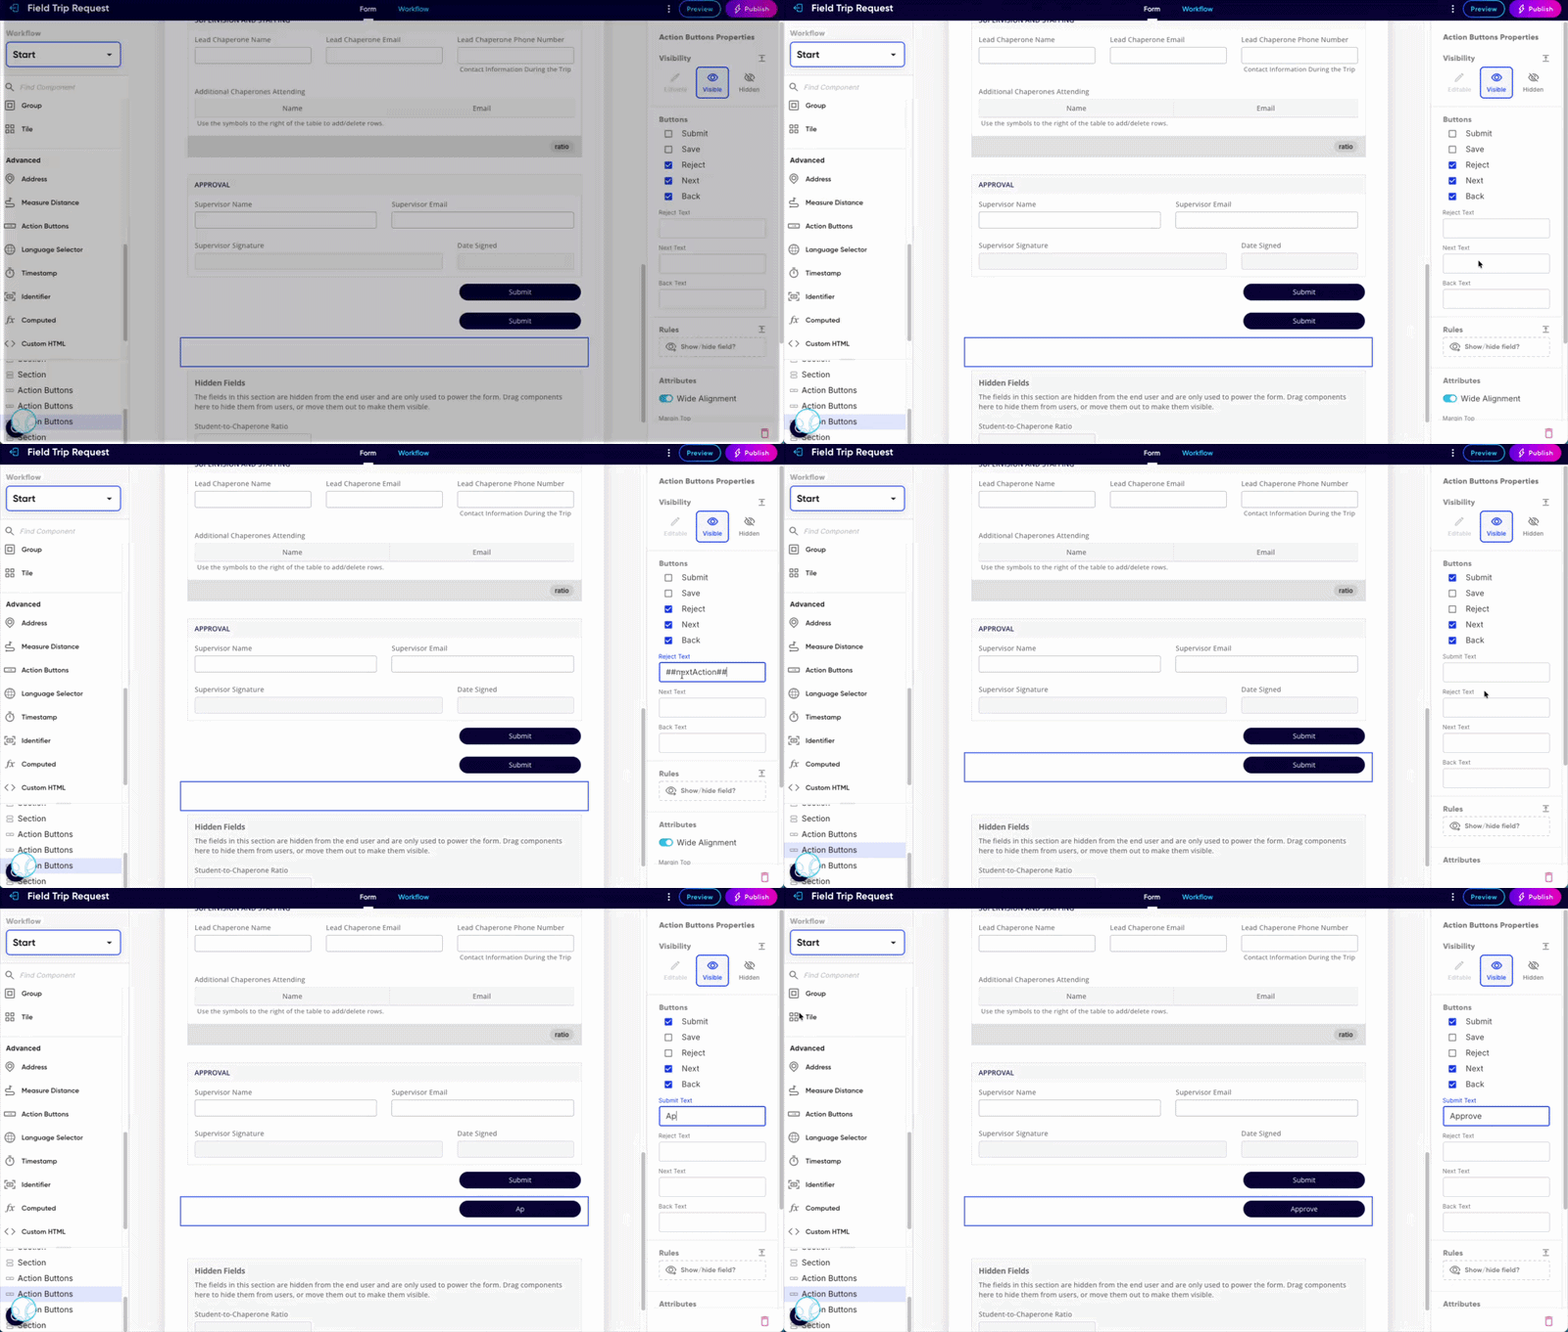
Next, on the Approve Button (second button set), select Show/Hide Rule? and click Switch to Code. We'll write a short expression to ensure that this button only appears on the approvalStep and when the nextAction selection is Approve.
currentStep() === 'approvalStep' && nextAction === 'Approve'Ensure that your Approval Step either has an ID of approvalStep, or that you are using the ID of the workflow step that's relevant to your workflow. To find/edit the workflow step ID, enter the Code Editor and select the Workflow Tab where you can view and adjust the step ID references.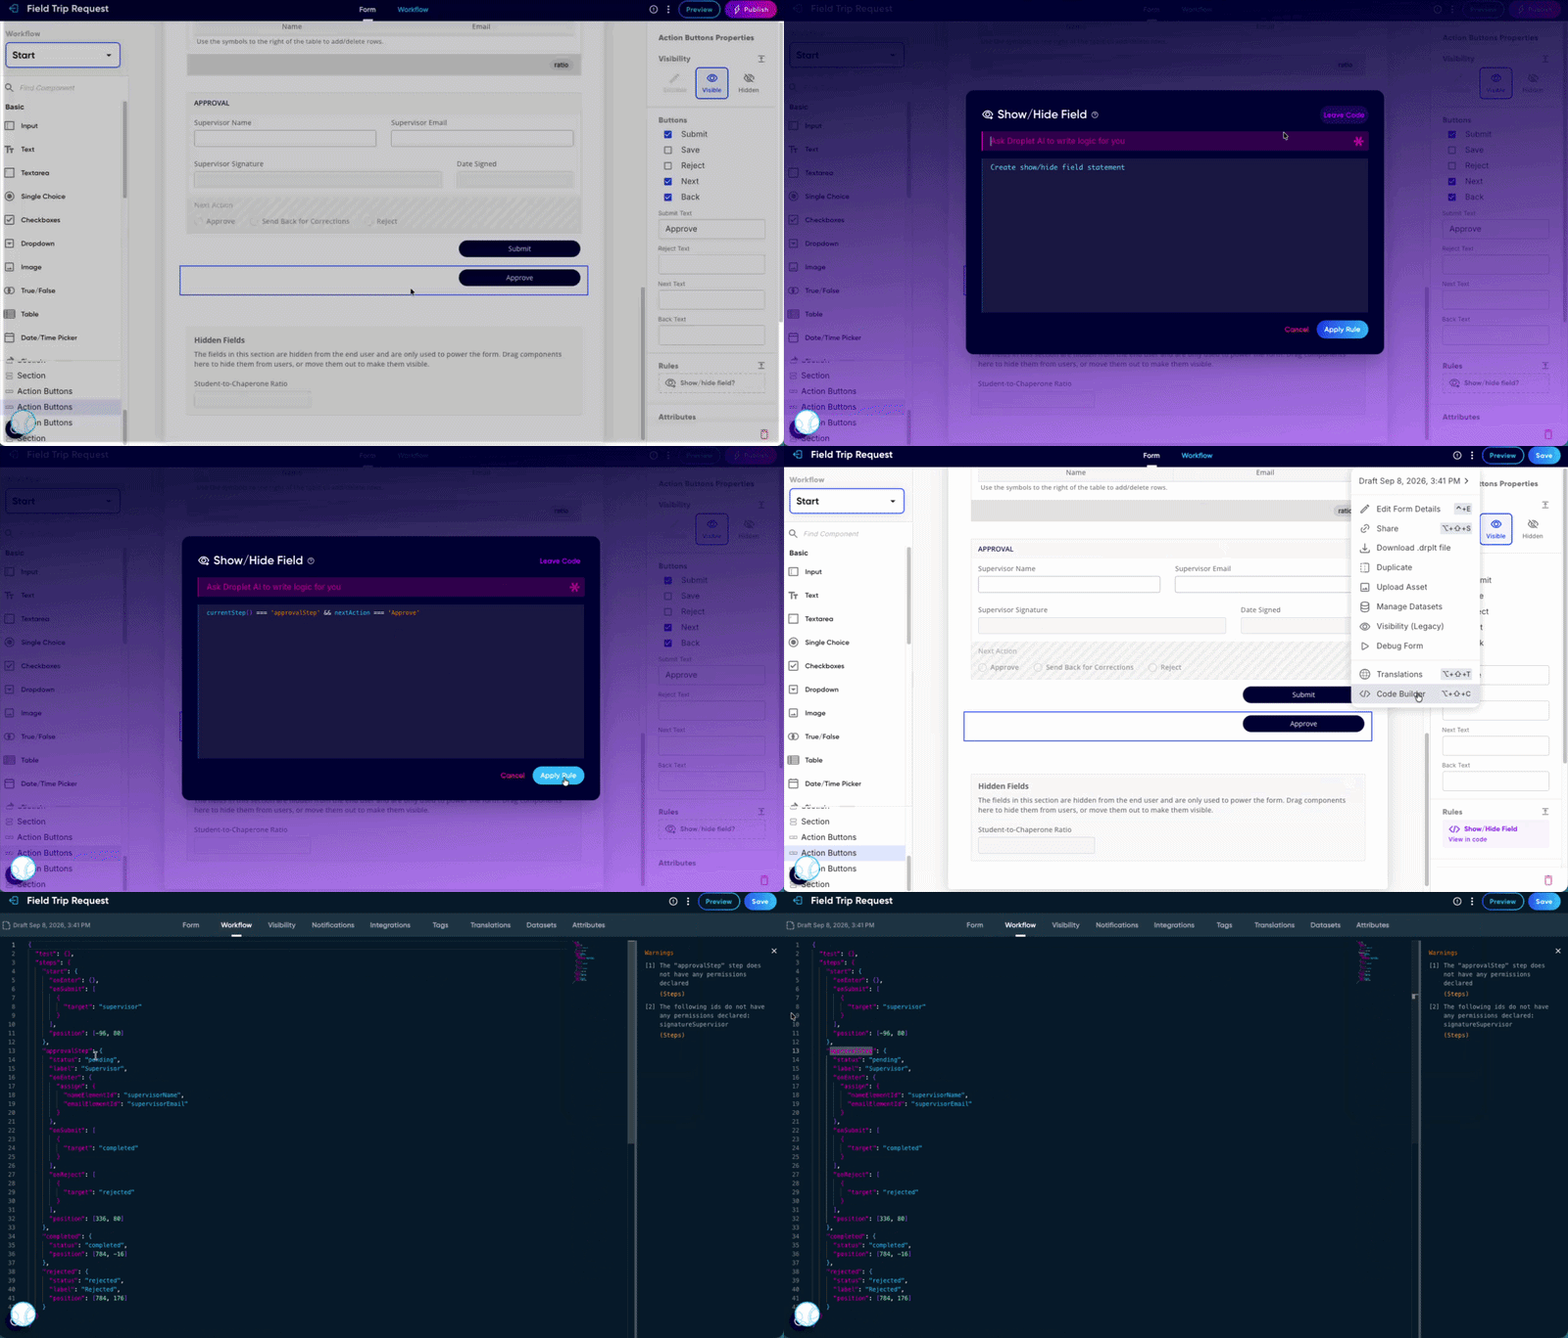
Click on the third button set and select Show/Hide Rule? and select Switch to Code. We'll write a short expression to ensure that this button only appears on the approvalStep, when nextAction has a value, and when that value isn't Approve.
currentStep() === 'approvalStep' && nextAction && nextAction !== 'Approve'This is a three-part expression. The first part checks if the current workflow step is the Approval Step. The second part (nextAction) checks if the approver has chosen any option from the Next Action radio button. And the third part, (nextAction !== 'Approve') checks if the choice in Next Action is anything except for Approve.
Ensure that the regular Action Buttons (the first set) are hidden while a submission is on the Approval Step. Open the first set of Action Buttons and select Show/Hide Rule? to use this expression:
currentStep() !== 'approvalStep'Connect the Workflow Pathway
In the Workflow Editor, draw rejection pathways from the Approval Step to the Start Step and to the Rejected Step.
If you don't have a Rejected Step on your workflow already, add one!
Click on the Approval Step card and click "Edit Step."
Under "When Rejecting" rules, edit the first rule to show, When rejecting, navigate to "Start" when the following occurs: approvalStep is Send Back for Corrections.
If no other rules are met, Transition to Rejected always.
Return to the Workflow and ensure that the Submitter is assigned on the Start Step.
Edit the Start Step notification to include the ##_reason##.

Add a Reason Block
When a submission is sent back for corrections, it’s helpful to give the submitter clear feedback. You can do this by adding a Corrections Reason section that appears only when needed.
When the Reject button is pressed, anything typed in the Reason for Action window is saved in a value with the ID _reason. We’ll display these notes at the top of the form when it’s returned for corrections, so the submitter knows exactly what needs to be changed.
Set the width to 12 columns and a background color on the tile that fits your forms aesthetic. 
This submission was flagged for changes.  Please ensure the following is addressed and then resubmit:
##_reason##
typeof _reason !== 'undefined'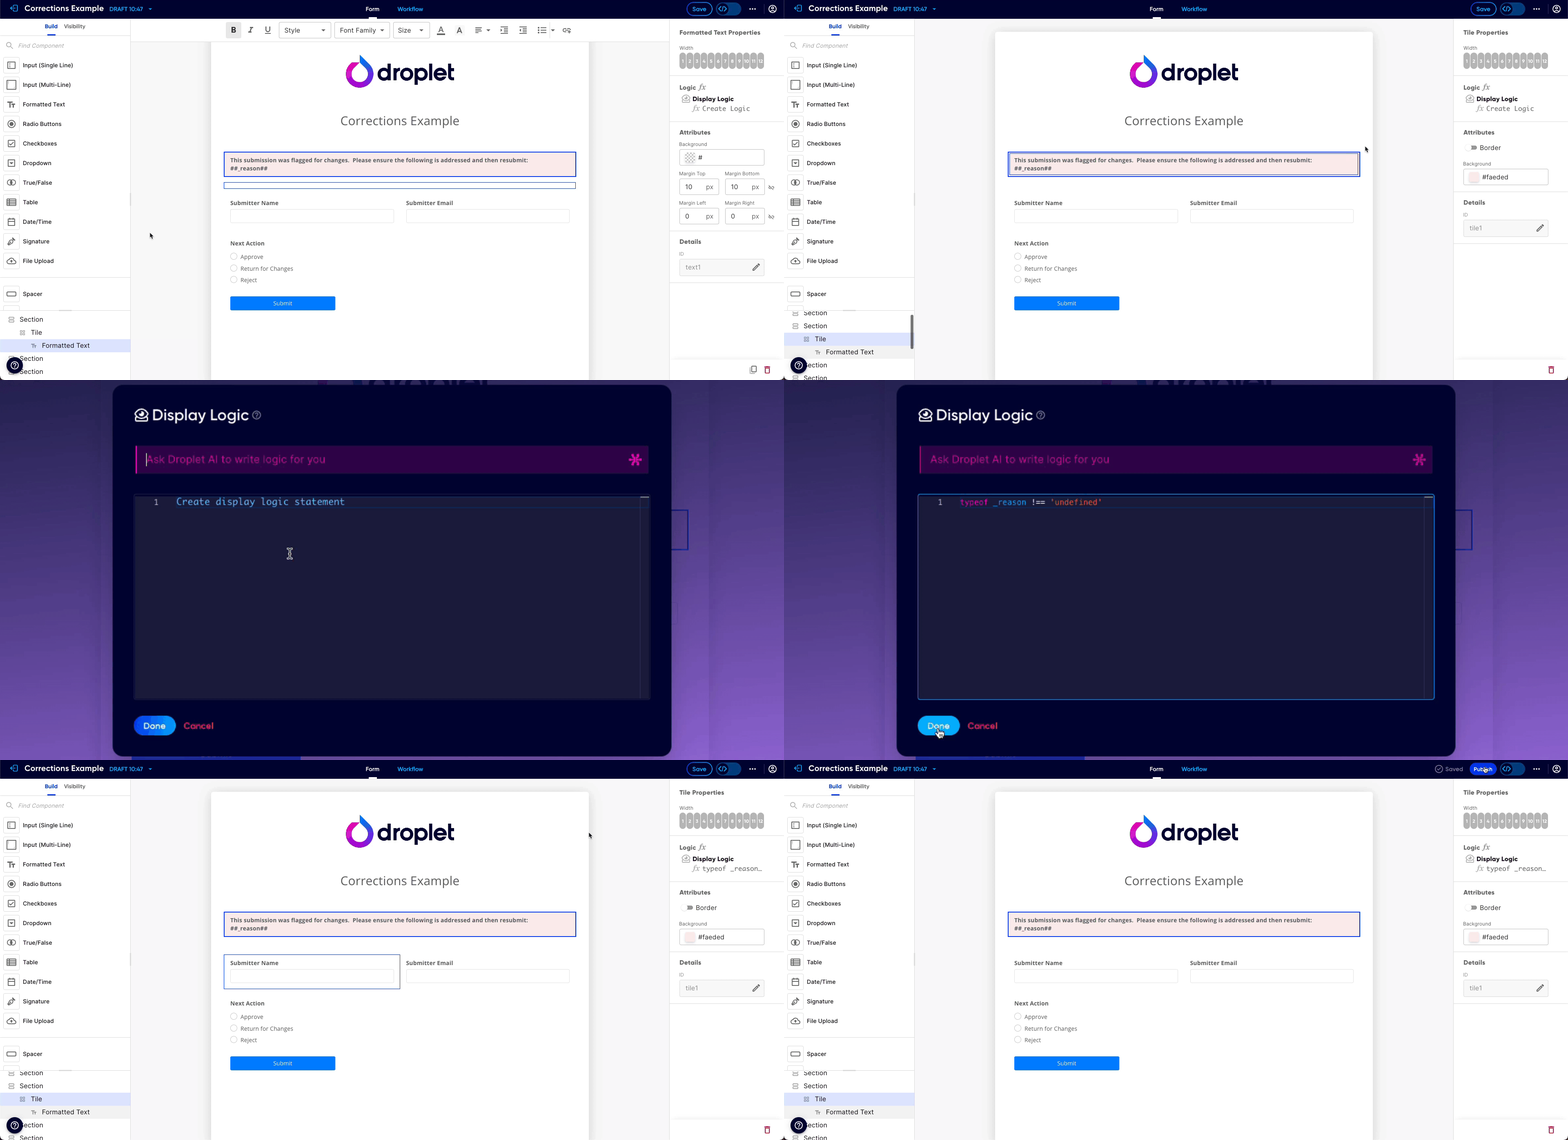
Parallel workflow steps
By default, workflow steps run in sequence - one after another. With parallel steps, you can run multiple steps at the same time. This is useful when two or more people need to review or fill in different parts of a submission independently.
Each parallel step runs at the same time, and the workflow waits for all of them to finish before moving on to the next step. Setting them up has its own specific steps in the Workflow Editor, walked through in the dedicated guide below.
Parallel steps are available for workflows with two or more review steps. Each parallel branch can have its own assignee and field visibility settings.
Set up parallel workflow steps
Easily arrange workflow cards
As you build complex workflows, the step cards can become scattered or overlap in the visual editor. Click the Clean Up button in the Workflow Editor toolbar to automatically arrange all workflow cards in an orderly layout. This makes it easier to see the entire workflow at a glance and understand the flow between steps.
Attach PDFs to notifications
You can attach a PDF copy of the submission to any workflow notification email. When configuring a step's notification settings, enable the Attach PDF option in the editor. The recipient receives the email with the submission PDF as an attachment, which is useful for record-keeping or when the recipient does not have access to Droplet.
The Notifications rail also includes a Send Reminder if Incomplete section alongside the step-begins and step-finishes notifications, so you can schedule reminders for a step without opening the code editor. It uses the same reminders interface as packets and eSign. Timing that can only be set in code, such as minute or hour units, date-field triggers, and field-driven intervals, shows a Configured in code chip and is written back untouched.
Builders working in the Code Builder can go further and control what that PDF includes, such as embedded upload files, private admin-only uploads, the activity log, or a compact layout, by adding a pdfOptions object to the notification in code. The full option list and a sample snippet live in Control what the attached PDF includes in the Workflow notifications guide.