Workflow notifications
Notifications are the emails Droplet sends as a submission moves through your workflow. They tell the right person that something needs their attention, confirm an outcome, or keep a stakeholder in the loop. This guide covers how to add a notification to a step, choose who receives it, write the message, personalize it with form data, and send it only when it matters.

How notifications work
Every notification belongs to a single workflow step, and each step can send more than one. A notification has four parts: who receives it, when it sends, what the email says, and an optional condition that decides whether it goes out at all.
There are four moments a step can send email:
Send to Assignee. The email that goes to whoever the step is assigned to, letting them know they have something to do. This is the most common notification and the one most steps need.
Send When Step Begins. Extra emails sent the moment the step starts, to people other than the assignee. Use this to notify a manager or a shared inbox that a review has begun.
Send When Step Finishes. Emails sent once the step is completed.
Send Reminder if Incomplete. Scheduled reminders that go out while the step is still open, nudging the assignee that the submission is waiting on them. You set the timing in the Notifications rail with the same reminders controls used for packets and eSign, so no code editor is needed.
When you can, attach a notification to a step's start (Send to Assignee or Send When Step Begins) rather than its finish. A completed step can route to any of several next steps, so sending on finish makes it harder to reason about what just happened. Sending on entry keeps each email tied to a known step. To announce an outcome such as an approval, put the email on the entry of the step the submission lands on, not on the finish of the step it just left.
Where to find notifications
Open your form and switch to the Workflow tab at the top of the builder. You will see your steps laid out on the canvas.
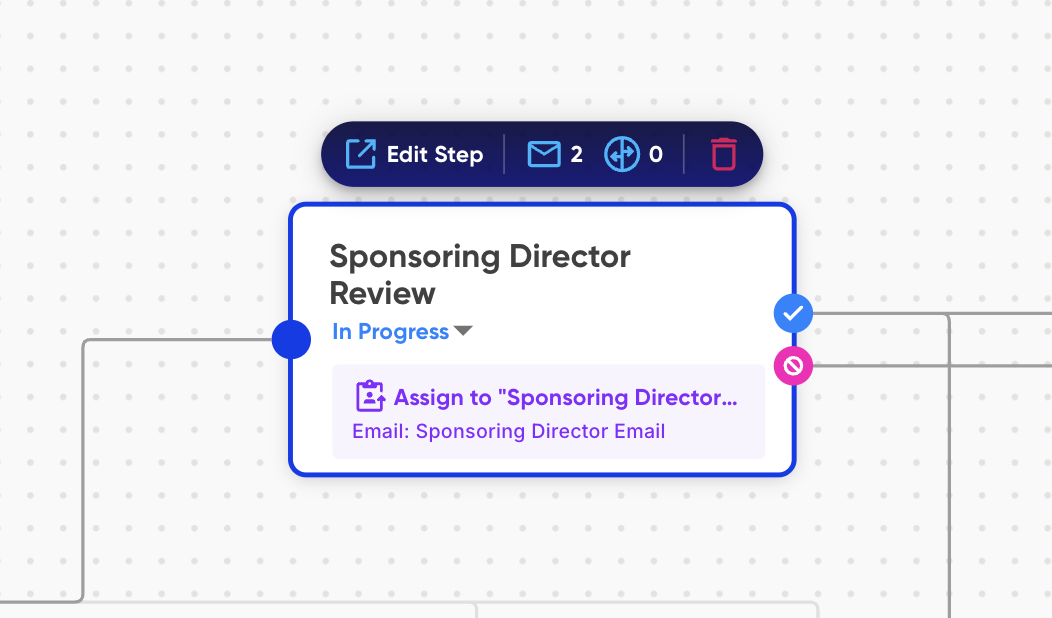
Hover the step you want to edit and click Edit Step. The envelope icon on the step shows how many notifications it already has.
Inside the step, select the Notifications tab. The left column lists the send moments, including Send Reminder if Incomplete for scheduled reminders, and the right side is where you write the email. Each notification's type appears as a heading at the top of the right panel, so you can tell which send moment you are editing instead of going by the assignee email alone.
Notify the assignee
Start with the most common case: emailing the person the step is assigned to. Select Send to Assignee in the left column, then write the message on the right.
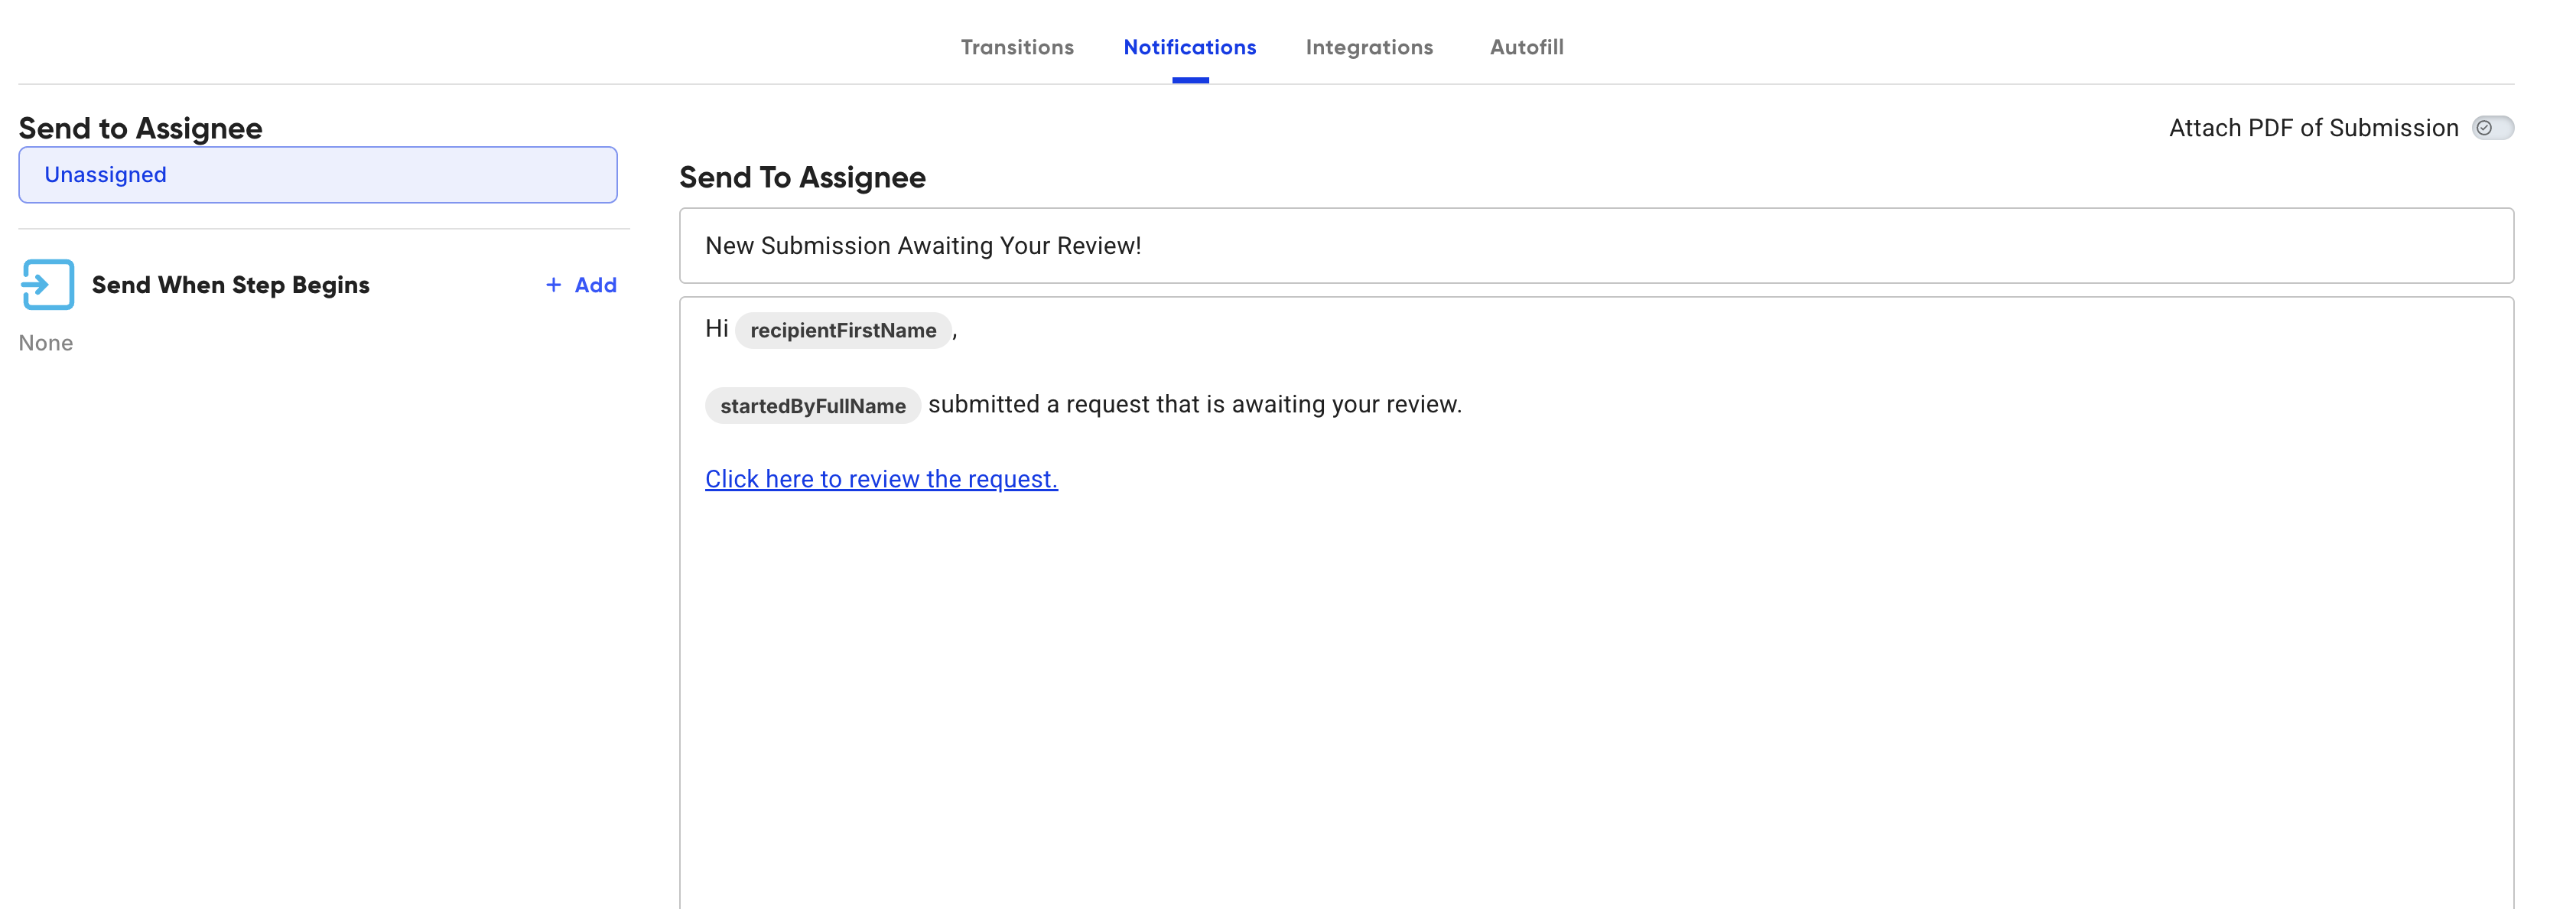
The assignee is set by the step itself, not by the notification. If a step shows Unassigned, set who it routes to on the step first, then the assignee notification will know where to go.
A step does not have to email its assignee at all. Remove Send to Assignee from the step's email panel and Droplet stops sending the automatic assignment email when a submission enters that step. This helps when one person is assigned a high volume of submissions from the same form. Every step keeps the assignment email by default, so this is opt-in, and manually reassigning a submission still sends an email.
Add other recipients
To email someone besides the assignee, use Send When Step Begins or Send When Step Finishes and click + Add, then Add Recipient. You can choose one of three recipient types.
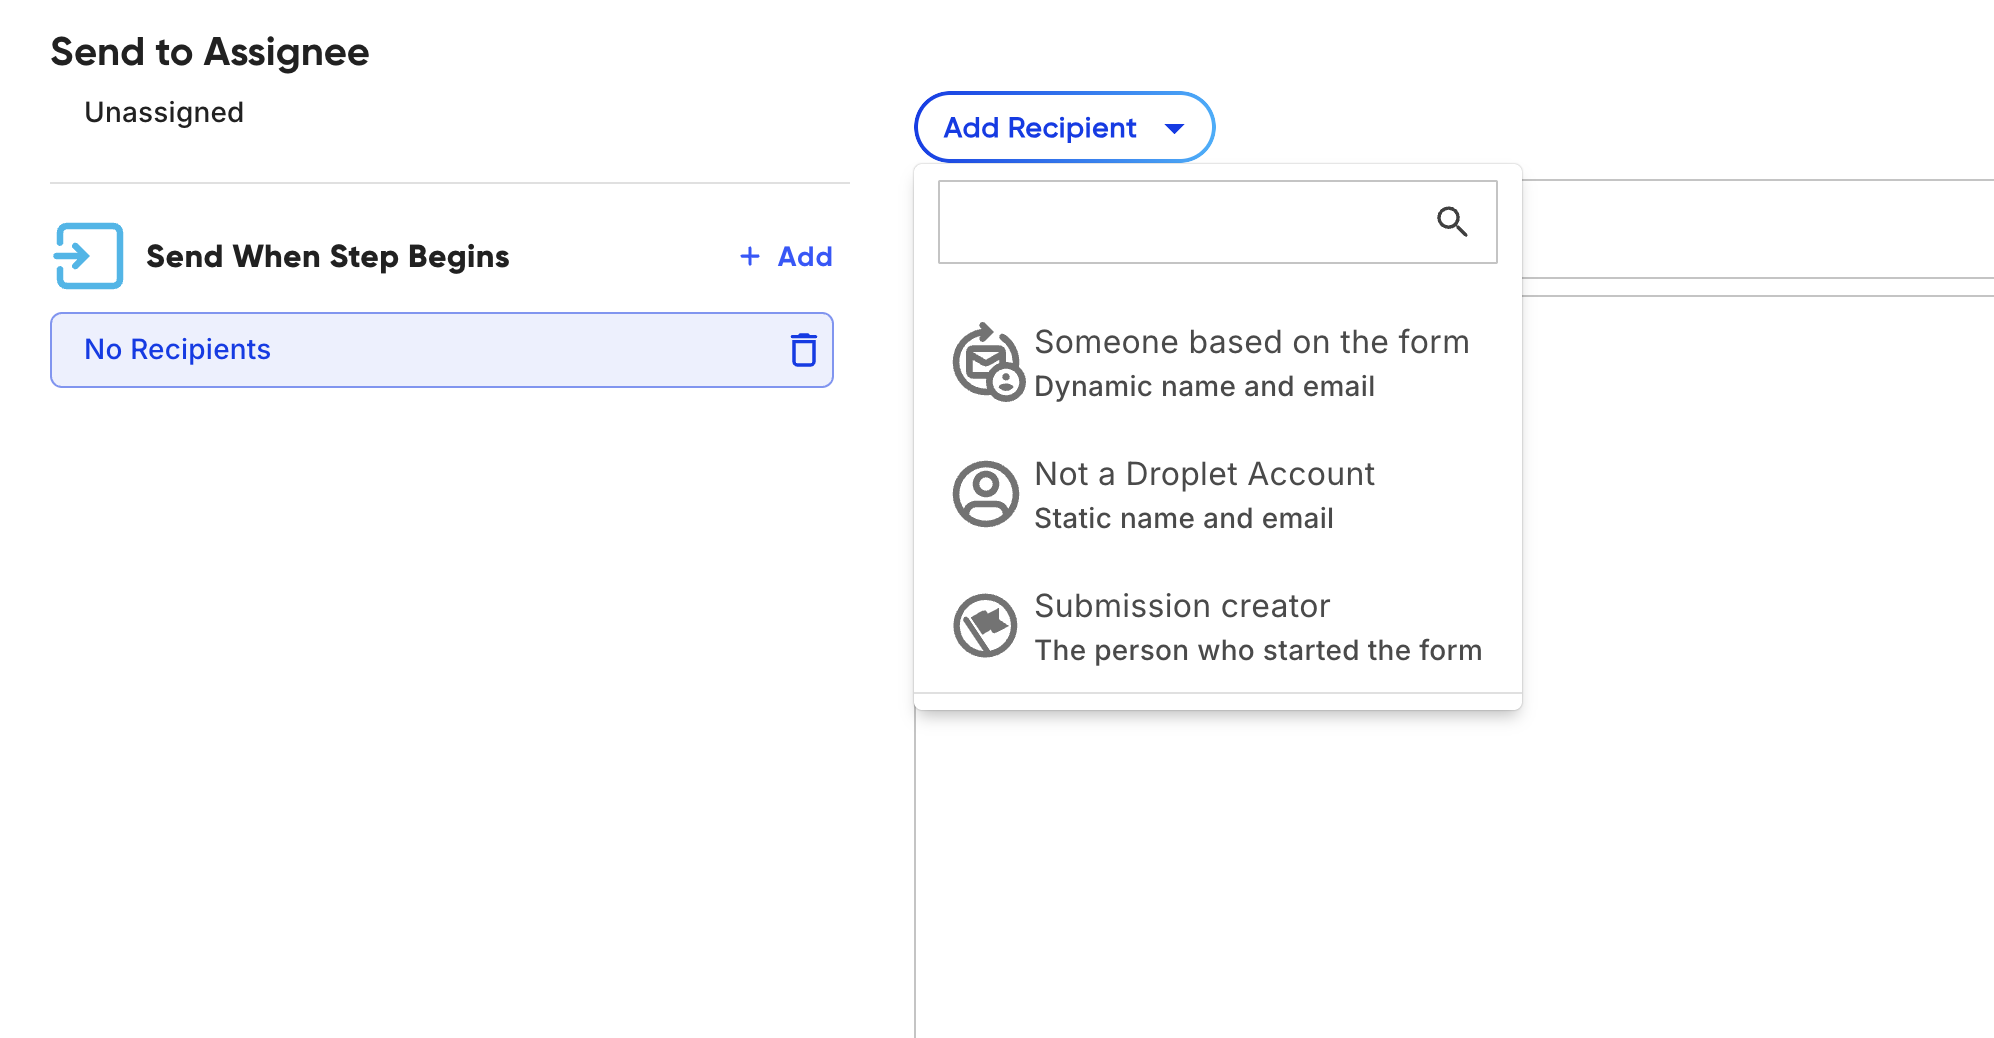
| Recipient type | Use it when |
|---|---|
| Someone based on the form | The recipient's name and email come from fields on the form, so the address changes with each submission. Use this for a manager, sponsor, or approver entered by the submitter. |
| Not a Droplet Account | You want to email a fixed, hard-coded address every time, such as a department inbox. Enter the name and email directly. |
| Submission creator | You want to reach the person who originally started the form, for example to confirm an outcome or ask for a correction. |
Add as many recipients as a notification needs. Each send time keeps its own list, so the people notified when a step begins can differ from the people notified when it finishes.
Schedule reminders
To nudge an assignee whose step is still open, select Send Reminder if Incomplete in the left column and set the schedule, then write the message the same way you would any other notification.
Reminder timing that was set up in the code editor is preserved, not overwritten. Minute and hour units, date-field triggers, and field-driven intervals show a Configured in code chip in the builder and are written back untouched.
Write the email
Each notification has a subject line and a rich-text body. Type the subject at the top, then write the body in the editor below. The toolbar gives you bold, italic, underline, font and size controls, alignment, lists, and a link tool, so you can format the message and add a clear call to action. The same editor appears wherever Droplet composes an email, so what you learn here carries over.
Keep the subject specific and scannable. Approval needed: new vendor contract tells the recipient what is being asked before they open the email, which gets faster responses than a generic Action required.
Personalize with dynamic fields
To drop live submission data into the email, place your cursor where you want it and click Add Dynamic Field. Droplet inserts a labeled chip that is replaced with the real value when the email sends. You can use dynamic fields in both the subject and the body.
Your own form fields appear in this menu (such as a request title or amount), and so do a set of built-in values about the submission, the assignee, and the person who started it:
| Dynamic field | What it inserts |
|---|---|
| Assigned To First Name, Last Name, Full Name | The name of the person this step is assigned to. Use the first name for a personal greeting. |
| Started By First Name, Last Name, Full Name | The name of the person who started the submission. |
| Submission Id | The unique ID of this submission, useful for record-keeping. |
| Form Name, Form Id | The name or ID of the form the submission came from. |
| Reject Reason | The note left when a submission is rejected or returned. Useful on a corrections step. |
| Any form field | The current value of that field, for example the request title, requested amount, or department. |
The same menu also holds the links that send recipients back into Droplet (Submission URL, Notification URL, and Link), covered next.
Link recipients to the submission
Most notifications should give the recipient a way to get back into Droplet. The Add Dynamic Field menu offers three link options, and choosing the right one for your audience matters.
| Link option | What it inserts | Use it for |
|---|---|---|
| Submission URL | A link to the submission that lets the recipient open and work on it. | The assignee, so they land directly on the task they need to complete. |
| Notification URL | A link tied to the notification, intended for people who are not the assignee. | Anyone you are keeping informed, such as a manager or stakeholder copied for visibility. |
| Link | A standard hyperlink (a full <a href>) to any web address you enter. | Pointing recipients to an outside page, such as a policy or a help article. |
To add one, place your cursor (or select a button such as a Review & Confirm button), then choose the link from Add Dynamic Field. The recipient gets a working link that opens the right submission.
A read-only mix-up stalls the workflow: make sure the person who has to take action gets the Submission URL, not the Notification URL.
Control what notification recipients can see
When someone opens the link in a Send When Step Begins or Send When Step Finishes email, they land on a read-only copy of the submission. By default that copy shows every field on the form. If a notification goes to someone who should not see all of it, for example a vendor contact who has no business seeing an employee's home address, you can hide individual fields or whole sections from that notification's recipients.
This is set in the builder's legacy visibility view, and it is separate from the per-step visibility you set on each field. Step visibility controls what an assignee can see and edit while working a step. Notification visibility only controls what a notification recipient can see when they follow the link in the email.
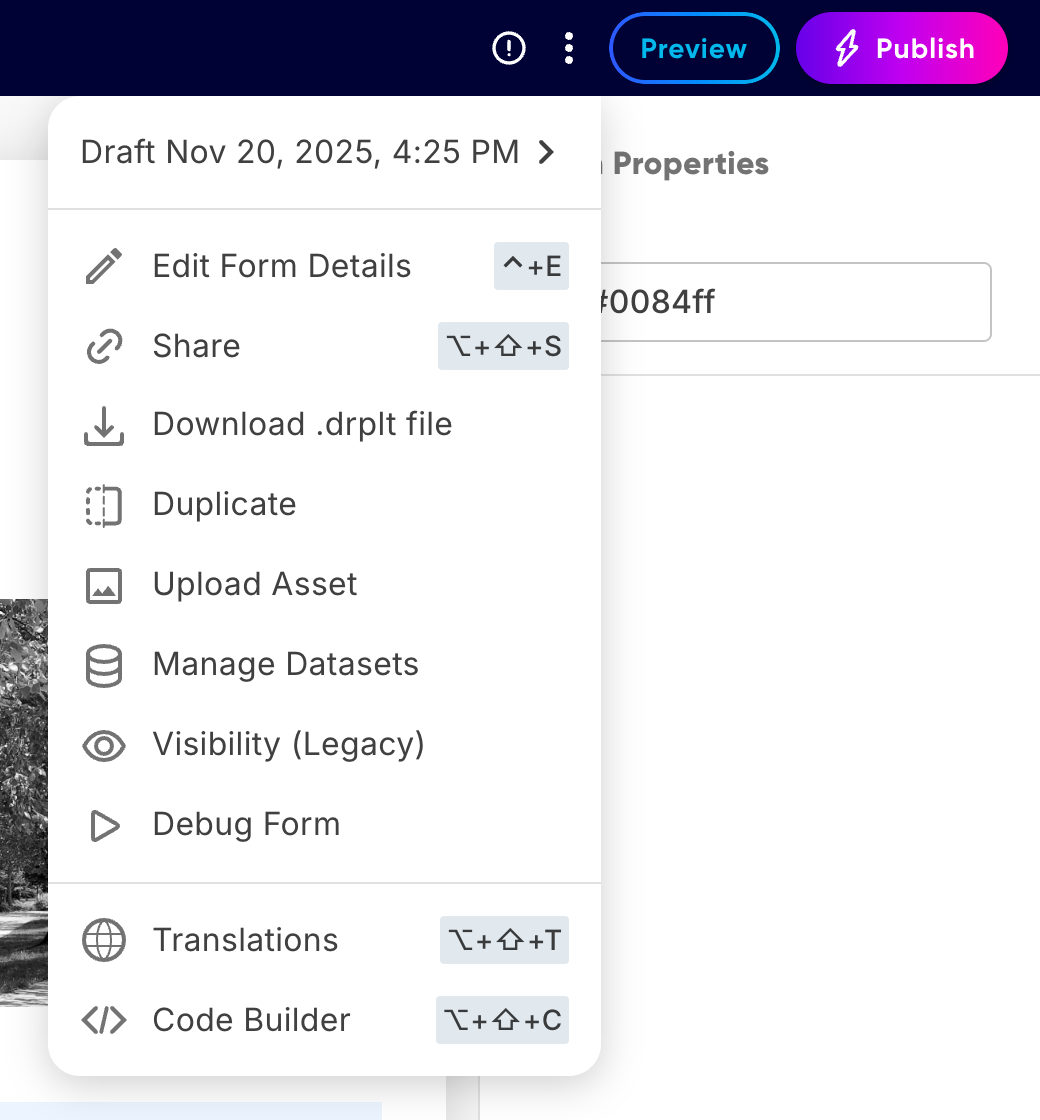
In the form builder, click the three-dot menu at the top right and choose Visibility (Legacy). The canvas switches to a view where you can select any field or section but not edit it.
In the panel on the right, choose Notifications next to Steps. The tab becomes available once the form has at least one notification.
Click the field or section on the canvas, or pick it from the tree on the left. The panel lists every notification on the form, grouped by workflow step, with each row labeled by who receives it. A step with no notification shows none.
Each row has two options: Read only (the eye) and Hidden (the crossed-out eye). Choose Hidden on a row and that notification's recipients will not see the selected field when they open the submission. A hidden element shows a hatched pattern on the canvas and a crossed-out eye in the tree on the left. To apply one setting to every notification at once, click the eye or crossed-out eye at the top of the column.
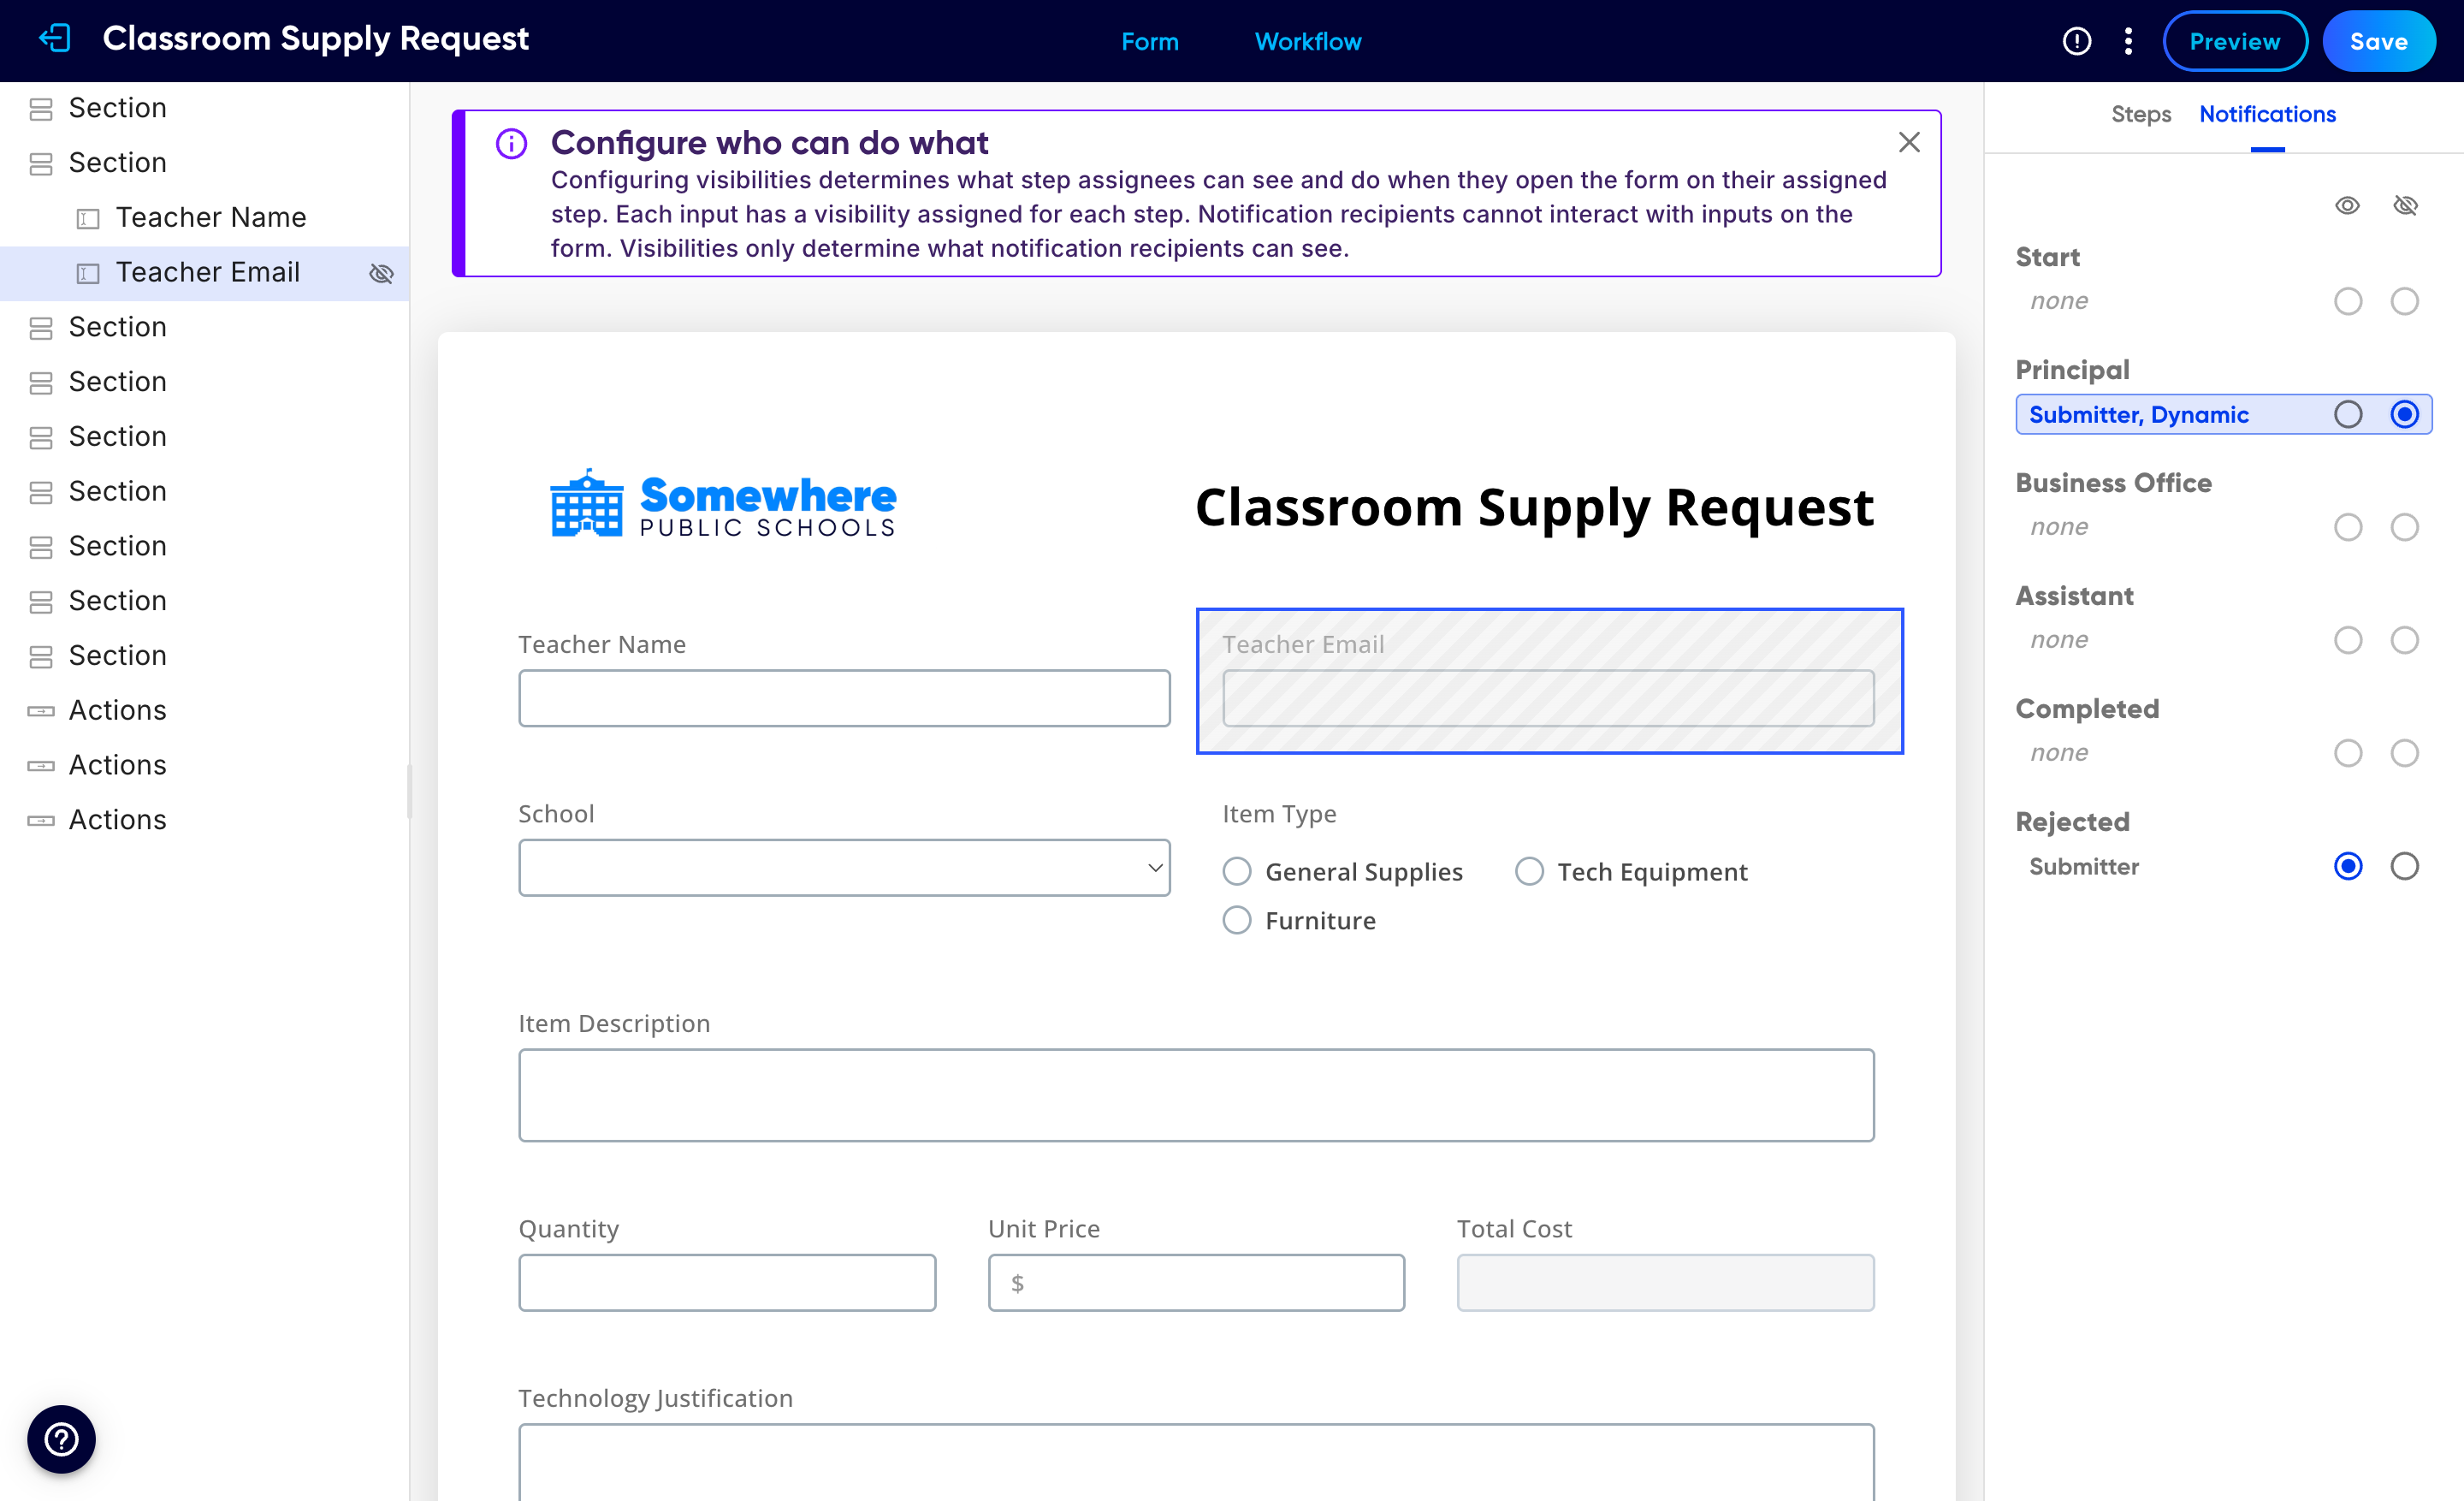
Repeat for any other fields or sections, then publish the form as you would after any other builder change.
Sections, tiles, and tables. Hiding a section or tile hides everything inside it, and the fields within it cannot be changed until the container is visible again. For a table, select the table and use the Table Columns list in the panel to set each column on its own.
The Send to Assignee email appears in this list too, but what an assignee can see and edit comes from the step's own visibility settings. To change that, use the Steps tab here or the field's Visibility control in the builder. See Control field visibility by step.
Notification visibility applies to the submission view behind the link, not to the email itself. Any dynamic field you place in the subject or body still fills in with the real value, so keep sensitive fields out of the email text as well.
In the Code Builder, this setting is a hidden array of field IDs on the notification, a sibling of template and recipients:
{
  "template": { "subject": "Facilities request approved", "body": "..." },
  "recipients": [
    { "type": "static", "name": "Facilities", "email": "facilities@example.org" }
  ],
  "hidden": ["submitterEmail", "staffHomeAddress"]
}
Send only when conditions are met
Sometimes a notification should go out only in certain cases, like emailing a finance approver only when an amount is over a threshold. Click Add Send Rule? on the notification to open the Notification Send Rule editor.
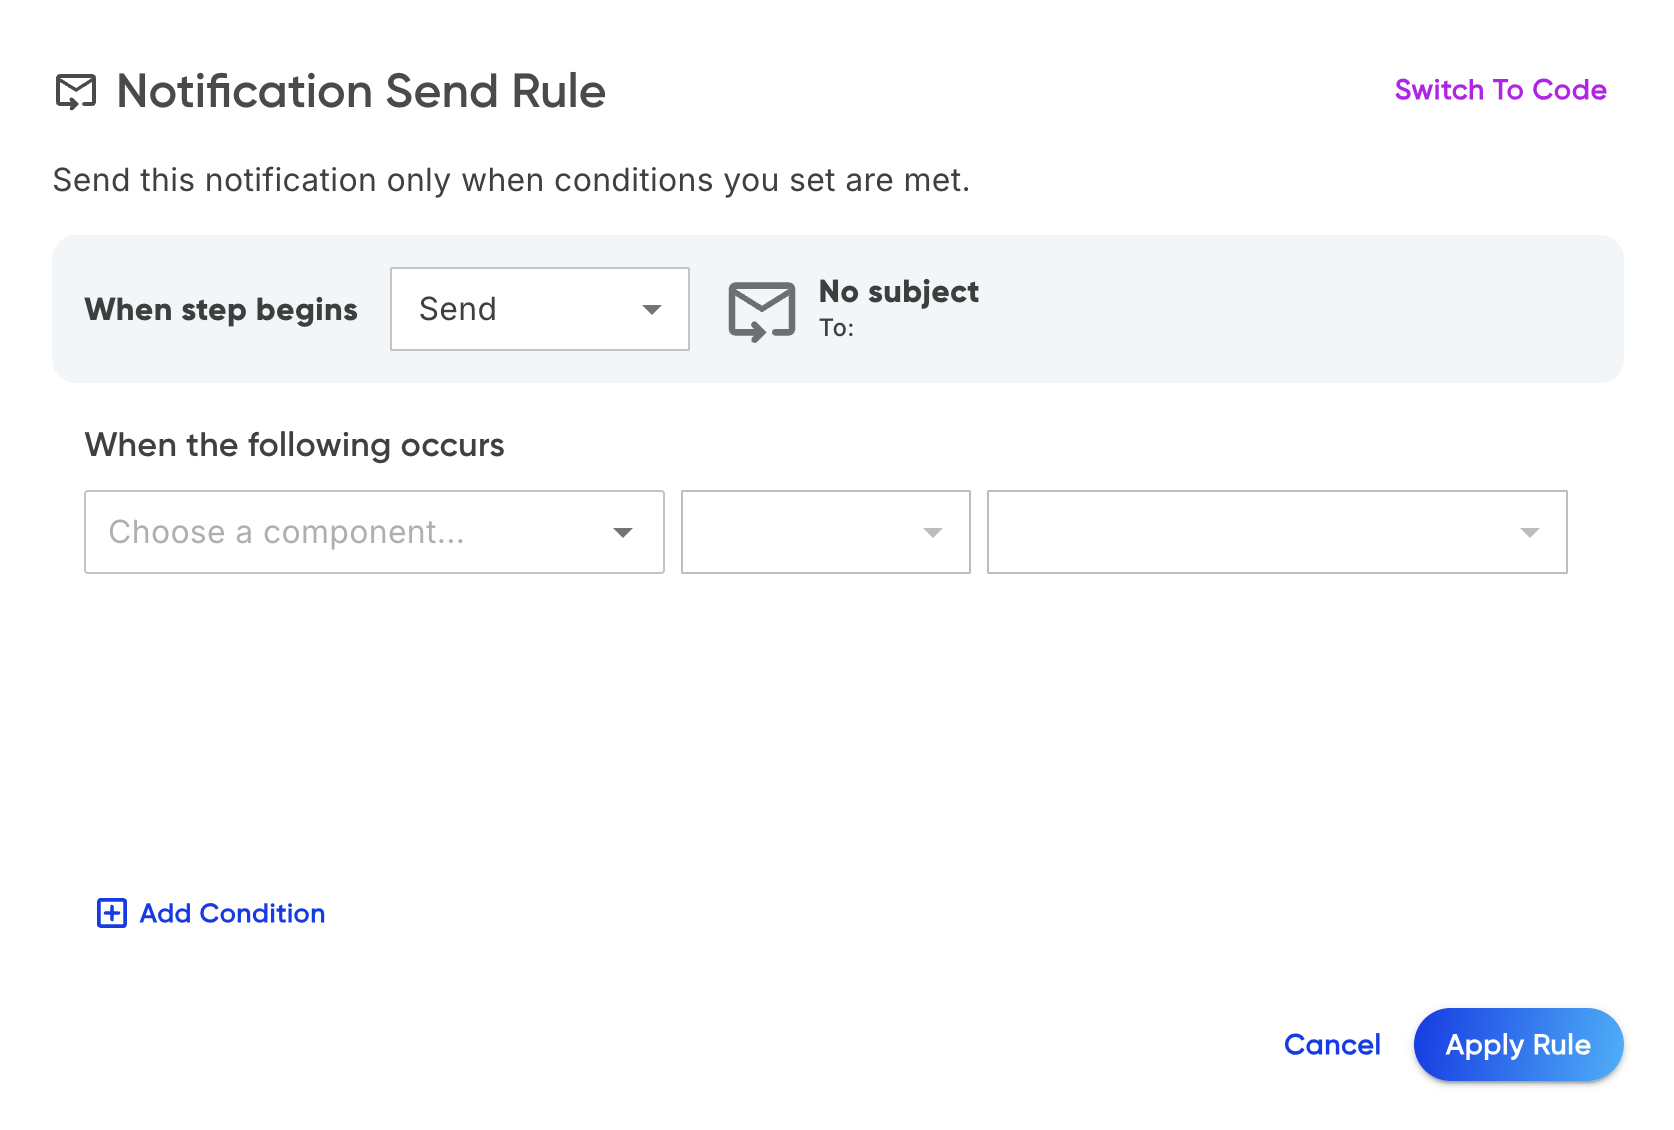
Set the rule to Send the notification when the conditions are met (or to hold it back).
Under When the following occurs, pick a component, an operator, and a value, for example Requested amount is greater than 75,000. Click + Add Condition to require more than one.
Click Apply Rule. The notification now sends only when the submission matches.
Need logic the builder cannot express? Choose Switch To Code in the send rule editor to write the condition as an expression. See the advanced section below.
Attach a PDF of the submission
To include a full PDF copy of the submission with the email, turn on the Attach PDF of Submission toggle at the top right of the notification. This is handy for recipients who want a record on file or who are not Droplet users.
The PDF reflects the submission at the moment the email sends, so attach it on a step that runs after the relevant fields are filled in.
The file name of the attached PDF is set automatically by Droplet and can’t be renamed, either in the builder or in code. If recipients need to tell attachments apart, add identifying details, such as the request title or submitter’s name, to the email’s subject line using dynamic fields.
The toggle attaches a standard PDF, the same copy a recipient would get from a basic export. To control exactly what that PDF includes, such as embedding uploaded files or adding the activity log, configure the attachment in code. See Control what the attached PDF includes below.
Advanced: edit notifications in code
Implementation Managers and builders working in the Code Builder can author notifications directly. Each step's notifications live under an onEnter key, which can hold a single notification or an array of them.
{
  "managerReview": {
    "onEnter": [
      {
        "type": "assignment",
        "template": {
          "subject": "Approval needed: ##requestTitle##",
          "body": "<p>Hi ##recipientFirstName##, ##submittedByName## has submitted a request that needs your approval.</p><p><a href='##assignmentUrl##'>Review & Confirm</a></p>"
        }
      },
      {
        "template": {
          "subject": "Large request flagged for finance",
          "body": "<p>A request over threshold was submitted. <a href='##submissionUrl##'>View it</a>.</p>"
        },
        "recipients": [
          { "type": "static", "name": "Finance", "email": "finance@example.org" }
        ],
        "if": "isGreaterThan(parseFloat(requestedAmount), 75000)"
      }
    ]
  }
}
Common mistakesendToSubmitter, recipients, type, and if are siblings of template, not properties inside it. The template object holds only subject and body. Nesting any of the others inside template causes an import error.
The interpolation tokens map directly to the dynamic fields above:
| Token | Inserts |
|---|---|
##recipientFirstName## | First name of the recipient. |
##submittedByName## | The submitter's name. |
##initiatedByFullName## | Full name of the person who started the submission. |
##submissionUrl## | Read-only link to view the submission. |
##assignmentUrl## | Actionable link that opens the recipient's task. |
##_reason## | The reject or return reason text. |
##fieldId## | The value of any form field by its ID, for example ##requestTitle##. |
The builder's friendly link labels do not map one to one onto these code tokens, so choose by behavior: use ##assignmentUrl## for the actionable link the assignee opens, and ##submissionUrl## for a read-only view shared with others.
Control what the attached PDF includes
The Attach PDF of Submission toggle attaches a standard PDF. In code, that toggle is the attachSubmissionPdf flag, a sibling of template on the notification. To tune what the PDF contains, add a pdfOptions object alongside it. Each key mirrors a checkbox from the manual Export to PDF dialog, so a notification can attach the same fuller PDF an admin would build by hand.
{
  "onEnter": {
    "type": "assignment",
    "template": {
      "subject": "Approval needed: ##requestTitle##",
      "body": "..."
    },
    "attachSubmissionPdf": true,
    "pdfOptions": {
      "uploadsInPdf": true,
      "privateUploads": true,
      "activityLog": true
    }
  }
}
Every option is a boolean that defaults to false, so list only the ones you want to turn on.
| Option | Adds to the PDF |
|---|---|
uploadsInPdf | The files uploaded on the submission, embedded in the PDF rather than only listed. |
privateUploads | Files from private upload fields, which are left out of the standard PDF. A field is private when step permissions hide it from the submitter, so only a reviewer or admin at a later step can add files to it. |
activityLog | The submission's activity log, showing who did what and when. |
generalInfo | The submission's general information section. |
dataVerificationKey | A data verification key for confirming the PDF is authentic. |
compactLayout | A denser layout that fits more on each page. |
reducedMargins | Narrower page margins for a tighter print. |
pdfOptions only takes effect when attachSubmissionPdf is true. Omit an option, or the whole object, to fall back to the standard PDF the toggle produces on its own.
These seven options are the full list. There is no option for renaming the attached PDF file.
Design the email with HTML
The body accepts HTML, so you can move past plain text to a branded, personalized email with a logo, a clean details panel, and a clear button. Use table-based markup for the widest email-client support. When you place the markup in the body, write it as a single-line string and use single quotes around the HTML attributes so it stays valid inside the JSON.
Get the code block for a notification
An assignment notification does not show up in the code editor until it has been customized in some way. To get a correctly formatted block to paste your HTML into:
Open the assignment notification and give it a temporary subject and body, such as Temporary Subject and Temporary Body. Any edit counts. This just marks the notification as customized so it gets written into the code.
The notification now appears under the step's onEnter, with the temporary text sitting in template.subject and template.body. That is the block you will edit.
Replace the body value with your HTML between the quotes, and swap the temporary subject for the real one. Save and import.
The same approach works for custom notifications: set them up in the builder first, then refine the HTML in the code editor.
A starter HTML template
Here is a layout some Droplet forms use: a centered card with a logo, a heading, a grey details panel, and a single call-to-action button. Replace the logo URL, heading, copy, and dynamic fields, and point the button at ##assignmentUrl## (or ##submissionUrl## for a view-only link).
<table width='100%' border='0' cellspacing='0' cellpadding='0' align='center' style='max-width: 600px; margin: auto; background-color: #ffffff; padding: 20px;'>

  <!-- Logo -->
  <tr><td align='center' style='padding-bottom: 20px;'>
    <img src='YOUR_LOGO_URL' alt='Logo' style='display: block; max-width: 200px; height: auto;'>
  </td></tr>

  <!-- Heading -->
  <tr><td align='center' style='padding-bottom: 20px;'>
    <h1 style='font-size: 26px; color: #000235; font-weight: bold; margin: 0; font-family: sans-serif;'>Action needed</h1>
  </td></tr>

  <!-- Details card -->
  <tr><td align='center' style='padding-bottom: 20px;'>
    <table width='100%' border='0' cellspacing='0' cellpadding='20' style='border: 1px solid #e0e0e0; border-radius: 10px; background-color: #f9f9f9;'>
      <tr><td align='left'>
        <p style='font-size: 16px; color: #555555; line-height: 1.5; margin: 0; font-family: sans-serif;'>
          Hi ##recipientFirstName##,<br /><br />
          ##submittedByName## has submitted a request that needs your review.<br /><br />
          <b>Item:</b> ##requestTitle##<br />
          <b>Submitted by:</b> ##submittedByName## (##submittedByEmail##)
        </p>
      </td></tr>
    </table>
  </td></tr>

  <!-- Call to action -->
  <tr><td align='center'>
    <a href='##assignmentUrl##' style='display: inline-block; padding: 12px 24px; font-size: 16px; color: #ffffff; background-color: #000235; border-radius: 6px; text-decoration: none; font-weight: bold; font-family: sans-serif;'>Review Now</a>
  </td></tr>

</table>
Keep one clear button per email. Use your district or department brand color for the heading and the button background (the template uses Droplet navy #000235), and host the logo at a stable image URL. To return a submission for fixes, swap in ##_reason## so the recipient sees why, and label the button something like Edit & Resubmit.
Tips for reliable notifications
Test by publishing, not previewing. Notifications do not send from Preview. To test them, publish the form and run a real submission through the workflow with a few internal people, then confirm the right person got the right email with the values filled in.
One job per email. A clear subject, a short body, and a single obvious link outperform a long message with several asks.
Need a hand setting up a notification? Contact the Droplet support team and we will walk through it with you.