Create a custom print view
When someone prints a submission or saves it as a PDF, Droplet normally prints the form exactly as it looks on screen. A print view lets you design the printed copy separately: leave a section off the paper, add a block that only appears in print, or replace the whole printout with a one-page summary built for a filing cabinet or a print shop counter. This is an advanced feature that lives in the Code Builder. Every block you need is in this guide to copy and adapt.
How print views work
A print view is built from two wrappers that you place around parts of your form in the Code Builder:
<View type="web">holds content that appears only on screen. It is left off the printout.<View type="print">holds content that appears only on the printout. Nobody filling out or reviewing the form sees it on screen.
Anything outside both wrappers appears in both places, which is how every form behaves today. You only wrap the parts you want to treat differently.
| Where the content sits | On screen | On the printout |
|---|---|---|
Inside <View type="web"> | Yes | No |
Inside <View type="print"> | No | Yes |
| Outside both | Yes | Yes |

The same submission on screen and on paper. Everything on the printed copy comes from the print view.
"The printout" means any printed or PDF copy of the form: printing the form or a submission from the browser, a PDF downloaded from the submissions list, and the PDF Droplet attaches to workflow notification emails. A few things never print no matter where they sit: the Submit, Reject and Save buttons, and any field that is hidden at the current step, whether by a Show/Hide rule or by the step's Visibility settings.
Three ways to use it
Leave something off the printout. Wrap one section in a web view. Instructions for submitters, internal staff notes and long policy text are common choices. This is the quickest change and needs nothing else.
Add something only to the printout. Add a print view with a block such as an "office use only" box, blank lines for a wet signature, or a cover summary. The rest of the form prints as usual.
Replace the whole printout. Wrap the entire form in a web view and build a print view from scratch: a job ticket, a claim summary with totals, or a one-page signature sheet for a long agreement.
A full replacement starts empty. It shows only what you put in it, so when you add a field to the form later, it will not print until you add it to the print view too. Leave a comment at the top of the form in the Code Builder, such as {/* Print view below: add new fields there too */}, so whoever edits the form next knows it exists.
Before you start
Open the Code Builder. In the form builder, open the ⋮ menu at the top right and choose Code Builder, then use the Form tab. If you have not used it before, see Advanced tips and tricks.
Work in a draft. Nothing changes for submitters until you publish, so you can experiment safely.
Know your field IDs. The print view refers to answers by each field's ID. Select a field in the visual builder to see its ID in the properties panel. IDs are case sensitive.
Leave a section off the printout
Find the section in the Code Builder and wrap it in a web view. Here an internal notes box stays on screen for staff but never prints:
<View type="web">
  <Section id="staffNotes">
    <Textarea id="internalNotes" label="Internal notes" />
  </Section>
</View>
Place the view directly inside <Form>, at the same level as your sections, not inside a section. A view can hold several sections, so you can wrap a run of them at once.
A field only needs hiding from the printout at certain steps? You may not need a view at all. A field set to Hidden on a step does not print at that step. See Control field visibility by step.
Add a block only to the printout
Add a print view where you want the block to appear in the printed copy. This one adds an office use box at the end of the printout:
<View type="print">
  <Section border>
    <Text>
      <p><b>For office use only</b></p>
      <p>Received by: ______________________   Date: ____________</p>
    </Text>
  </Section>
</View>
Content inside a print view prints in the position you place it, so put the view after your last section for a footer, or before your first one for a cover block.
Replace the whole printout
For a printout designed from scratch, the form takes this shape. Everything people fill out goes in the web view, the page you design for paper goes in the print view, and the action buttons stay outside both:
<Form color="#203E7C">
  <View type="web">
    {/* Every section people fill out */}
  </View>
  <View type="print">
    {/* The page you design for paper */}
  </View>
  <Actions />
</Form>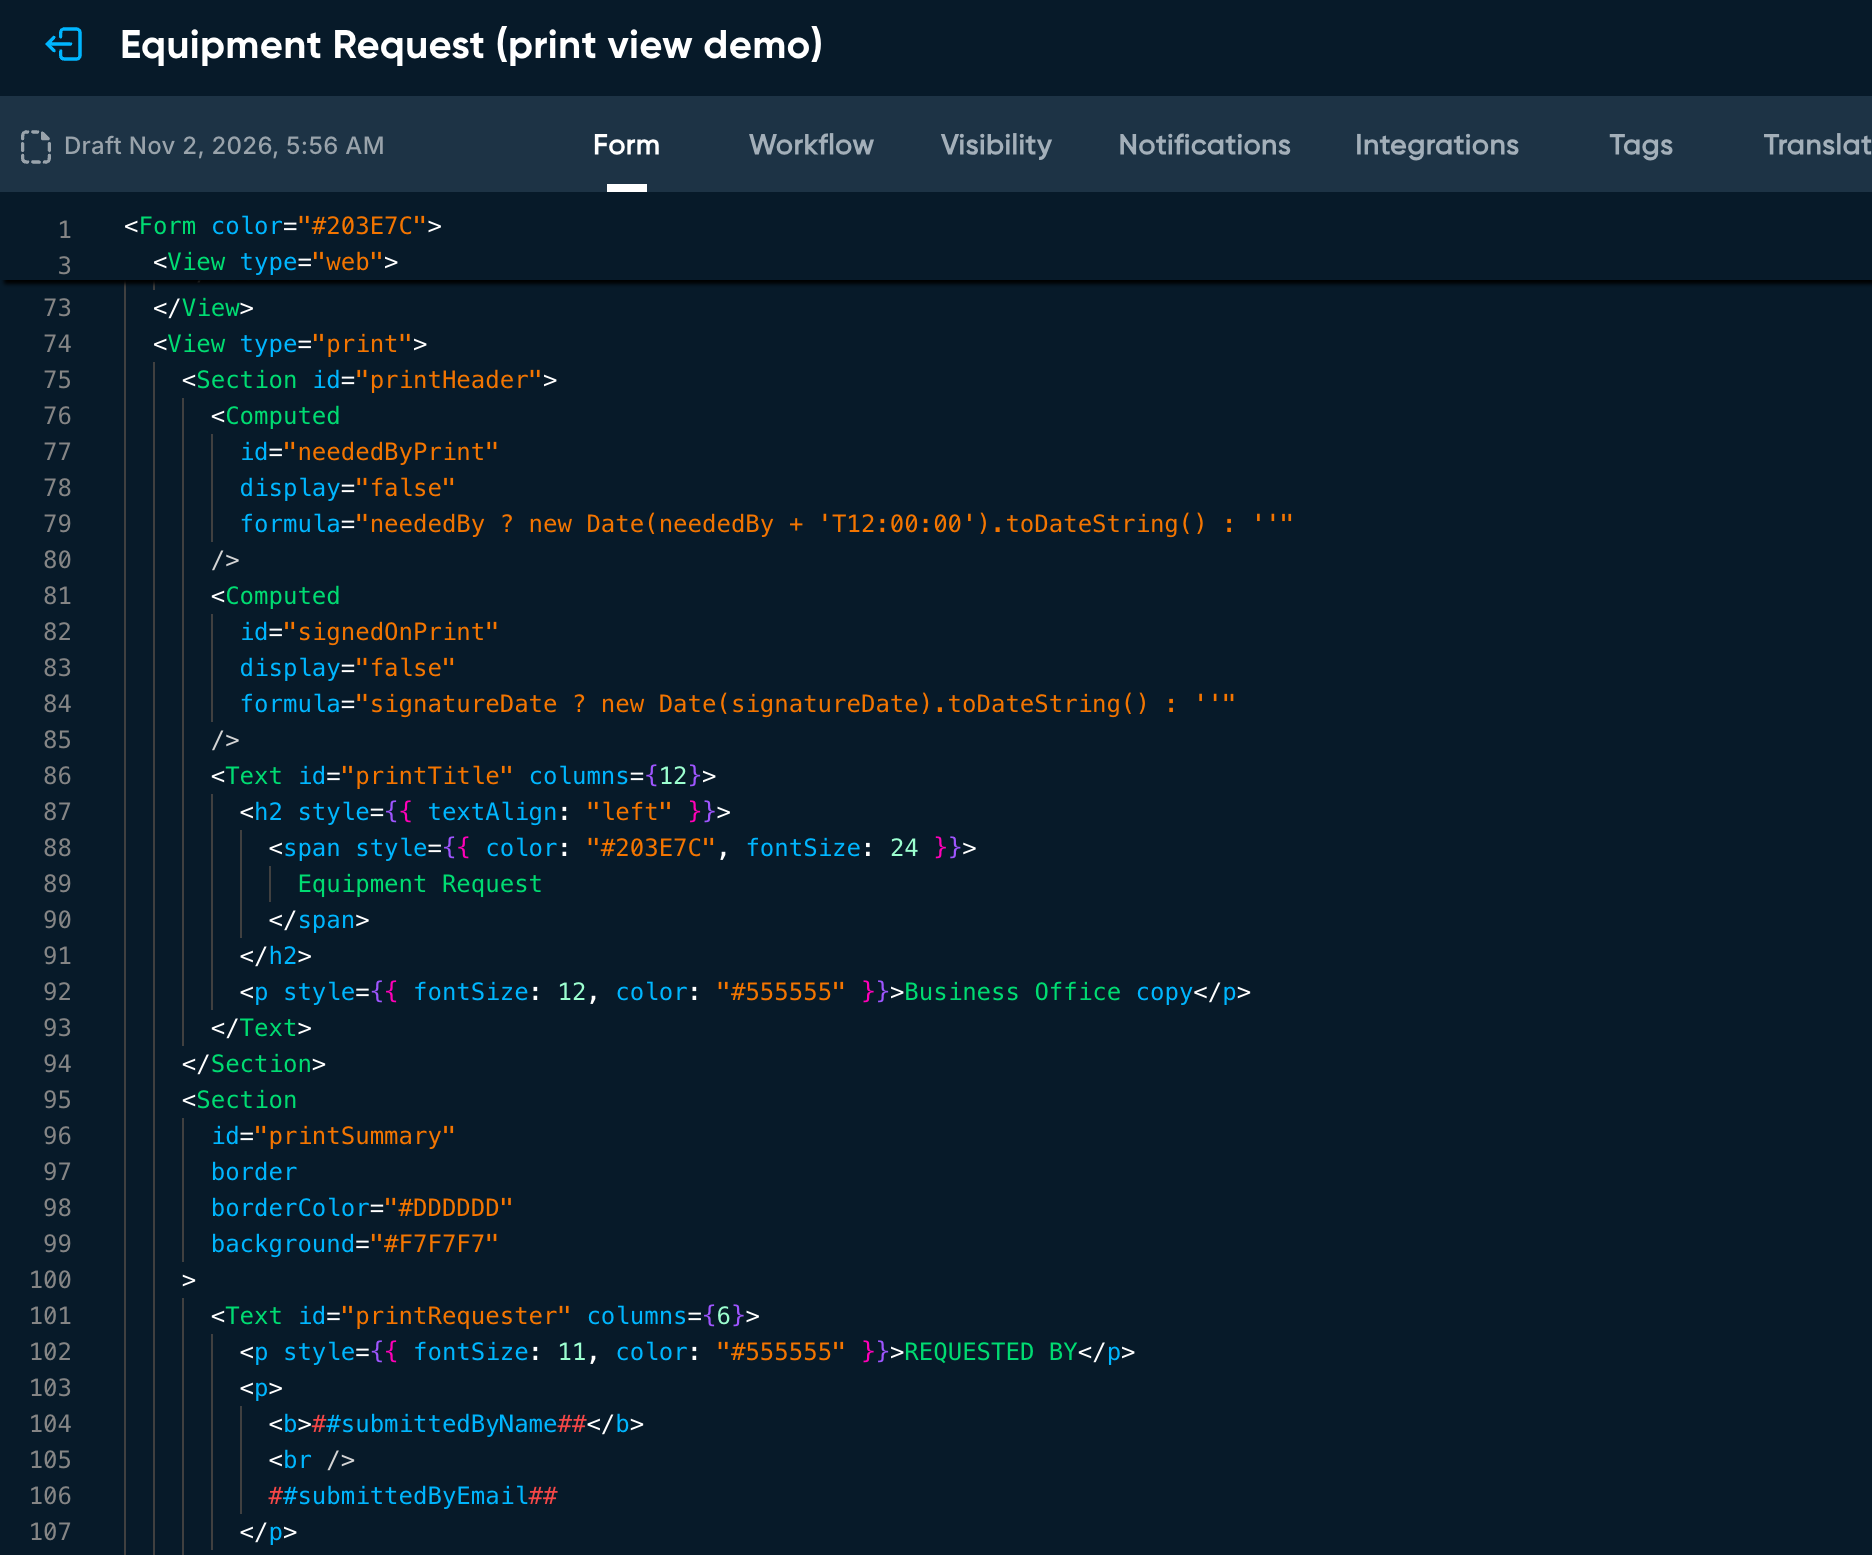
In the Code Builder, the web view closes and the print view begins. Text in the print view shows answers with ##fieldId##.
The rest of this guide builds a print view for an Equipment Request form. On screen it has these fields:
| Field | ID |
|---|---|
| Your name and email | submittedByName, submittedByEmail |
| School (Dropdown) | school |
| Date needed (Date) | neededBy |
| Items (Table) | items, with columns itemName, quantity and lineTotal |
| Signature, with its Date Signed | signature, signatureDate |
Swap in your own field IDs as you go.
Step 1: Show answers in the print view
Every ID in a form must be unique, and that includes IDs inside views. So you cannot paste a copy of a field into the print view. Instead, you display its answer. Wrap a field's ID in double hashes inside a Text block, and the printout shows that field's answer:
<Section border borderColor="#DDDDDD" background="#F7F7F7">
  <Text columns={6}>
    <p style={{ fontSize: 11, color: "#555555" }}>REQUESTED BY</p>
    <p><b>##submittedByName##</b><br />##submittedByEmail##</p>
  </Text>
  <Text columns={6}>
    <p style={{ fontSize: 11, color: "#555555" }}>SCHOOL</p>
    <p><b>##school##</b></p>
  </Text>
</Section>
Two other ways to bring answers in:
A labeled value. A Computed field whose formula is just another field's ID prints that answer under a label of your choosing, styled like a regular field. Give it a new ID; adding
Printto the end is an easy convention:<Computed id="schoolPrint" label="School" columns={6} formula="school" />One table row. To print a single cell, name the table, the row number (counting from 0) and the column:
##items.0.itemName##is the first row's item name.
Step 2: Format dates and other values
Double hashes print the answer exactly as it is stored, which for dates and timestamps is not always friendly. Add a hidden Computed field that formats the value, then print the Computed field instead:
<Computed
  id="neededByPrint"
  display="false"
  formula="neededBy ? new Date(neededBy + 'T12:00:00').toDateString() : ''"
/>
<Computed
  id="signedOnPrint"
  display="false"
  formula="signatureDate ? new Date(signatureDate).toDateString() : ''"
/>
Both print as, for example, Fri Oct 30 2026. The 'T12:00:00' on the Date field keeps the day from shifting back by one in time zones behind UTC. Put helper fields like these in any section of the print view; display="false" keeps them out of sight while they still calculate. For more on formulas, see Formulas and computed fields.
Step 3: Add a table
When a table prints, typed-in cells are cut off at the column's width, while calculated columns wrap onto extra lines. For a table with long entries, the print view can hold a read-only copy whose columns read each row from the original table:
<Section>
  <Table
    id="itemsPrint"
    label="Items requested"
    displayRows="Array.isArray(items) ? items.length : 0"
  >
    <TableColumn id="itemNamePrint" label="Item" width={60} formula="itemName[getCurrentRowIndex()]" />
    <TableColumn id="quantityPrint" label="Qty" width={15} align="center" formula="quantity[getCurrentRowIndex()]" />
    <TableColumn id="lineTotalPrint" label="Total" width={25} align="right" formula="lineTotal[getCurrentRowIndex()]" />
  </Table>
</Section>displayRowsgives the copy exactly as many rows as the original has.In each formula, the original column's ID followed by
[getCurrentRowIndex()]reads that column's value for the matching row.Every column ID needs to be new, just like any other ID. A table must sit directly inside a section.
See Use the Table component for the rest of the table options.
Step 4: Show signatures
Signers type their name and adopt it as their signature. To print it in a handwriting-style font, wrap the signature field's ID in a span styled with the signature font, and print the formatted date beside it:
<Section>
  <Text columns={8}>
    <p style={{ fontSize: 11, color: "#555555" }}>Requester signature</p>
    <p><span style={{ fontFamily: "signature", fontSize: 26 }}>##signature##</span></p>
  </Text>
  <Text columns={4}>
    <p style={{ fontSize: 11, color: "#555555" }}>Date signed</p>
    <p>##signedOnPrint##</p>
  </Text>
</Section>
Each signature on the form works the same way, so an approval section can list the requester, the principal and the business office one under another. To print an approver's block only once they have signed, add display="principalSignature" (using that signature's ID) to the Text or to a Tile around it.
Step 5: Lay out the page
A print view uses the same layout components as the rest of the form, so everything you know about sections and tiles carries over (see Use layout components):
Columns, boxes and dividers. Split a section into columns with
columnson each Text or Tile (12 is the full width). Addborder,borderColorandbackgroundto a Section or Tile for boxes and shaded panels, and use<Line />or<Line vertical />for dividers. Background colors print as they appear.A logo. Copy the
<Image>tag from the top of your form into the print view. If it has anid, give the copy a new one.Text styling. On
<p>and<div>you can setfontSize,color,textAlignandfontFamily. Headings taketextAlignonly, so style a span inside them instead:<h2 style={{ textAlign: "center" }}><span style={{ fontSize: 22 }}>Equipment Request</span></h2>. The font choices aresansSerif1,sansSerif2,serif1,serif2,monospaceandsignature.Page breaks.
<Pagebreak />(the PDF Page Break in the visual builder) starts a new printed page. Wrap it in a Group with adisplayrule to break only when needed, for example when a long table would otherwise split a signature block:<Group display="Array.isArray(items) && items.length > 10"><Pagebreak /></Group>Content that depends on answers or the step. Anything in a print view can take a
displayrule. Print an "Approved" banner only once the request is complete withdisplay="currentStep() === 'completed'", or print a non-standard choice in bold with two Text blocks, one for each case.
Preview and test your print view
A print view never shows on screen, including in the form builder. To see it:
Preview the form and fill in every field your print view uses, including a table with several rows and a signature. Empty fields print as blanks, which makes problems hard to spot.
With the form or the submission open, press Ctrl + P on Windows or Cmd + P on a Mac. The preview shows exactly what prints. Close it without printing to keep editing.
Download the test submission as a PDF and check it too, along with any step where the printout should change. See Download a PDF of a submission.
Frequently asked questions
I added a field, and it does not show up on the printout. Why?
Your form probably has a full replacement print view, with the rest of the form inside a web view. A replacement only prints what you put in it. Add the new answer to the print view with ##fieldId## or a Computed field.
The Code Builder will not accept my print view. What is wrong?
The most common cause is a repeated ID: a field, table, column or other element pasted into the print view with the same ID as the original. Give every element in the print view its own ID. Also check that each view sits directly inside <Form> and each table sits directly inside a section.
A value is missing from the printout. What should I check?
Check the ID between the hashes against the field's ID in the properties panel, including capital letters, and make sure there are exactly two hashes on each side. If the ID is right, the field may be empty, or set to Hidden at the step you are printing from. Elements inside a print view follow the same Visibility settings as the rest of the form.
Can the printout change from one step to the next?
Yes. Add a display rule with currentStep() to any section, tile or text in the print view, for example to print approval details only once the request reaches its final step. Step Visibility settings also apply to everything in the print view.
Can I hide something from the printout without building a print view?
Yes. Wrapping a single section in <View type="web"> is all it takes, and you do not need a print view to go with it. If it only needs hiding at certain steps, setting the field to Hidden on those steps works too.
Can I build a print view in the visual builder?
No. Views are set up in the Code Builder only. Once they exist, you can keep editing the fields inside the web view in the visual builder as usual.
Where to go next
- Download a PDF of a submission › compact layout, margins and other download options.
- Use layout components › sections, tiles, groups and the PDF Page Break.
- Use Show/Hide field rules › the same rules work on anything in a print view.
- Advanced tips and tricks › more Code Builder options, including
##fieldId##in text.