Advanced tips and tricks
A grab bag of lesser-known, genuinely useful form options. Most of these are not in the visual builder's properties panel: you set them in the Code Builder, where each component is a tag you can add props to.
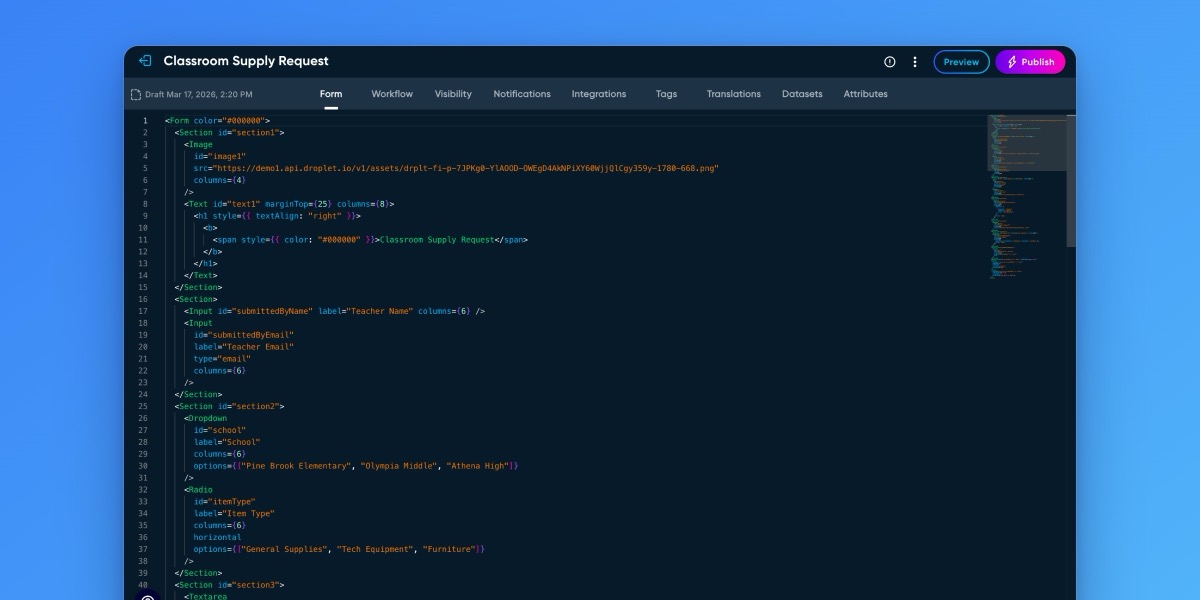
Open the Code Builder
Several of the tricks below are props that the drag-and-drop builder does not expose. To reach them, open the Code Builder: in the form editor, click the ⋮ (more actions) menu in the top bar and choose Code Builder, or press ⌥ ⇧ C.
The Code Builder shows your form as a set of tags, one per component. Each field has an id and a label; you add the props below right alongside them.
<Input id="teacherName" label="Teacher Name" columns={6} />Changes you make in the Code Builder and the visual builder are two views of the same form, so you can switch back and forth. Edits save to your draft just like any other change.
Give a field a default value
Add initialValue to start a field with a value already filled in. The submitter can still change it (as long as the field is editable).
<Input id="grade" label="Grade level" initialValue="Not specified" />- Pre-select a choice
- For a Dropdown or Checkboxes field, pass the value(s) as an array: initialValue={["General Supplies"]}.
- Start a True/False checked
- On a True/False field (<Boolean> in code), add initialValue on its own, with no value, to start it checked. Leave it off to start unchecked.
<Boolean id="agreeToTerms" label="I agree to the terms" initialValue />
Looking to fill fields from a link instead of hard-coding a default? See Prefill form fields with URL parameters.
Clear a field when it gets hidden
By default, when a Show/Hide rule hides a field, whatever the user already typed in it is kept and still submitted. That is often not what you want: a follow-up answer that no longer applies should go away with the field.
Add the clear prop so the field's value resets the moment it is hidden:
<Textarea id="techJustification" label="Technology justification" clear />Now if the field shows only when "Tech Equipment" is selected, switching to a different option both hides the field and wipes its answer, so no stale data is left behind.
Do the opposite for a hidden field you fill through the link. If you prefill a hidden field with a URL parameter (for source tracking, routing, and the like), leave clear off, or the value is wiped as soon as the field hides.
Show another field's value inside text
Wrap a field's id in double hashes to drop its live value into a label, a Text block, a hint, or an email. The value updates as the user types.
<Text id="greeting">Thanks, ##submittedByName##, your request is almost done.</Text>This is handy for personalized confirmations, dynamic section headings, and labeling repeated fields (for example, an upload labeled with the row it belongs to). The same ##fieldId## syntax works in workflow notification subjects and bodies.
Add a Reason Block
When a submission is sent back for corrections or outright rejected, a reason is required and is sent to the submitter via email notification. Creating a reason block on the form itself will give the submitter clear feedback they can take action on immediately, while only appearing when needed.
Drag on a Tile component toward the top of your form — wherever you'd like for this message to appear. Set the width to 12 columns and a background color on the tile that fits your form's aesthetic.
Add the Text Component to the tile and set its width to 12. Then, use this as the text content:
This submission was flagged for changes. Please ensure the following is addressed and then resubmit:
##_reason##
The Reason for Action text that the approver included when they sent this submission back will be populated in place of ##_reason##
Select the Tile, click "Show/hide field?" to edit the display logic. Click "Switch to Code" and paste this. Then click "Apply Rule".
typeof _reason !== 'undefined'This will show the tile if there is a reason for rejection or sending back. Otherwise, this tile will remain hidden.
If you want a reason block for rejection and corrections, follow the same steps to create a second block. Then edit the display logic to show only when there is a reason and a specific workflow step.
For the corrections reason block display logic, use:
typeof _reason !== 'undefined' && ['start'].includes(currentStep())For the rejection reason block display logic, use:
typeof _reason !== 'undefined' && ['rejected'].includes(currentStep())Ensure you are using the correct workflow step ID (i.e. rejected, start, adminApproval). To find/edit the workflow step ID, enter the Code Editor using the upper-right switch and select the Workflow tab. There, you can view and adjust the step ID references.
There are two ways to Send Back for corrections: creating a corrections workflow route and using the Send Back action on an individual submission.
The reason block works for both!
Right-align numbers in a table
The align prop on a table column only takes effect on calculated columns, the ones that have a formula or a fixed values list. On a plain free-entry column it is ignored, so leave it off there. Right-aligning a money or total column keeps the decimals lined up.
<TableColumn id="lineTotal" label="Total" formula="qty * price" align="right" />Add a video to your form
Droplet does not have a dedicated Video component. Videos are added using the Html layout component, which renders raw HTML. There are two supported patterns depending on where your video lives: a self-hosted file (uploaded as a Droplet asset, or hosted elsewhere) or a web-hosted video (YouTube, Vimeo, etc.).
Format matters! If you are uploading your own video file, it must be .mp4.
Self-Hosted Video File
Convert your source file to .mp4 if it is not already.
In the form-builder, click the three dots in the upper right corner and click Upload Asset. Once you've uploaded your video, its URL is automatically copied.

Add a Custom HTML component to your form. Under its properties, click into the HTML Editor.
Delete what is there. Copy and paste this HTML block, replacing the template source URL with your own.
<video width="100%" height="360" controls><source src="PASTE YOUR URL HERE"/></video>Web-Hosted Video
Follow the steps 1-3 from above, but add this code instead, replacing the template source URL with your own.
Where to go next
Several nuances are big enough to have their own guide:
Prefill form fields with URL parameters › open a form with fields already filled, or pass hidden tracking data.
Use Show/Hide field rules › show or hide fields based on other answers (pairs with clear).
Formulas and computed fields › calculate values from other fields.
Use Validation rules › require or constrain what people can enter.