Schedule reminder emails
Sometimes an approval sits untouched because the approver's first email got buried. A scheduled reminder nudges them automatically: if a submission is still waiting on a step after a number of days you choose, Droplet sends a follow-up, and can keep sending on a cycle until the step is done. You set it up right inside the workflow builder, alongside the step's other notifications, with no code involved. If you prefer to work in code, or have a long workflow to cover, the same reminders can be added in the Code Builder, and this guide walks through both.
How it works
A reminder belongs to a workflow step and goes to the person that step is assigned to. When a submission arrives on the step, the clock starts. If the step is still incomplete after the wait you chose, Droplet emails the assignee. Add a repeat and the reminder keeps going out on that cycle for as long as the submission is still sitting on the step. Once the assignee completes the step, there is nothing left to remind them about, and no more reminders send.
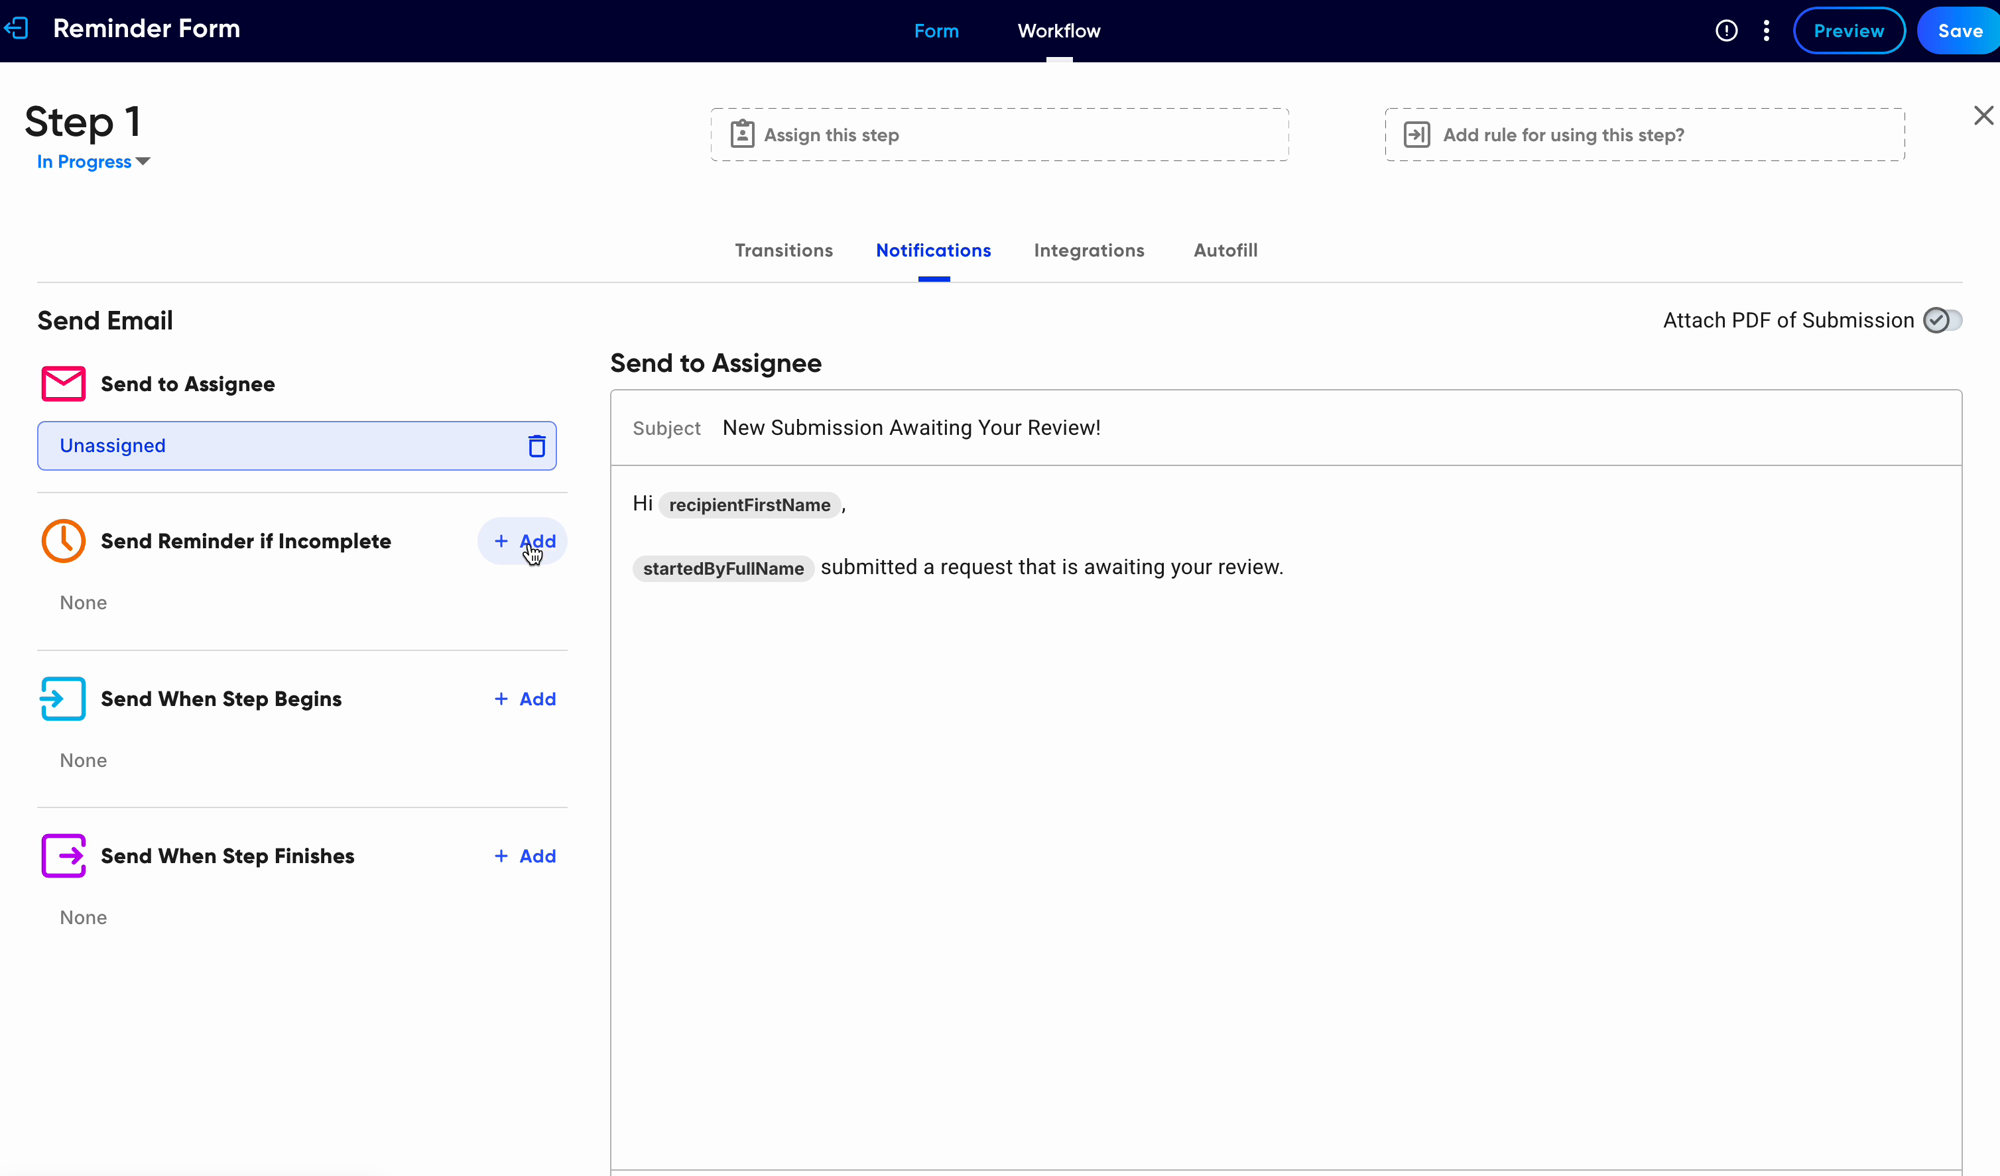
Reminders live in the step's Notifications tab, in a section called Send Reminder if Incomplete. It sits alongside the other emails a step can send: Send to Assignee, Send When Step Begins, and Send When Step Finishes. If you have set up reminders on packets or eSign documents, the timing controls will look familiar.
There are two ways to set a reminder up, and both produce the same result. The visual builder, covered in Steps 1 through 4 below, suits most forms. The Code Builder, covered after that, is quicker when a form has many steps, and it is where you set timing in minutes or hours.
Reminders are set per step. If your workflow has three approval steps and you want reminders on all three, repeat this setup on each one. For a long workflow, pasting the reminders in through the Code Builder is usually faster.
Before you start
Work in a draft. Open the form in the builder and create a new draft if you are viewing a published version. Nothing you change takes effect until you publish, so you can set this up safely and review it first. New to the builder? Start with Create and edit a form and Configure workflows.
Make sure the step is assigned. Reminders go to the step's assignee, so a step that shows Unassigned has nobody to remind. Set who the step routes to first, using Assign this step.
Step 1: Open the step's Notifications tab
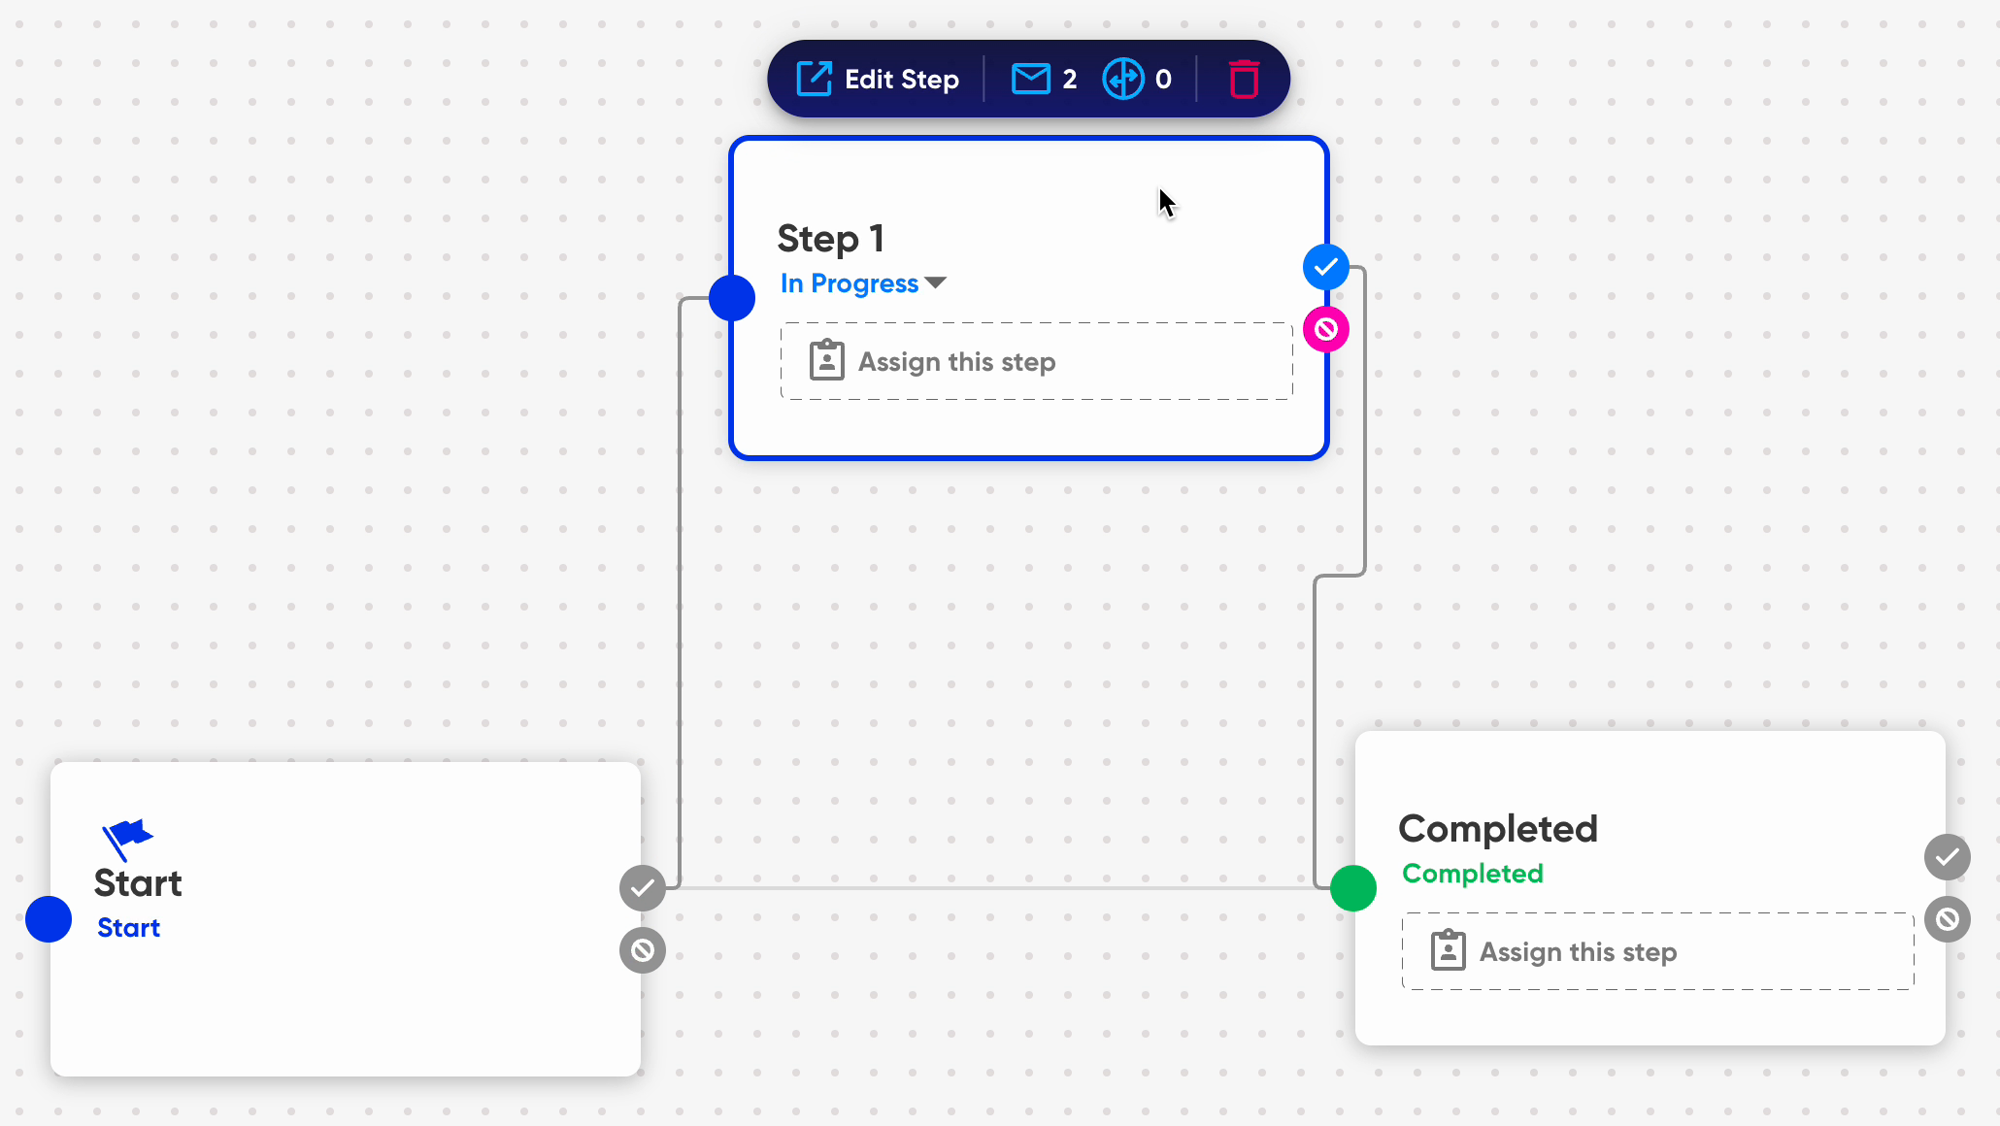
Open your form in the builder and switch to the Workflow tab at the top. Your steps are laid out on the canvas.
Hover the step you want to add a reminder to and click Edit Step. The envelope count on the toolbar shows how many notifications the step already has.
Inside the step, select the Notifications tab. The left column, under Send Email, lists the moments a step can send an email. The right side is where you edit whichever one is selected.
Step 2: Add the reminder and choose the timing
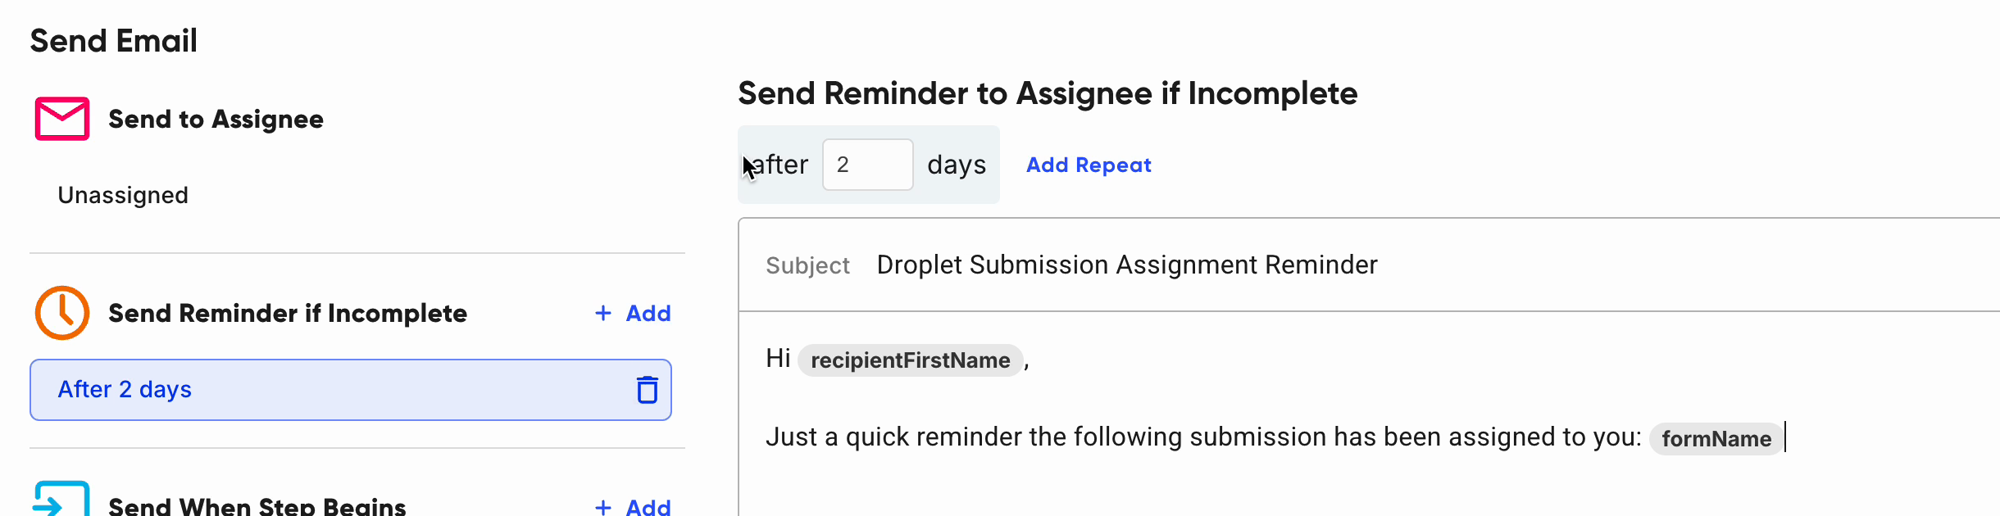
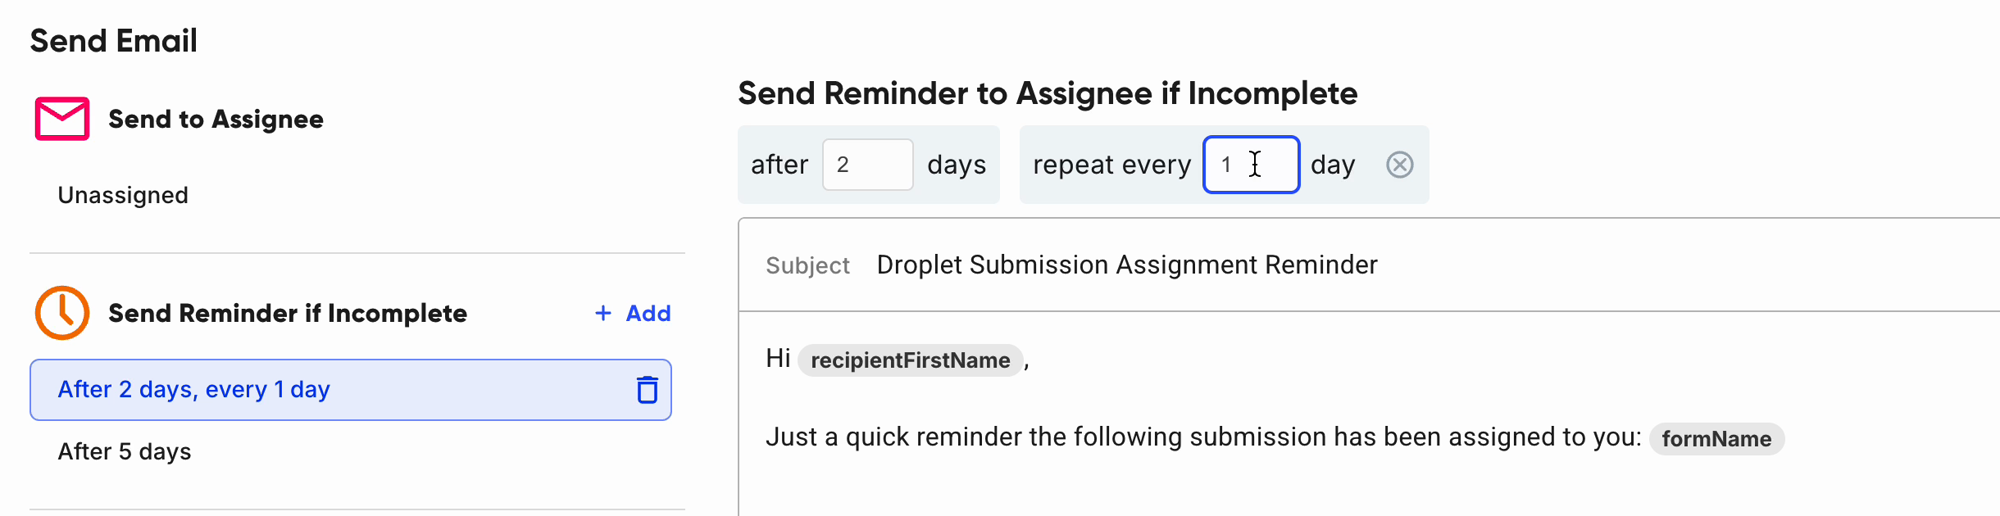
In the Send Reminder if Incomplete section, click + Add. A new reminder appears in the list, and the right side opens it under the heading Send Reminder to Assignee if Incomplete. Droplet starts every new reminder at two days.
In the after box, type how many days Droplet should wait after the submission lands on the step before sending the first reminder. Whole days only, and at least one. The summary in the left column updates to match, for example After 3 days.
Click Add Repeat and fill in repeat every. The reminder then re-sends on that cycle for as long as the submission is still waiting on the step. To stop repeating, click the circled x beside the repeat box.
Choose a repeat cycle you would be comfortable receiving yourself. For approvals that can sit a while, a first nudge after two or three days and a repeat every seven days is a sensible default.
The builder measures reminders in whole days. If you need a reminder measured in minutes or hours, set it up in the Code Builder instead; see Choosing the timing. For a reminder timed off a date field on the form, contact the Droplet support team and we will set it up with you. See Reminders marked Configured in code for how those appear afterward.
Step 3: Write the reminder email
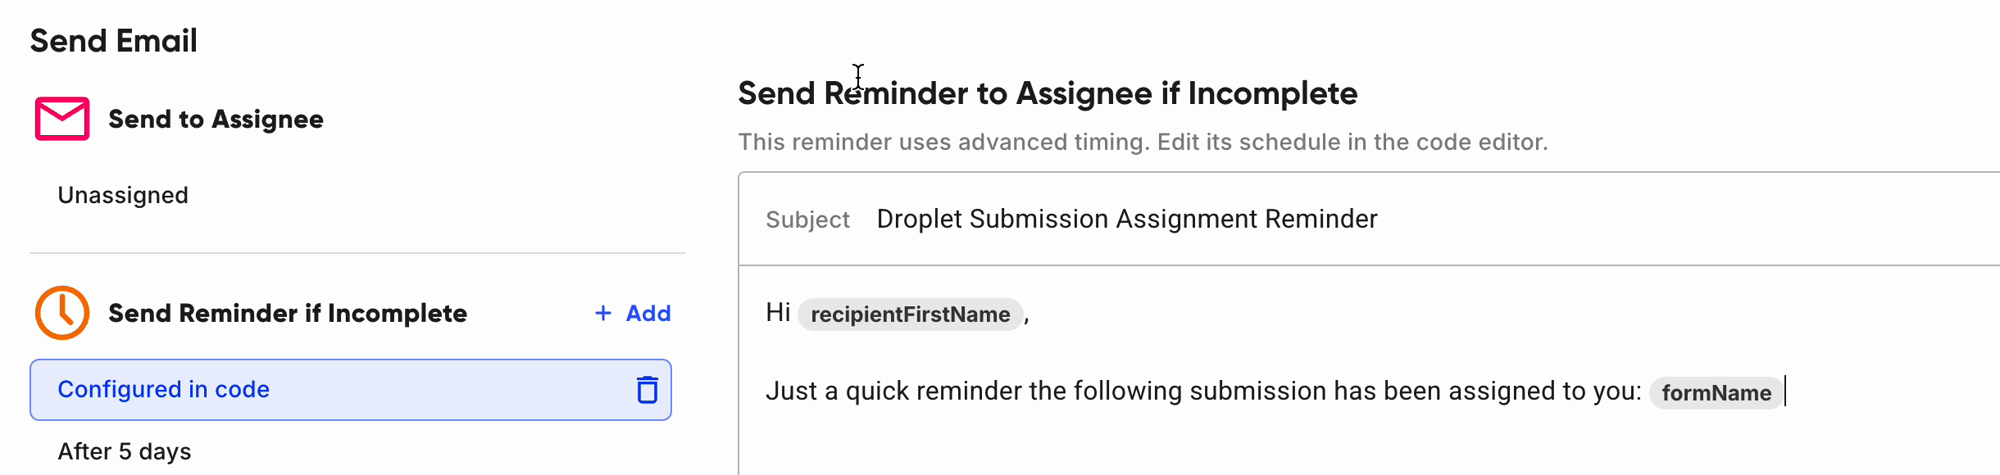
Below the timing you will find the subject and body, prefilled with Droplet's standard reminder. The subject reads Droplet Submission Assignment Reminder, and the body greets the assignee by first name and names the form. Edit both however you like. The toolbar gives you bold, italics, underline, fonts, sizes, colors, alignment, lists, and links, and Add Dynamic Field drops in live details such as the recipient's name, who started the submission, and the form's name.
Every reminder goes out in Droplet's standard email layout, which includes a button that opens the submission, so the assignee always has a way back in. If you would also like a link inside your own text, place your cursor where you want it and choose Submission URL from Add Dynamic Field.
Reminder emails never attach a PDF of the submission. The Attach PDF of Submission toggle applies to the step's other notifications.
For more on writing notifications, including dynamic fields and formatting, see Workflow notifications.
Step 4: Save, then publish
Click Save at the top right. The reminder is stored with the step, and its timing shows in the left column whenever you open the Notifications tab. Reminders only run on the published version of your form, so when you are happy with the setup, publish the draft.
Want to see one arrive before rolling it out? Set the wait to one day, publish, start a test submission that lands on the step, and leave it untouched. The reminder shows up in the assignee's inbox the next day. Then set the timing back to the real value and publish again.
Managing reminders
More than one reminder on a step. Click + Add again. Each reminder keeps its own timing and email, and each shows its own summary in the list, such as After 2 days and After 5 days, every 7 days. This is handy when an early nudge and a later escalation need different wording.
Edit a reminder. Click it in the list to open its timing and email on the right.
Delete a reminder. Click the trash icon on its row. A Notification deleted message appears briefly with an Undo option in case you change your mind. Save to make the change stick.
Add reminders in the Code Builder
Everything above can also be done in the Code Builder, the code view of your form. It is the quicker route when a workflow has many steps, because you can paste a reminder into every step in one sitting instead of opening each step in turn. It is also where you set timing the visual builder does not offer, such as minutes or hours.
Reminders added this way are the same reminders. They show up in each step's Notifications tab afterward, and you can keep editing them in either place. You do not need to be a programmer, either; every block you need is here to copy and paste.
How a reminder looks in code
In code, a reminder has two halves, and they belong to the same workflow step:
The schedule lives in the Workflow tab. It says when to send: for example, three days after the submission arrives on the step.
The email lives in the Notifications tab. It is the subject and body of the reminder itself.
The two halves are joined by a shared ID that you choose, such as supervisorReminder. The schedule points at the email by that ID, and Droplet checks the pairing when you save, so it will tell you if the two sides do not match.
Two things to know before you paste:
Know your step's name. Every workflow step has a short internal name such as
step1orsupervisor. You will see it in the Code Builder; it is the label each block of settings sits under.Copy the blocks exactly. The Code Builder speaks JSON, a structured text format that is picky about commas, quotes, and brackets. Paste the examples from this article and change only the words inside the quotation marks. If something is off, Droplet shows you an error when you save instead of accepting a broken form.
Open the Code Builder
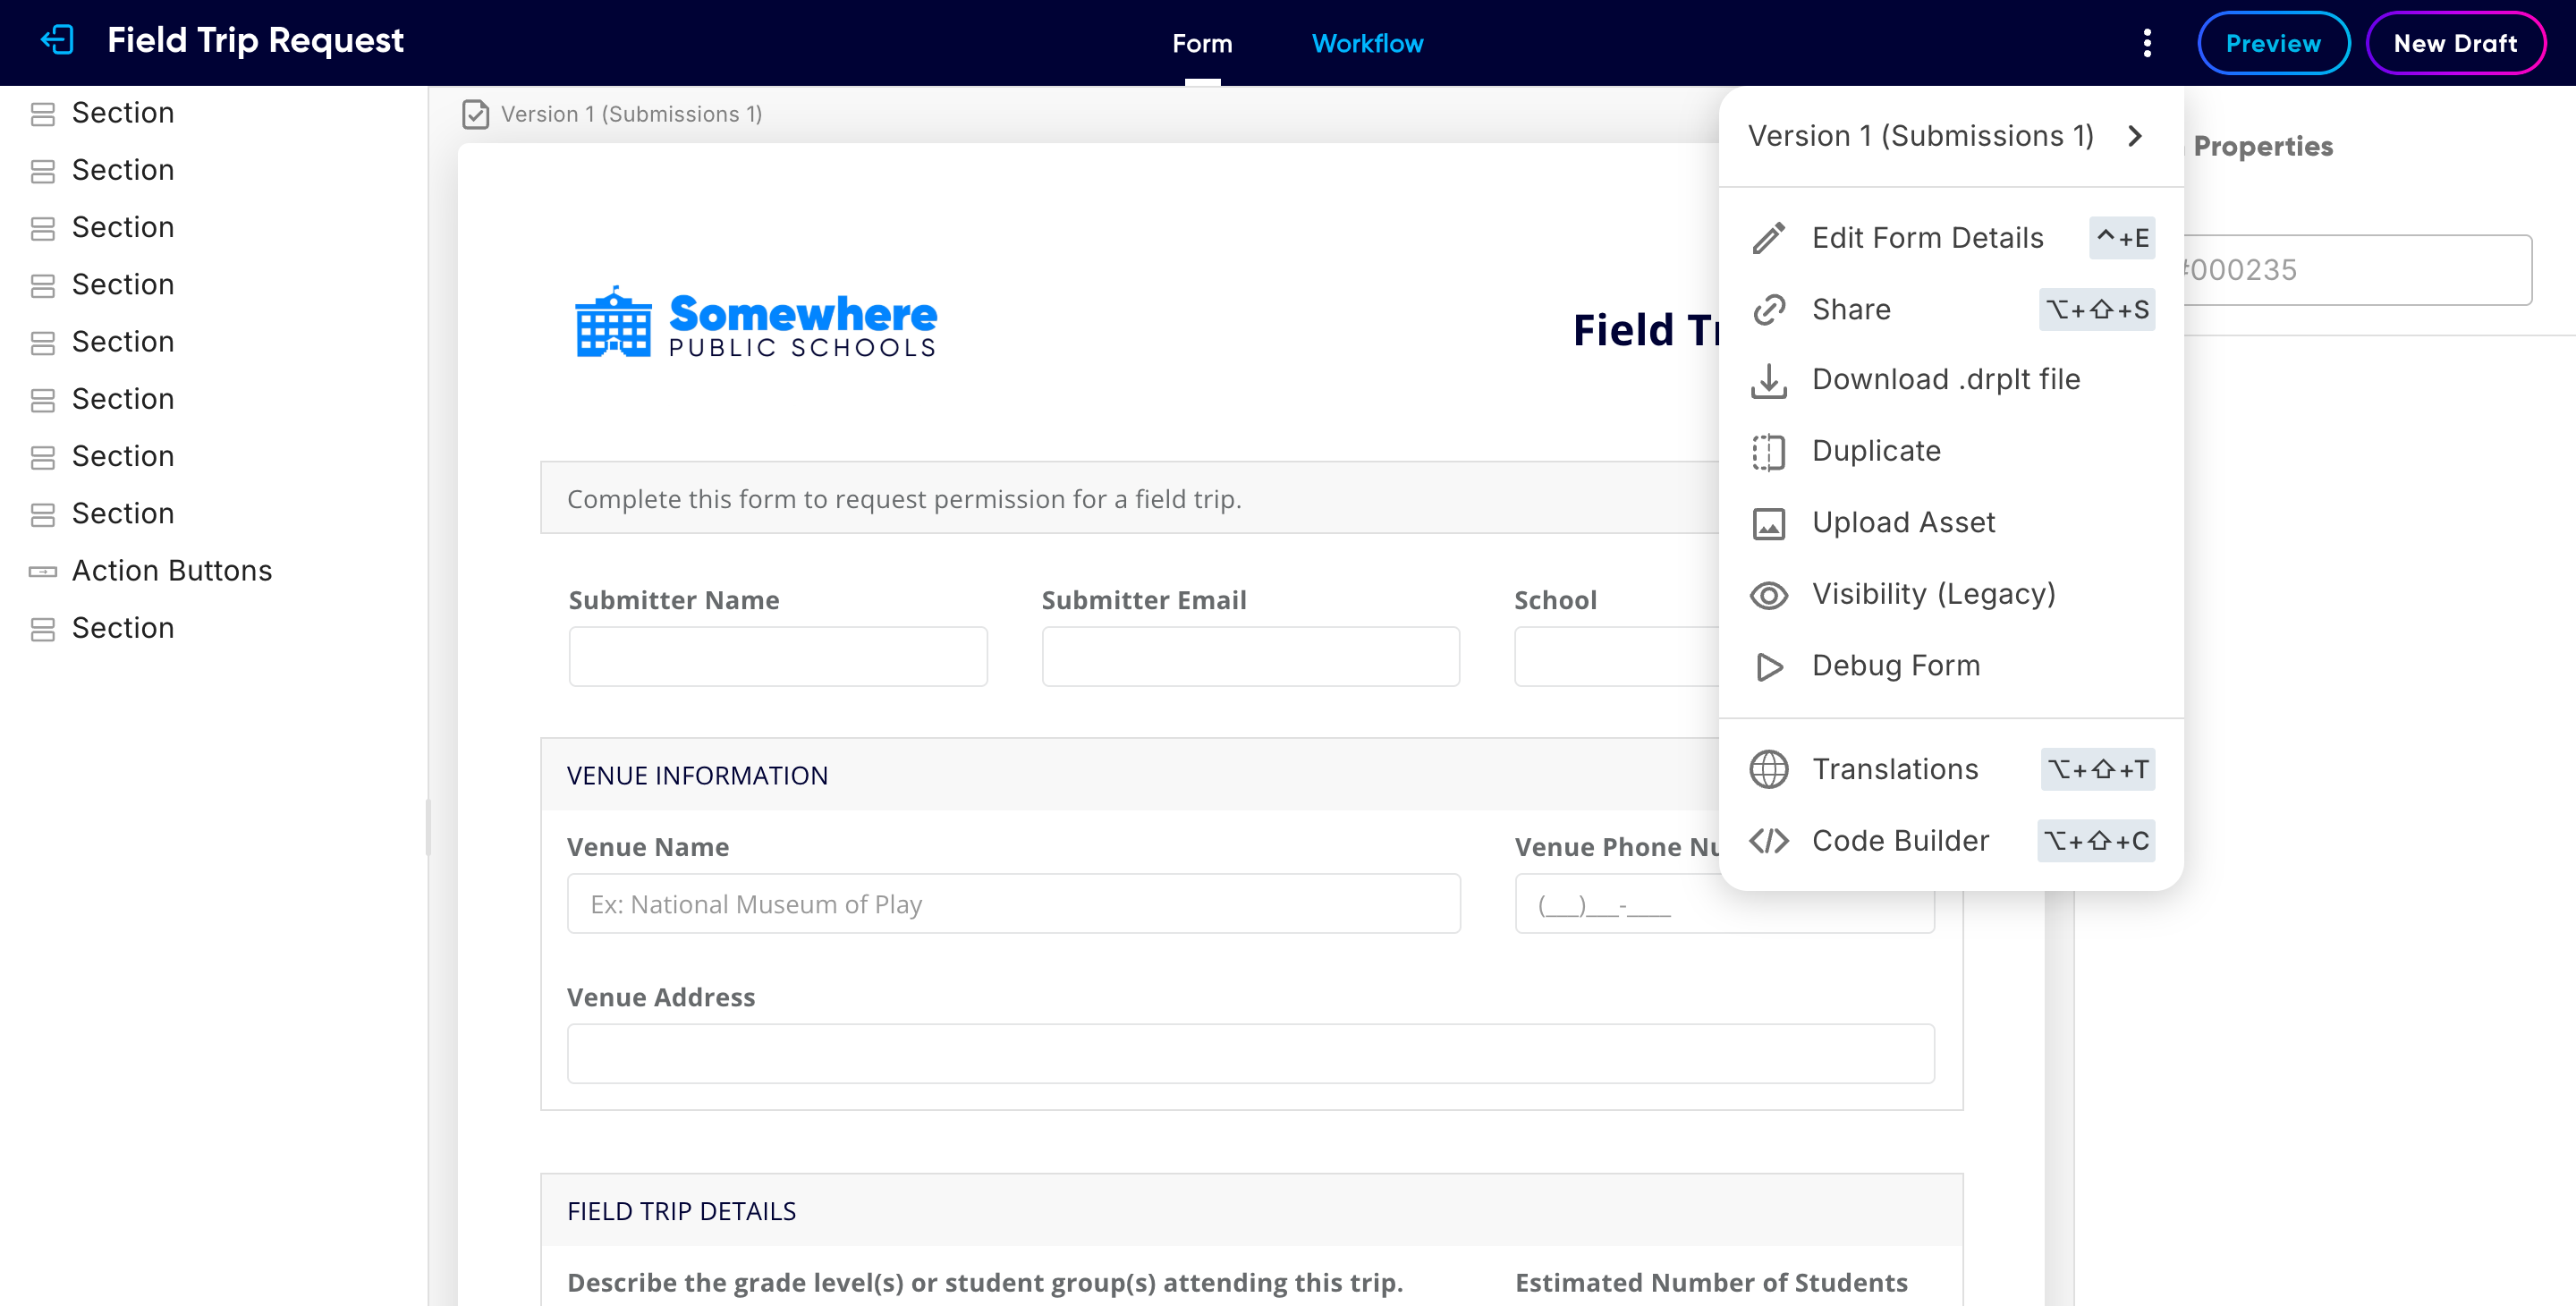
With your form open in the builder, click the ⋮ menu at the top right of the screen.
Select Code Builder at the bottom of the menu. The visual builder switches to a code view with tabs along the top: Form, Workflow, Visibility, Notifications, and more. To switch back at any time, open the same menu and choose Visual Builder.
Add the schedule to the workflow step
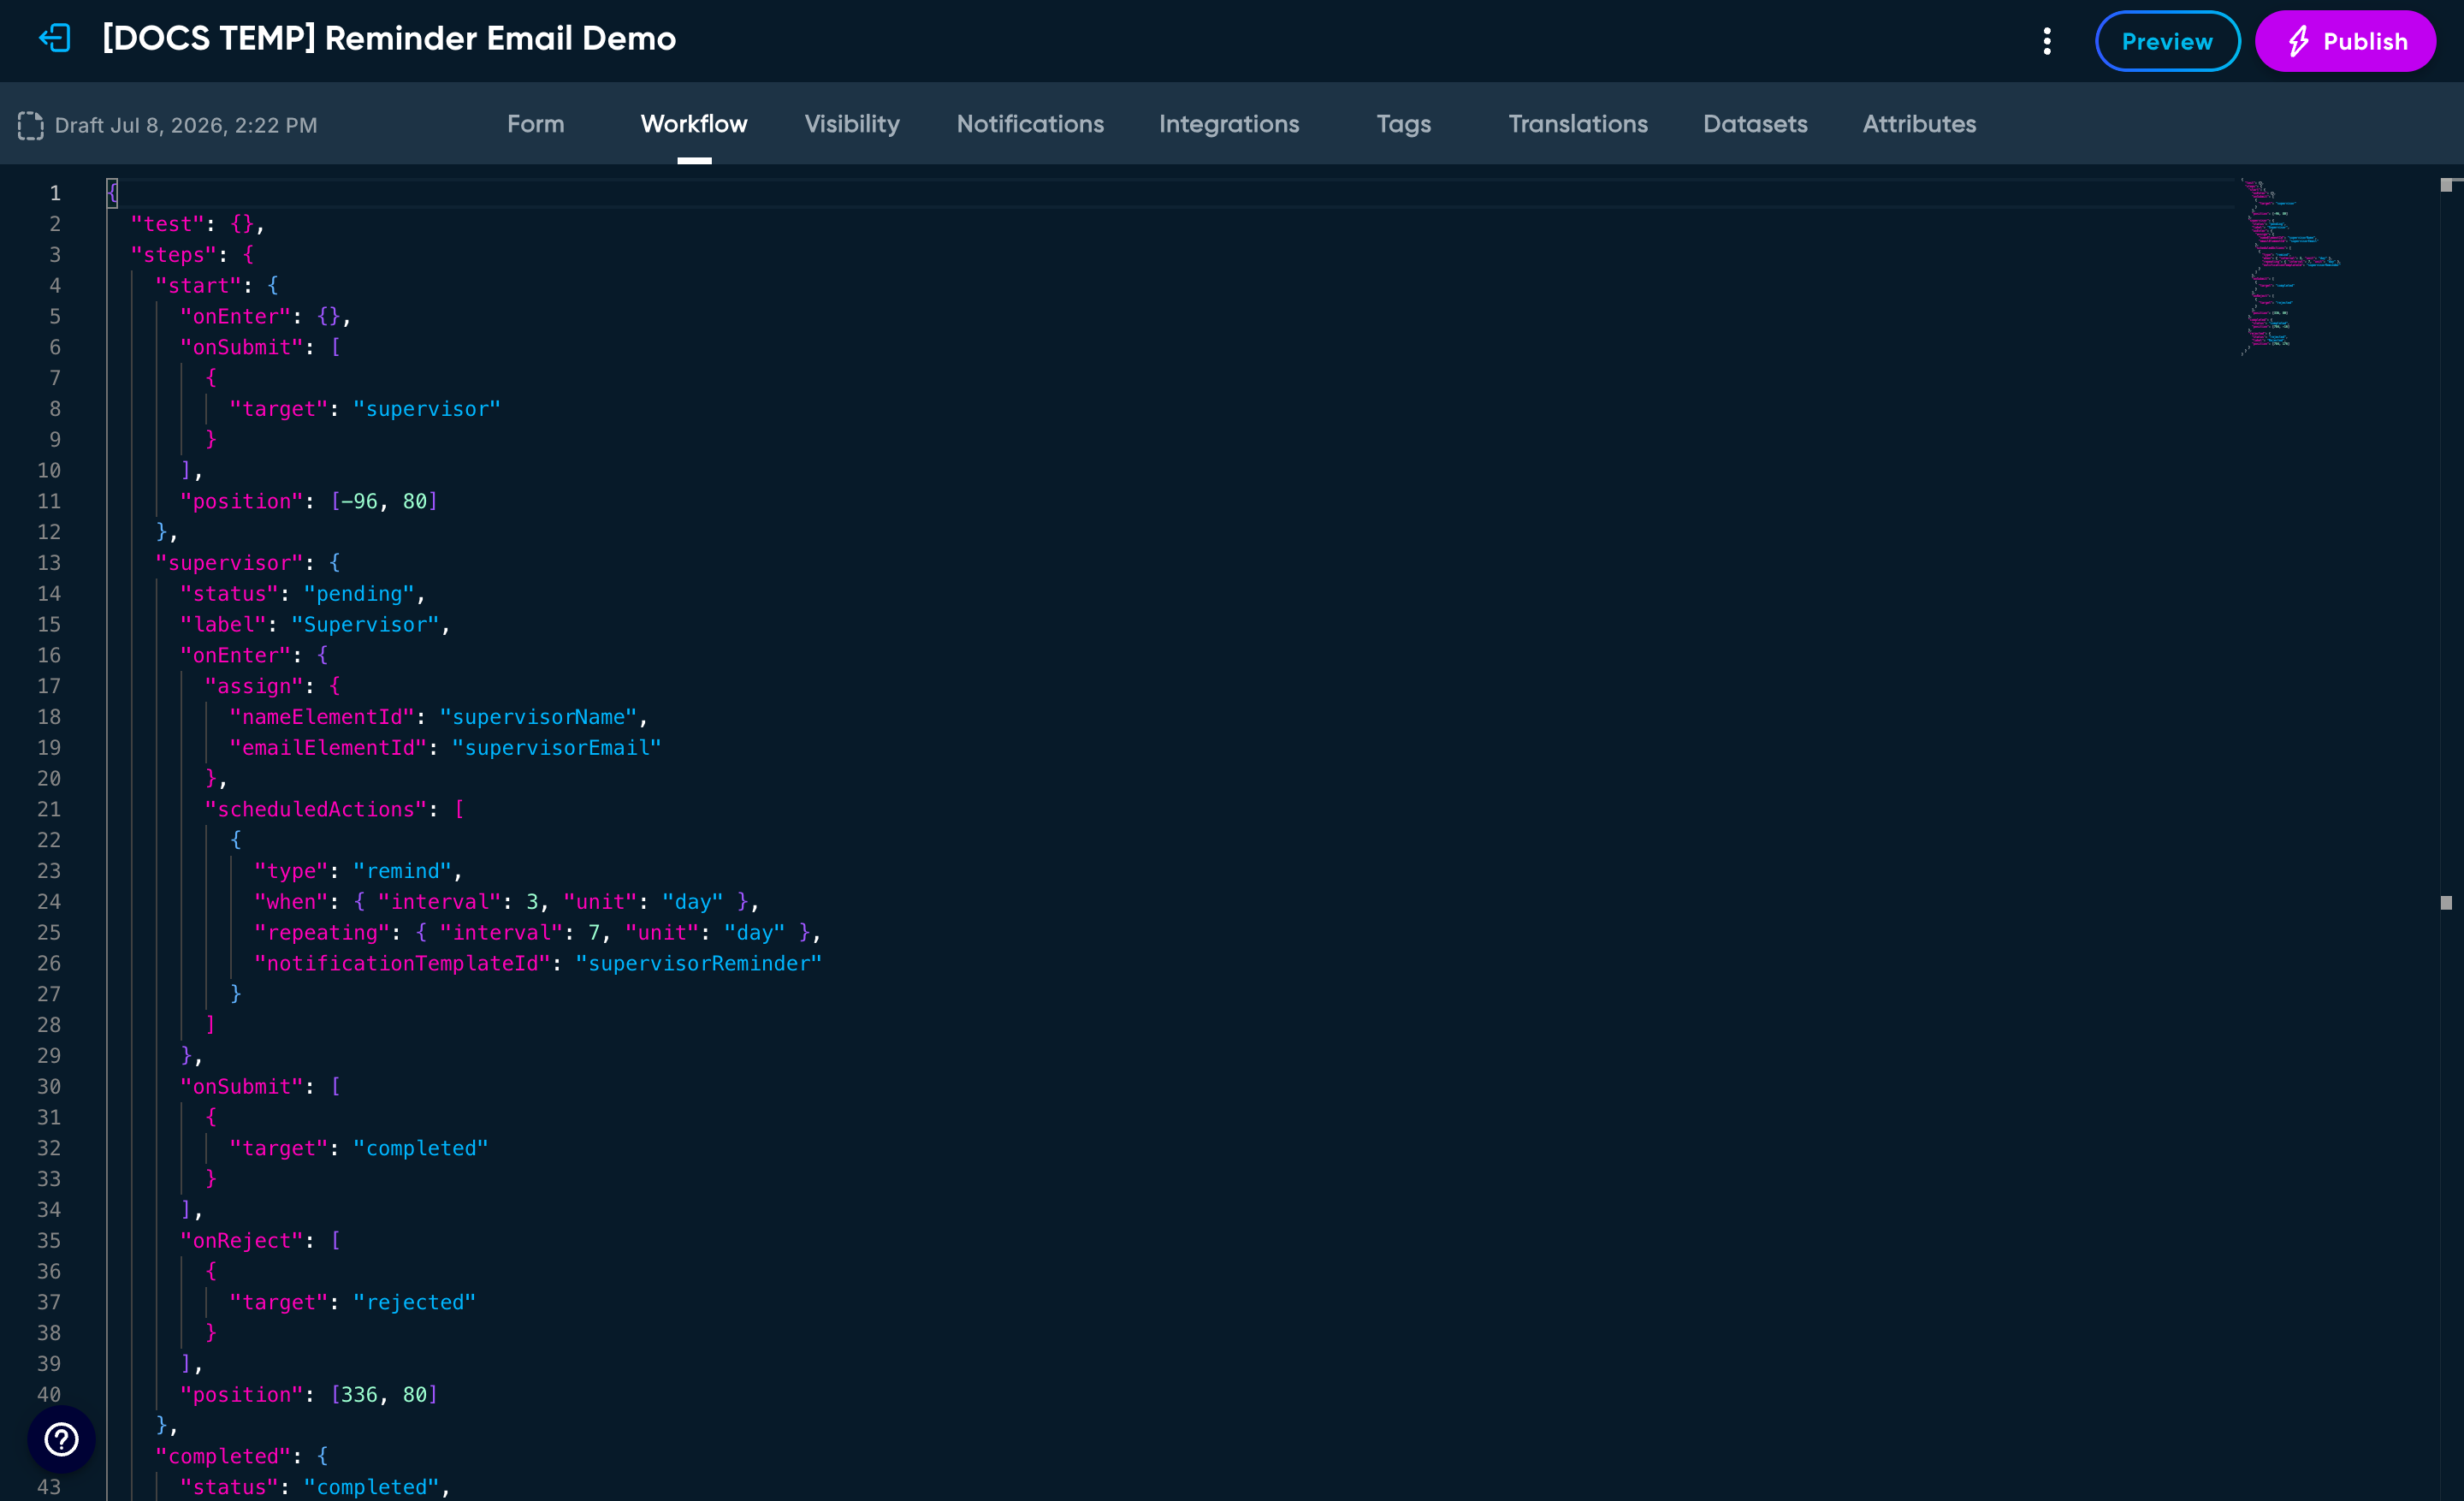
Click the Workflow tab. You will see your steps listed by name inside "steps", and each step has an "onEnter" section that describes what happens the moment a submission arrives on it. This is where the schedule goes.
Find the step you want to add a reminder to, and add a scheduledActions block inside its "onEnter", right after the existing "assign" block (add a comma after assign's closing brace first):
"scheduledActions": [
  {
    "type": "remind",
    "when": { "interval": 3, "unit": "day" },
    "notificationTemplateId": "supervisorReminder"
  }
]
Here is what each part means, in plain words:
| Setting | What it does |
|---|---|
"type": "remind" | Tells Droplet this scheduled action is a reminder email. Leave it exactly as written. |
"when" | How long to wait after the submission enters the step. { "interval": 3, "unit": "day" } means three days. Change the number and the unit to suit. |
"notificationTemplateId" | The ID that joins the schedule to the email you will write next. Pick something descriptive; you will type the same ID there. |
Choosing the timing
For the first send, the unit in when can be "minute", "hour", or "day". Always write it in the singular, even when the interval is more than one, and use a whole number for the interval:
| You want | Write |
|---|---|
| 30 minutes | { "interval": 30, "unit": "minute" } |
| 12 hours | { "interval": 12, "unit": "hour" } |
| 3 days | { "interval": 3, "unit": "day" } |
| 2 weeks | { "interval": 14, "unit": "day" } |
Days are the largest unit for the first send, so write longer waits in days: 14 days for two weeks, 30 days for a month. If you try a unit Droplet does not accept, the save fails with a clear message listing the allowed values.
To keep reminding on a cycle, add a repeating line to the same block:
"scheduledActions": [
  {
    "type": "remind",
    "when": { "interval": 3, "unit": "day" },
    "repeating": { "interval": 7, "unit": "day" },
    "notificationTemplateId": "supervisorReminder"
  }
]
This sends the first reminder after three days, then repeats it every seven days for as long as the submission is still waiting on the step. The repeat cycle accepts a wider set of units than the first send: "minute", "hour", "day", "week", or "month", still written in the singular.
If you would like to adjust the timing from the visual builder later, write both when and repeating in days, for example 7 days instead of 1 week. Day-based reminders stay fully editable in the step's Notifications tab. Any other unit still works, and the reminder is labeled Configured in code there.
Add the reminder email
Now click the Notifications tab. This tab holds the emails each step sends, grouped under the step's name. Add a reminder entry for your step, using the same step name as in the Workflow tab and the same ID you chose for the schedule:
{
  "supervisor": {
    "onEnter": [
      {
        "id": "supervisorReminder",
        "type": "remind",
        "template": {
          "subject": "Reminder: a field trip request needs your review",
          "body": "<p>Hi ##recipientFirstName##, this is a friendly reminder that a field trip request is still waiting for your review.</p><p><a href='##notificationUrl##'>Open the request</a></p>"
        }
      }
    ]
  }
}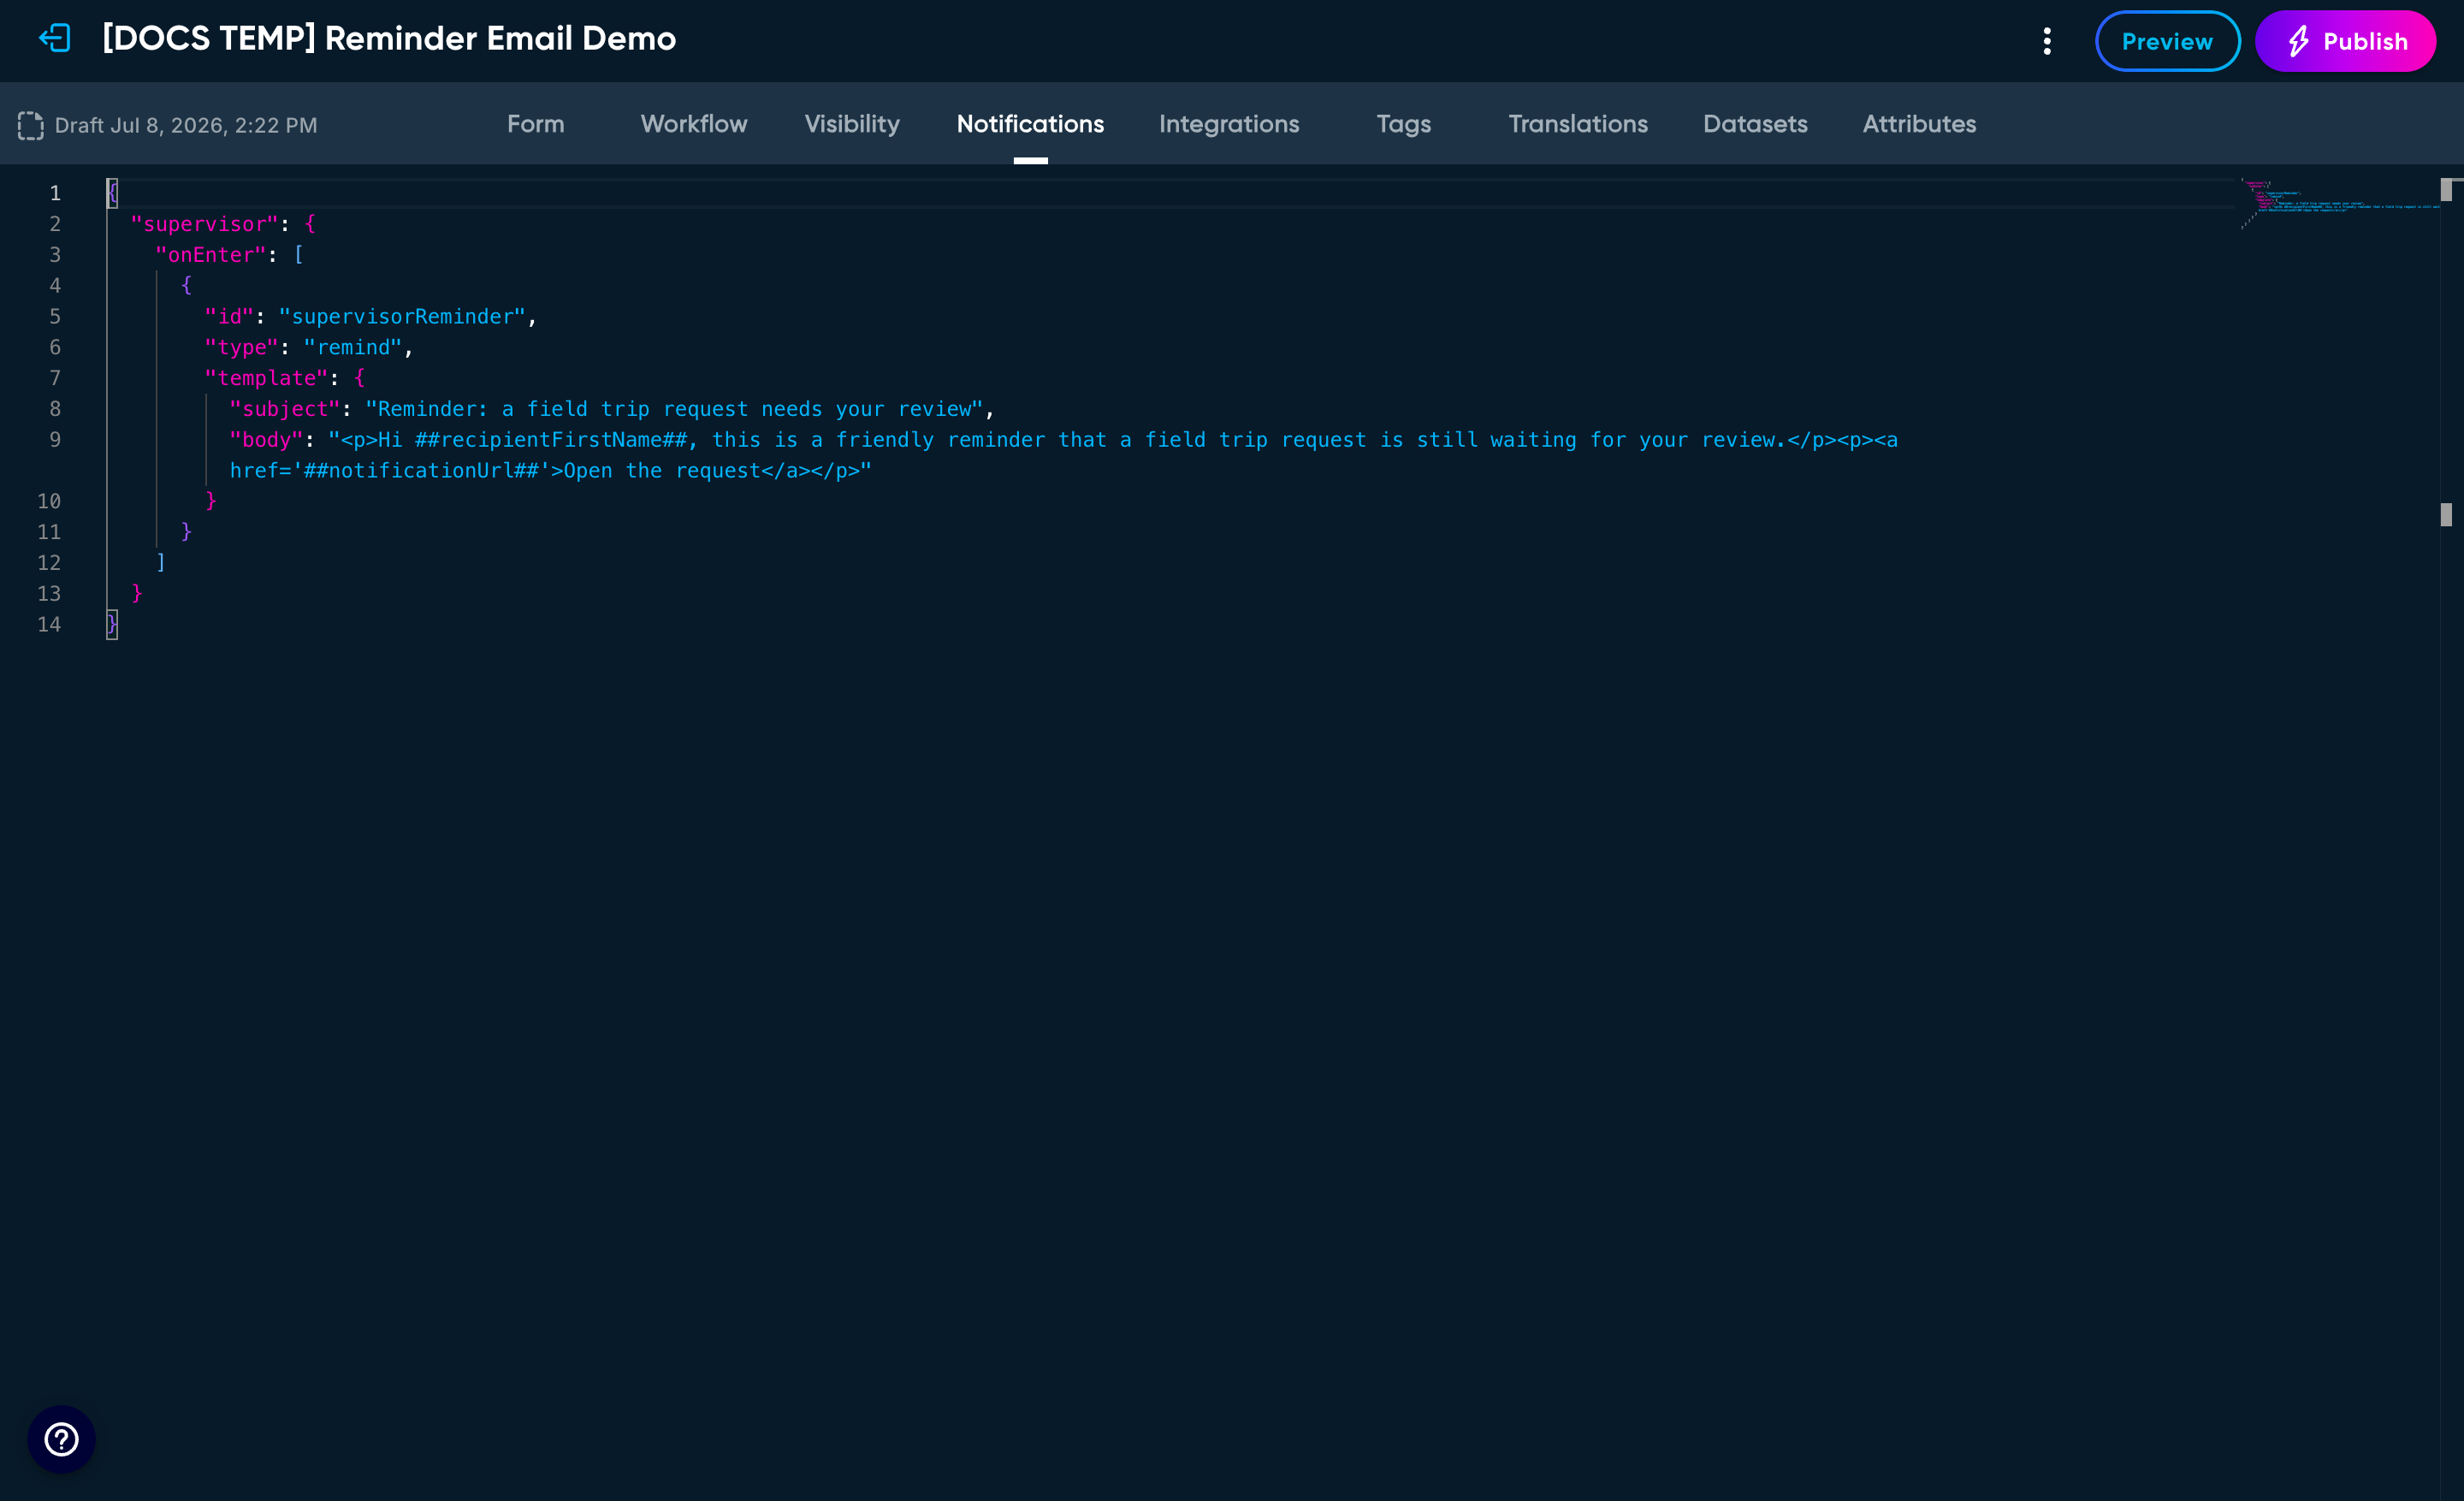
Three things to check as you adapt this:
The
idmust match thenotificationTemplateIdfrom the schedule, exactly, including capitalization, and it must sit under the same step name. This is the thread that ties the two halves together.Keep
"type": "remind"on the notification too. It marks this entry as the reminder email rather than a normal step notification.Include
##notificationUrl##in the body. It becomes a working link that takes the recipient straight to the submission. If the body has no link, Droplet points that out with a warning when you save.
Reminder templates use ##notificationUrl## (or ##submissionUrl##) for the link. The ##assignmentUrl## token you may know from assignment notifications is not available here, and Droplet will flag it as nonexistent if you use it.
The body accepts the same HTML and dynamic tokens as other notifications, so you can personalize with ##recipientFirstName##, pull in form values by their field ID (for example ##requestTitle##), and style the email however you like. See Workflow notifications for the full token list and a polished HTML email template you can reuse.
If the step already has notifications under "onEnter", such as a customized assignment email, do not replace them. Just add the reminder as one more entry in the array, separated by a comma.
Covering many steps at once
This is where the Code Builder earns its keep. For a workflow with a long run of approval steps, work down the Workflow tab and paste the same scheduledActions block into each step's "onEnter", changing only the notificationTemplateId. Then switch to the Notifications tab and add one email entry per step. Each step needs its own entry under its own name, because a schedule only looks for its email on the step it belongs to:
{
  "principal": {
    "onEnter": [
      {
        "id": "principalReminder",
        "type": "remind",
        "template": {
          "subject": "Reminder: a field trip request needs your approval",
          "body": "<p>Hi ##recipientFirstName##, a field trip request is still waiting for your approval.</p><p><a href='##notificationUrl##'>Open the request</a></p>"
        }
      }
    ]
  },
  "transportation": {
    "onEnter": [
      {
        "id": "transportationReminder",
        "type": "remind",
        "template": {
          "subject": "Reminder: a field trip request needs your approval",
          "body": "<p>Hi ##recipientFirstName##, a field trip request is still waiting for your approval.</p><p><a href='##notificationUrl##'>Open the request</a></p>"
        }
      }
    ]
  }
}
The subject and body can be identical from step to step, so once the first entry reads the way you like, copy it and change only the step name and the id. Save once at the end. Droplet checks every pairing in a single pass and lists any step where the schedule and the email do not line up.
Name your IDs after the step they belong to, such as principalReminder and transportationReminder. When a form has many reminders, descriptive IDs make the pairing between the two tabs much easier to follow.
Save and check your work
Click Save at the top right. Droplet validates both tabs together:
If everything lines up, the button returns to Publish with no messages. You are ready to test.
If something is off, a panel opens on the right listing errors (which block the save) and warnings (which do not). Fix what it points at and save again.
The messages you are most likely to meet, and what they mean:
| Message | What it means | Fix |
|---|---|---|
| Action at ... points to a notification that does not exist. Create a notification of type "remind"... | The schedule's notificationTemplateId has no matching email. Either the email entry is missing, it sits under a different step, or the two IDs differ. | Make the notification's id match the schedule's notificationTemplateId exactly, on the same step. |
| ...does not reference a notification URL... | The email body has no link token of its own. This is a warning, so the save still goes through. You may also see it for reminders made in the visual builder whose text was left without a link. | Add ##notificationUrl## to the body, ideally inside a clear link or button. |
| ...references a nonexistent "assignmentUrl" | The body uses a token that reminder emails do not support. | Swap ##assignmentUrl## for ##notificationUrl##. |
| "when.unit" does not match any of the allowed types... | The timing unit is not one Droplet accepts, often a plural like "days" or a unit that is only valid on repeating. | Use "minute", "hour", or "day" (singular) in when, and write longer waits in days. |
| Unexpected non-whitespace character / parse error | A stray comma, quote, or bracket broke the JSON. | Look at the line number in the message. The most common culprits are a missing comma between entries and an extra closing brace at the end. |
As with the visual builder, reminders only run on the published version of your form, so publish the draft once it saves cleanly. To see a reminder arrive without waiting a day, use a short wait such as { "interval": 5, "unit": "minute" }, publish, and run a test submission through to the step. Reminders do not send from Preview. Once the email has arrived and the link works, set the timing back to the real value and publish again.
A complete step, for reference
Here is a whole step named supervisor as it appears in the Workflow tab, with its schedule in place. Its matching email is the supervisorReminder entry shown under Add the reminder email.
"supervisor": {
  "status": "pending",
  "label": "Supervisor",
  "onEnter": {
    "assign": {
      "nameElementId": "supervisorName",
      "emailElementId": "supervisorEmail"
    },
    "scheduledActions": [
      {
        "type": "remind",
        "when": { "interval": 3, "unit": "day" },
        "repeating": { "interval": 7, "unit": "day" },
        "notificationTemplateId": "supervisorReminder"
      }
    ]
  },
  "onSubmit": [ { "target": "completed" } ],
  "onReject": [ { "target": "rejected" } ]
}
Read together: when a submission reaches the Supervisor step, it is assigned using the names on the form, and a reminder is scheduled. If the supervisor has not acted after three days, they get the reminder email, and again every seven days after that until they do.
How code and the visual builder work together
Both routes save to the same place, so you can mix them freely, even on the same form.
Reminders written in code appear in the visual builder. Open the step's Notifications tab and each one is listed under Send Reminder if Incomplete. If its timing is in whole days, it shows a summary such as After 3 days, every 7 days, and you can change the timing and the email right there.
Other timing is labeled Configured in code. That covers minutes, hours, and repeats in weeks or months. The email is still editable in the visual builder; the schedule is changed in code. See the next section.
Reminders made in the visual builder appear in code. You will find them in the same two tabs, with an ID Droplet generated for you:
remind-followed by a long string of letters and numbers. You can leave it as it is. If you would rather rename it, change it in both the Workflow and Notifications tabs so the halves still match.Both halves are needed. An email entry with no schedule never sends and is not listed in the visual builder. A schedule with no email is blocked when you save in code, and shows a warning icon in the visual builder.
Reminders marked Configured in code
A reminder that uses timing the builder does not offer, such as a wait measured in minutes or hours or a schedule tied to a date field, shows Configured in code in the list instead of a day count. Open it and the timing controls are replaced by a short note that its schedule is managed elsewhere. You can still edit its subject and body here like any other reminder, and its timing stays exactly as it was when you save. If the timing itself needs to change, edit its when and repeating values in the Code Builder, or contact the Droplet support team and we will adjust it with you.
FAQ
Who receives the reminder?
The person the step is assigned to when the reminder sends. If the step shows Unassigned, nobody receives it, so assign the step first.
Does it keep sending after the step is done?
No. Reminders only matter while the submission is sitting on the step. As soon as the assignee completes the step, or the submission moves on, pending reminders stop.
Can I remind someone other than the assignee?
Reminders are for the assignee only. To notify someone else when a submission reaches a step, use Send When Step Begins, which sends right away and can go to anyone you choose.
Can I set a reminder in hours instead of days?
Yes, in the Code Builder. The visual builder's timing controls work in whole days, but in code the wait can be written in minutes or hours; see Choosing the timing. The reminder then appears in your list as Configured in code, with its email still editable in the builder. If you would rather not touch the code, contact the Droplet support team and we will configure it for you.
My workflow has a lot of steps. Is there a faster way than adding reminders one at a time?
Yes. In the Code Builder you can paste a reminder into every step in one sitting and save once. See Covering many steps at once. The reminders still show up in each step's Notifications tab afterward, so anyone on your team can adjust them visually later.
Can I set up some reminders in the visual builder and others in code?
Yes. Both save to the same place, so a reminder made one way can be opened and edited the other way. See How code and the visual builder work together.
I do not see Send Reminder if Incomplete on a step.
Parallel steps, the ones that fan out into several sub-steps at once, do not have an assignee of their own, so they have no reminder section. Add the reminder on each sub-step instead.
One of my reminders shows a warning icon.
Its schedule exists but its email is missing, so it will not send. Click the reminder and choose Create Template. Droplet fills in the standard reminder email, which you can edit before you save.
Related reading
Workflow notifications covers everything about the emails a step can send, including recipients, dynamic fields, send rules, and a branded HTML template that works nicely for reminders too.
Configure workflows explains steps, assignment, and routing, which is useful background for knowing where a reminder belongs.
Would you rather we set it up? Contact the Droplet support team with the step name, the timing you want, and the wording of the email, and we will take it from there.