There are two types of notifications in Droplet forms: Assignment Notifications and Custom Notifications.
Assignment Notifications
Assignment Notifications are automatically sent to the assignee of a workflow step, letting them know there’s a task to complete. While there’s a default email for each assignee, you can customize it to fit your needs better.

How to Find Assignment Notifications
In the Form Editor, navigate to the Workflow.
Select a workflow step and click the envelope icon in the hover menu.
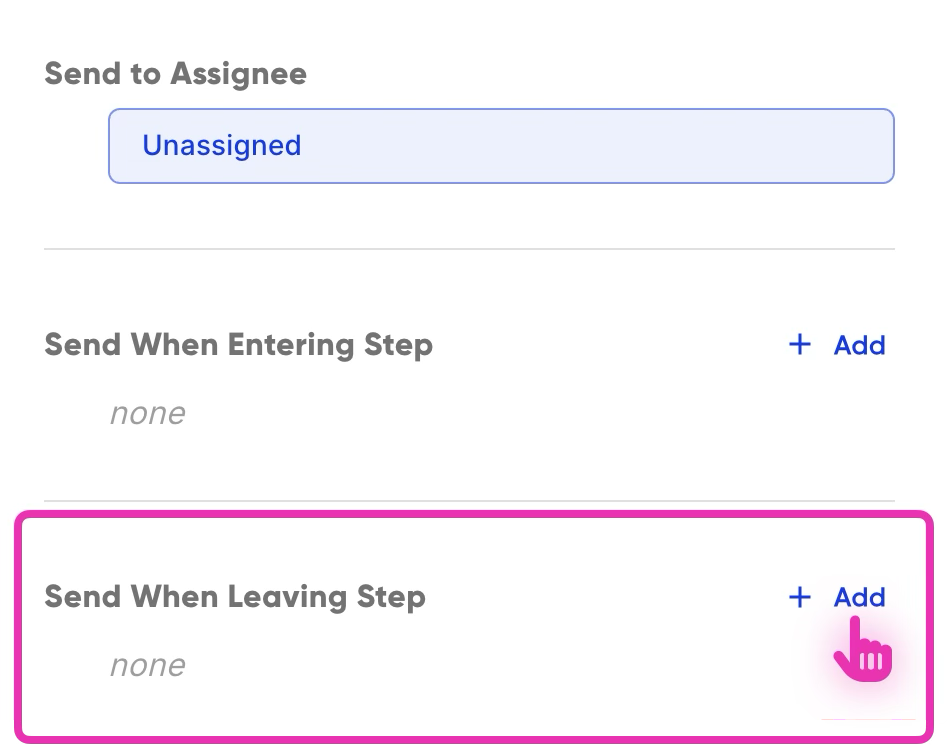
Along the left side, you can see the 'Send to Assignee' notifications, which are the Assignment Notifications when a submission has been assigned at this step.
From here, you can customize the subject line and text of the standard assignment notification.

Default messages are helpful, but adding details like the Form Name to the Subject Line can make it easier for users to identify and prioritize notifications. Keep reading about Dynamic Fields below.
Custom Notifications
Custom Notifications can be sent to anyone, whether inside or outside your organization. These notifications can include submission data and a link to view the submission using a Dynamic Field (more on these below).
Unlike Assignment Notifications, Custom Notifications aren’t preset. You’ll need to set them up for your specific process.
How do I Create a Custom Notification?
Let’s walk through creating a notification using an example where we notify the superintendent when a Reimbursement Form is submitted and when the reimbursement total exceeds $500. Follow these steps to create Custom Notifications at any point in the form’s workflow.
Decide When to Send the Notification
In the Workflow Editor, click a step card and then its envelope icon .

Access the Notifications Tab
Click the + Add button under the appropriate condition (When Entering Step or When Leaving Step).
Consider Setting a Send Rule
Usually, you’ll want notifications to be sent with every submission. However, you can also set conditions to send notifications only when specific criteria are met.
If a notification doesn’t need to go out every time, use Send Rules to define the exact conditions under which it should be sent. Droplet AI can really help here.

Add Recipients
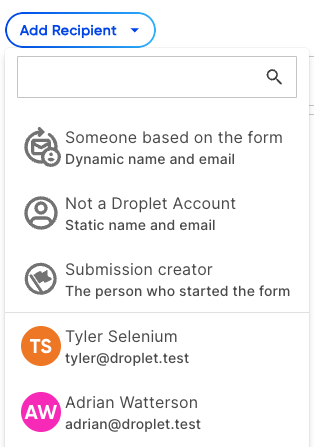
Click the Recipients dropdown and select the appropriate options:
Sends the notification to the person who started the form
Use form information to decide who should receive a notification. For example, send to a specific contact based on the location chosen in the form
Select anyone with an active Droplet account in your organization
Enter a name and email for recipients without a Droplet account
Write an Email Subject Line
Write a clear subject line to inform recipients about the email content. You can use Dynamic Fields to include details like the Form Name or the Submitter's Name.
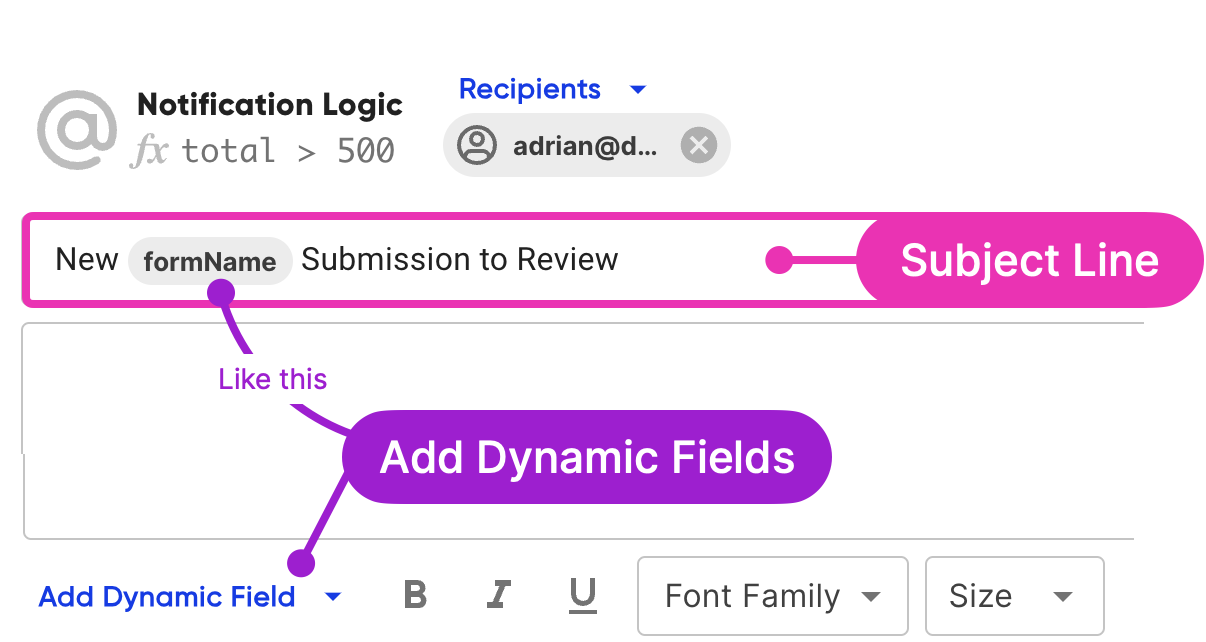
Compose the Email Body
Use the rich text editor to format your message, add lists, change fonts, or insert images and links. Use the Dynamic Fields dropdown to pull important submission information into the email.
More on Dynamic Fields next!

Dynamic Fields
Dynamic Fields, also known as merge fields, let you insert specific submission or form data into notifications, similar to a Mail Merge. You can easily find several commonly used fields in the Add Dynamic Field menu of a notification:
| Dynamic Field | Description | Example |
|---|---|---|
| Assigned To First Name | The first name of the person the form is assigned to at the current workflow step. | John |
| Assigned To Last Name | The last name of the person the form is assigned to at the current workflow step. | Doe |
| Assigned To Full Name | The full name of the person the form is assigned to at the current workflow step. | John Doe |
| Submitter First Name | The first name of the person who initiated the form. | Jane |
| Submitter Last Name | The last name of the person who initiated the form. | Smith |
| Submitter Full Name | The full name of the person who initiated the form. | Jane Smith |
| Submission ID | The unique identifier number associated with the submission. | 6590 |
| Form Name | The name of the form. | Reimbursement Form |
| Form ID | The unique identifier associated with the form. | 13R17D |
| Submission URL | The URL for the submission that gives submission access to the assignee. | https://app.droplet.io/submission |
| Link | A clickable link with the URL for the submission. It says "Click here to view submission". | Click here to view submission |
| Notification URL | The URL for the submission that gives access to anyone with the URL (not clickable). | https://app.droplet.io/submission |
| Rejection Reason | If the submission has been rejected or sent back within the workflow for changes, the reason provided by the assignee who rejected the submission will be surfaced. | Forgot last name in Name field |
Add your Own Form’s Fields
Want to customize your notifications even further? You can add your own form’s fields to the notifications. It’s simple!
Find the Component ID
Go to your form and locate the component you want to include. When selected, the component ID is at the bottom of the Properties Panel on the right. Copy the relevant component ID (e.g., total).
Insert the Component ID in a Notification Subject or Body
In your notification, place the component ID between two sets of ## symbols. For example, if your component ID is total, you would insert ##total##. The value of that submission component will be merged in place of ##total##.
Attach a PDF of the Submission
You can choose to attach a copy of the submission as a PDF file on the notification by toggling on "Attach PDF of Submission", as well.

How do I Edit an Existing Notification?
Work in a Form Draft
If there is a large green banner that spans your screen that says Published, then you will need to create a new draft.
Locate the Notification to Edit
Select the relevant Workflow Step and switch to the Notifications tab to view associated notifications.
Edit the Notification
Make the necessary changes.
Save and Publish
Save your changes and publish when you’re ready.
Was this article helpful?
That’s Great!
Thank you for your feedback
Sorry! We couldn't be helpful
Thank you for your feedback
Feedback sent
We appreciate your effort and will try to fix the article