Droplet form submissions are directed through an automated workflow system that assigns the submission to one person at a time each time someone presses the submit or reject buttons on the form. You will define the automated workflow steps and assignees here in the workflow section of the form builder.
When you first open the workflow editor, your form defaults to the simplest workflow a Droplet form can have. This workflow moves from a step named "Start" to a step named "Completed." The step named "Rejected" is not being used but is available to use if any steps are added.

In the visual workflow editor, you can use the canvas and step cards to:
- Outlining Your Workflow Steps
- Adding Workflow Assignees to the Step Card
- Adding Step Assignees
- Dynamic Step Assignments
- Adding a Step Condition
- Creating Conditional Workflow Routing
Outlining Your Workflow Steps
You can add new workflow steps by pressing on the approve or reject icons on a step card. Each step card is connected to the next through the button that someone would press on the form to direct the submission down that pathway. A path from a checkmark is how the submission will move when using the Submit button and a path from the circle with the line through it is how the submission will move when using the Reject button.

You can re-route your workflow by pressing on a connection line and moving it to a different card. In this way, your workflow can become as complex as you need it to be to fit the process you would like your form to follow.
We recommend renaming the steps to present a clearer outline of the workflow and changing the status of each step (In Progress, Completed, or Rejected), if necessary. The status is how the submission will look in the Droplet platform at that step.
 Form submissions at different workflow steps as indicated by their status.
Adding Workflow Assignees to the Step Card
Step assignees will receive an email that notifies them of their new assignment. Most steps will have an assignee so the submission can keep moving through workflow but assignees are not required so if you have a different process, your form can fit what you need.
If you have a simple workflow assignment, you can use the dropdown to select the person this step should assign to or choose "Select Someone Else" to enter a name and email address for this step.

If this step should assign to someone different with each submission, based on the data in that submission, the step assignment is considered to be a dynamic assignment. You can read more about dynamic workflow step assignments below.
If you prefer, you can also use the steps below to update the step assignee in the Step Details panel.
Workflow Step Details Panel

Adding Step Assignees
Steps typically have a defined assignee so when the submission reaches that step, Droplet automatically sends an assignment email to that person and they can take action on the submission. Adding step assignees to the workflow will keep your submissions moving along without needing to manually assign people in the Droplet application.
Including an assignment is optional and there are some situations where it could make more sense not to have an assignment on a workflow step. You may not want an assignment if the workflow step has a status of "Completed" and there are only certain times when the submission may re-enter an "In Progress" status and continue through another workflow. If someone would need to complete part of the submission in this case, they can assign the submission to themselves in the Droplet platform and move it ahead.
Just like from the step card, you can choose your step assignee from the dropdown or you can use a dynamic assignment to assign this step to someone based on information from the submission.
Dynamic Step Assignments
If your workflow assignment is dynamic, or will change with the varying data in this form's submissions, you can select "Dynamic" from the workflow and enter a Javascript expression to determine the assignment. You'll likely be referencing computed fields in your form layout or one or more datasets here.
 A Dynamic step assignment that assigns the submission to the secretary at the selected location by referencing a Computed field in the form layout.
Read more about using Computed fields in your form layout.
Learn more about connecting and referencing Datasets.
If you would like to assign a step to the original submitter, their name and email would be referenced by using the helper function getSubmittedBy(). This helper function stores the name and email of the person who started this submission and can be referenced here in the workflow or anywhere else throughout your form. You can use the name or email using getSubmittedBy().name or getSubmittedBy().email if you only need to use one or the other.
Adding a Step Condition
Sometimes a submission could travel from one step to a number of other steps depending on the information in the submission. This is called conditional routing. The alternative to this kind of workflow setup is allowing a step to be skipped if certain conditions are met at the entry to this step. This is useful if a certain administrator needs to approve a form but only for a particular budget code.
You can define the conditions a step should be skipped using a Javascript formula. If the formula evaluates to true, the Droplet System will use the step transitions that are defined for the Submit pathway to determine where the submission will move without assigning or stopping at this step.
 A Step Condition that says this step will be skipped if the Computed field with the ID of "skipSecretary" is false.
 Creating Conditional Workflow Routing
Oftentimes, complex forms need to follow one pathway for a certain set of data in the submission and a different pathway for another set of data. You can define the logic that directs these pathways by adding a list of step transitions and writing a Javascript expression. You can define conditional workflow transitions in the Submit or Reject pathways.
The list will evaluate in order from top to bottom and will route the submission to the step of the first true expression.
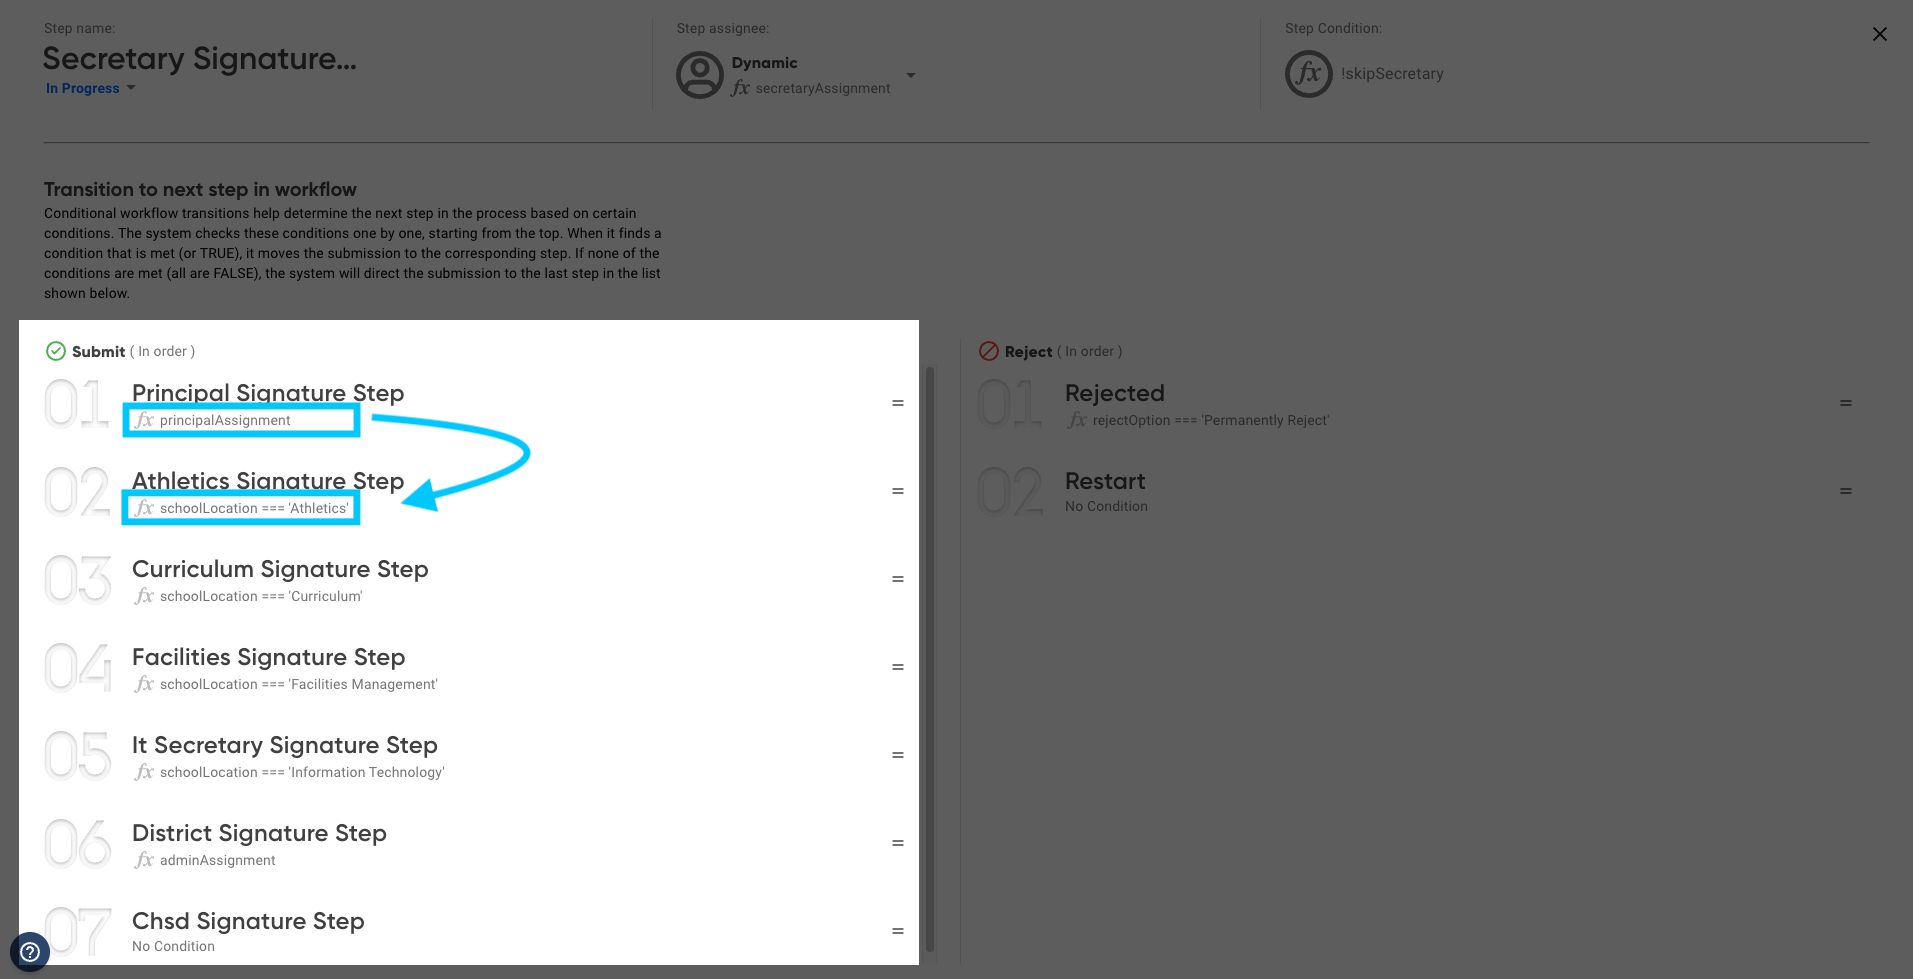
The image above shows a list of possible next steps in the Submit pathway of this form. When someone presses Submit from this step, the submission will check to see if the Computed component with the ID of "principalAssignment" is true. If it is true, the submission will go to the Principal Signature Step. If it is false, the submission will check the expression for the next possible step and send the submission there if that expression is true. If all expressions are false, the submission will go to the last step.
Fallback Step |
|---|
It's best practice to have a fallback step at the end of your list that doesn't have conditions attached. This way the submission will always have a pathway to follow when all conditions are false. If there is no fallback and all conditions are false, the submission will not be able to move forward in its workflow and the user will receive an error when they try to submit at that step. |
Was this article helpful?
That’s Great!
Thank you for your feedback
Sorry! We couldn't be helpful
Thank you for your feedback
Feedback sent
We appreciate your effort and will try to fix the article